Viewing Current Job or Job History
Displaying the Job screen
A job refers to an individual operation unit such as printing, sending, receiving, or saving.
Tap [Job List] on the main menu or on the main screen of each mode to view current job or job history, or to print a sending-receiving result report.
 Tips
Tips When a job is active, its icon and operation status are displayed in the header area on the main menu or the main screen of each mode. For details about the icon types, refer to [Icons indicating the type of an active job] .
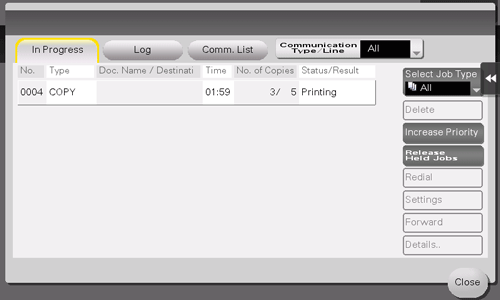
Viewing Current Jobs
Tap [In Progress] to display current or standby jobs on this machine. As necessary, you can reorder print jobs or delete a standby job.
Item | Description |
|---|---|
[Communication Type/Line] | Used to filter jobs to be displayed in the list based on the following conditions.
|
[Select Job Type] | Used to filter jobs to be displayed in the list based on the job type such as a print job or send job. |
[Delete] | Tap this button to delete a job selected in the list. |
[Increase Priority] (Print Job) | Tap this button to change the printing priority when print jobs are queued. Select a job to be printed first in the list of queued print jobs, then tap [Start].
|
[Release Held Jobs] (Print Job) | Tap this button to configure the proof print function and display a list of executed print jobs using the printer driver. When printing, select a desired print job, then tap [Start]. If necessary, you can change print settings or delete a job.
|
[Redial] | Tap this button to manually send a redial waiting fax you select from the list. A redial waiting fax is sent automatically by the auto redial function after the specified time lapsed; however, you can manually start sending without waiting for automatic sending. |
[Settings] | Tap this button to check the setting of a job selected in the list. |
[Forward] | Tap this button to forward a fax received by the in-memory proxy reception function to another destination. Select a destination in the address book or directly enter it, then tap [Start].
|
[Details..] | Tap this button to check detailed information of a job selected in the list. |
[Warning Display] | Displays the warning screen for an error when you select a job in which the error occurs. |
 Related setting (for the administrator)
- Select whether to hide personal information such as an address or file name in the [Job List] screen (default: [No]). For details, refer to [Personal Data Security Settings] .
- Select whether to permit a deletion of other user's job (default: [Restrict]). For details, refer to [Delete Other User Jobs] .
- Select whether to permit a change on the priority of a print job specified in [Increase Priority] (default: [Allow]). For details, refer to [Changing Job Priority] .
Viewing the job history
Tap [Log] to display a list of jobs processed on this machine up till then. You can check a job that could not be ended due to an error.
Item | Description |
|---|---|
[Communication Type/Line] | Used to filter jobs to be displayed in the list based on the following conditions.
|
[Select Job Type] | Used to filter jobs to be displayed in the list based on the job type such as a print job or send job. Jobs can be further filtered in combination with [Limitation Filter]. |
[Limitation Filter] | Used to filter jobs to be displayed in the list based on the selected conditions.
|
[Details..] | Tap this button to check detailed information of a job selected in the list. |
Tips- If user authentication is installed on this machine, change the authentication method and clear all management data; the job history is deleted.
Related setting (for the administrator)- Select whether to hide personal information such as an address or file name in the [Job List] screen (default: [No]). For details, refer to [Personal Data Security Settings] .
- The job history can be initialized if necessary. For details, refer to [Initialize] .
Printing a communication report
Tap [Comm. List] to print a fax report that contains the results of Scan, Fax TX, Fax RX, and fax communication (TX/RX) jobs. For a fax report, you can specify the number of destinations.
To print a fax report, select a target for [Report Type], tap [Selection Confirm], then press the Start key.