User's Guide

Replacing Consumables
- Replacing a Toner Cartridge
- Replacing a Waste Toner Box
- Replacing an Imaging Unit
- Replacing a Staple Cartridge: For Finisher FS-534
- Replacing a Staple Cartridge: For Saddle Stitcher SD-511
- Replacing a Staple Cartridge: For Finisher FS-535
- Replacing a Staple Cartridge: Saddle Stitcher SD-512
- Punch scraps: Processing in the Finisher FS-534
- Punch scraps: Handle the Finisher FS-535
- Punch scraps: Handle the Z Folding Unit ZU-606
Replacing a Toner Cartridge
The following example shows how to replace a Black Toner Cartridge.
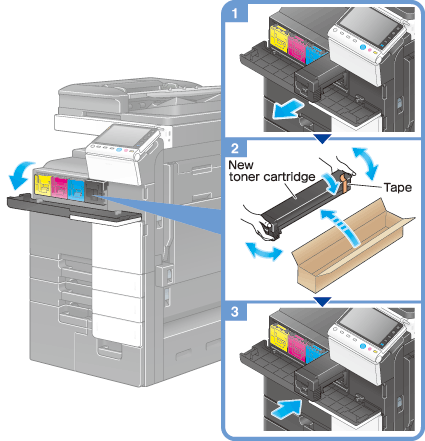
Tips
- Shake a new Toner Cartridge well, approximately 5 to 10 times, before installing it.
- If a Toner Cartridge other than for black is empty, printing can be continued forcibly using black. Tap [Continue], and then select a desired print job.
- Do not forcedly open or disassemble a Toner Cartridge (toner container).
- Do not forcedly remove or dispose of toner that remains in a Toner Cartridge (toner container).
Caution
Handling toner and Toner Cartridge
- Do not throw a toner or Toner Cartridge into a fire. Doing so may cause hot toner to spray in all directions, which may cause burn injuries.
- Be careful not to get the inside of the machine, your clothes, or hands dirty with toner.
- If any toner does get on your hand, wash it off using water or neutral detergent.
- If any toner gets into your eyes, immediately wash it out with water and consult your doctor.
Replacing a Waste Toner Box
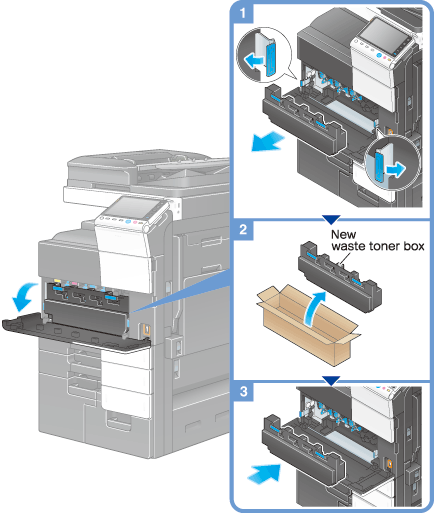
Tips
- Your service representative will recover your used Waste Toner Box. Place a cap on it and store it in a box.
Caution
Handling toner and Waste Toner Box
- Do not throw a toner or Waste Toner Box into a fire. Doing so may cause hot toner to spray in all directions, which may cause burn injuries.
- Be careful not to get the inside of the machine, your clothes, or hands dirty with toner.
- If any toner does get on your hand, wash it off using water or neutral detergent.
- If any toner gets into your eyes, immediately wash it out with water and consult your doctor.
Replacing an Imaging Unit
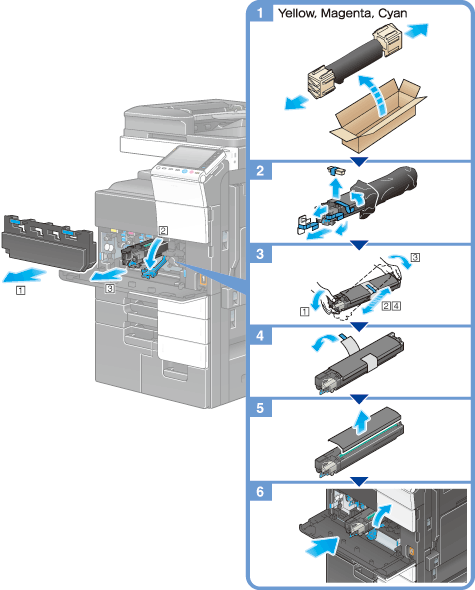
Tips
- Your service representative will collect your used Imaging Unit. Put it in a black plastic bag and store it in a box by itself.
- An Imaging Unit may be damaged due to exposure to light. Do not take a drum unit out of a black plastic bag until just before it is to installed.
- If an Imaging Unit other than for black has reached the replacement time, printing can be continued forcibly using black. Tap [Continue], and then select a desired print job.
- After replacing an Imaging Unit, be sure to clean the Print Head Glass for each color. For details on how to clean the Print Head Glass, refer to Here.
Caution
Handling toner and Imaging Unit
- Do not throw an Imaging Unit into a fire. Doing so may cause hot toner to spray in all directions, which may cause burn injuries.
- Be careful not to get the inside of the machine, your clothes, or hands dirty with toner.
- If any toner does get on your hand, wash it off using water or neutral detergent.
- If any toner gets into your eyes, immediately wash it out with water and consult your doctor.
Replacing a Staple Cartridge: For Finisher FS-534

Tips
- The figure shows an optional Finisher FS-534 with Saddle Stitcher SD-511 and Punch Kit PK-520 installed.
- Do not remove staples that remain in the machine. Otherwise, the stapling function will activate but no sheets will be stapled.
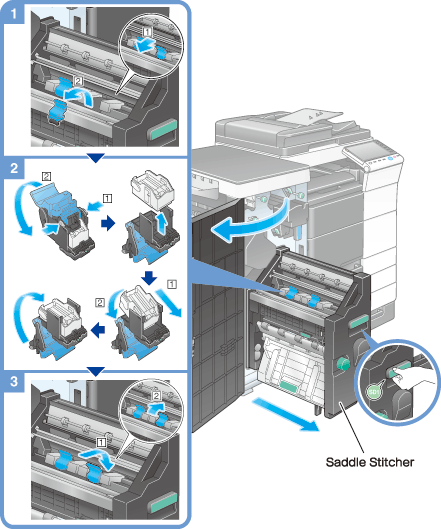
Replacing a Staple Cartridge: For Saddle Stitcher SD-511

Tips
- The figure shows an optional Finisher FS-534 with Saddle Stitcher SD-511 and Punch Kit PK-520 installed.
- Do not remove staples that remain in the machine. Otherwise, the stapling function will activate but no sheets will be stapled.
Replacing a Staple Cartridge: For Finisher FS-535

Tips
- The figure shows an optional Finisher FS-535 with Saddle Stitcher SD-512 and Punch Kit PK-521 installed.
- Do not remove staples that remain in the machine. Otherwise, the stapling function will activate but though no sheets will be stapled.
Replacing a Staple Cartridge: Saddle Stitcher SD-512
Tips
- The figure shows an optional Finisher FS-535 with Saddle Stitcher SD-512 and Punch Kit PK-521 installed.
- Do not remove staples that remain in the machine. Otherwise, the stapling function will activate but though no sheets will be stapled.
Punch scraps: Processing in the Finisher FS-534
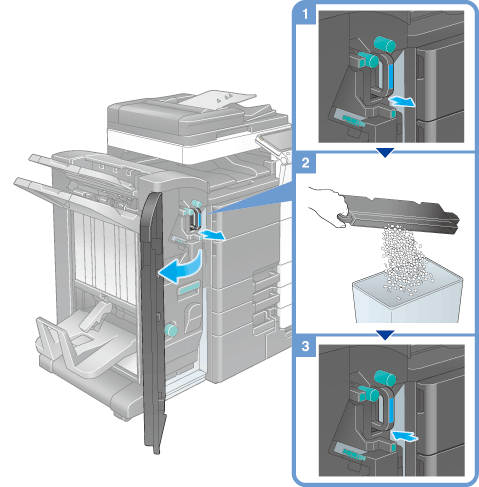
Tips
- The figure shows an optional Finisher FS-534 with Saddle Stitcher SD-511 and Punch Kit PK-520 installed.
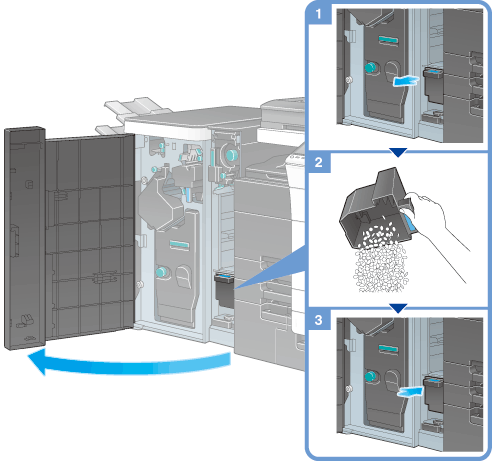
Punch scraps: Handle the Finisher FS-535

Tips
- The figure shows an optional Finisher FS-535 with Saddle Stitcher SD-512 and Punch Kit PK-521 installed.
Punch scraps: Handle the Z Folding Unit ZU-606
Tips
- The figure shows an optional Finisher FS-535 with Saddle Stitcher SD-512, Punch Kit PK-521, and Z Folding Unit ZU-606 installed.