
Importing Data from a Computer
Operate this machine through the application on a destination computer, and import the scanned original data. The imported original data can be edited or saved in a computer. This section explains an example using Windows 7 and [Windows Fax and Scan] application software.
From the Start menu, click [All Programs] - [Windows Fax and Scan].
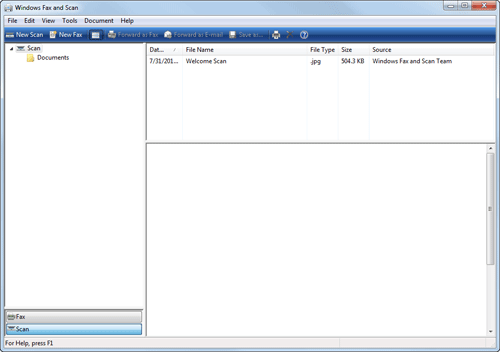
Click [New Scan].
The [New Scan] dialog box appears.
Specify the desired items from among the following to fit the original to be scanned.
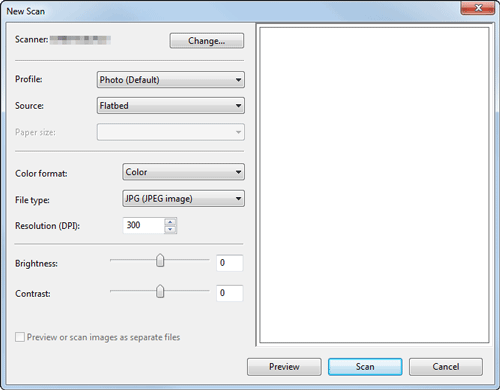
Settings
Description
[Scanner]
Displays the scanner name of this machine.
To switch other scanner, click [Change].
[Profile]
Select a profile to fit the original you want to load onto this machine.
[Photo]: Select this option to scan an original that consists primarily of photos.
[Documents]: Select this option to scan an original that consists primarily of text.
[Last used settings]: Select this option to scan an original using the previous settings.
[Add profile...]: Select this option to create a new profile other than the options above and add it as an option. Selecting [Add profile...] displays the [Add New Profile] window.
[Source]
Select the position to set the original.
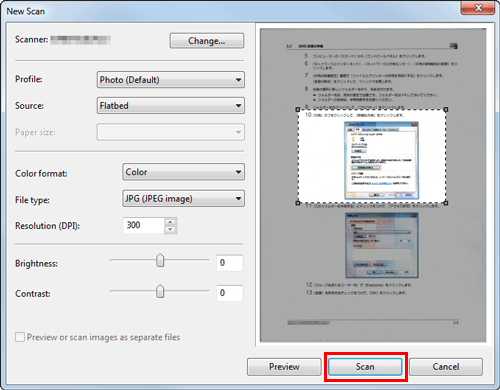
[Flatbed]: Select this option to load the original on the Original Glass. By selecting [Flatbed], you can use [Preview], which is a scan function.
[Feeder]: Select this option to load the original into the ADF.
[Paper size]
When [Feeder] is selected in [Source], specify the size of the original loaded in the ADF.
[Color format]
Select either [Color] or [Gray Scale] color mode to scan originals. The original is scanned in the selected color mode regardless of the original color.
[File Type]
Select a type of file to save.
[BMP]: Used to save an image file adopted by the "Paint" software supplied with Windows. This type does not support a function that compresses data to be saved, so the file size is larger than JPEG or PNG.
[JPG]: Used to save a file commonly used for a digital camera, which is available for saving a photo. This type does not support the saving of multiple pages into one file.
[PNG]: Used to save an image file with no quality degradation when compressing a file. Note that some files cannot be displayed in old Web browsers.
[TIF]: This type is a versatile image format. This type is available for a multi-page file that provides multiple pages in one file.
[XPS]: Extension of an XML-base file that is applied in Windows. You can install the XPS viewer to view or print data even if the source application is not provided.
[Resolution (DPI)]
Specify the resolution to scan the original.
[Brightness]
Specify the brightness with which to scan the original.
To specify the brightness level, drag the slider, or type in a numerical value.
[Contrast]
Specify the contrast to scan the original.
To specify the contrast level, drag the slider, or type in a numerical value.
Click [Scan].
If you select [Flatbed] in [Source], click [Preview] before saving data as a file, and check the image of the scanned original.
When necessary, trim a displayed image, or adjust [Brightness], [Contrast], or [Resolution (DPI)]. After checking the scanned original, click [Scan].
The original is scanned, and displayed on the application window of [Windows Fax and Scan].