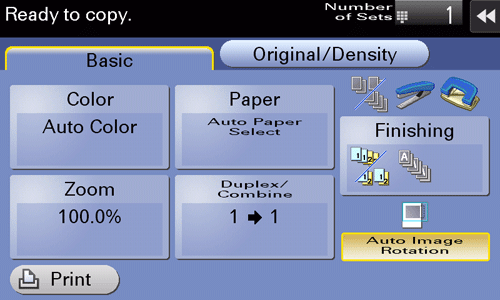
Copy Settings ([Basic])
- Selecting the copy color (Color)
- Selecting the size and type of copy paper (Paper)
- Enlarging or reducing an original image with any zoom ratio (Zoom)
- Using the Duplex/Combine function (Duplex/Combine)
- Sorting copied paper (Finishing)
- Copying the original in the loading direction with no rotation (Auto Image Rotation)
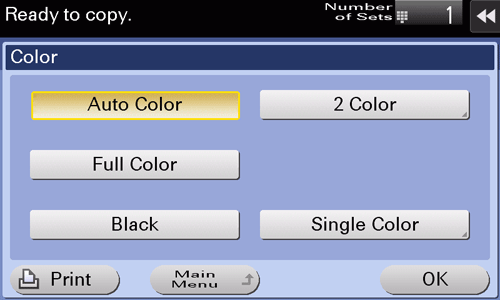
Selecting the copy color ([Color])
The original is copied using the selected color.
There are five color modes: [Auto Color] to copy based on the original color, [Full Color], [2 Color], [Single Color], and [Black].
Tap [Basic] - [Color].
Settings
Description
[Auto Color]
Tap this button to automatically select [Full Color] or [Black] according to the color of the scanned original when copying.
[2 Color]
Tap this button to make a copy in the specified two colors. This costs less than making a full color copy.
In the scanned original, an area judged to be color is copied with the specified color, and an area judged to be black in black.
[Full Color]
Tap this button to make a copy in full color mode regardless of the color of the scanned original.
[Black]
Tap this button to make a copy in black and white regardless of the color of the scanned original.
[Single Color]
Copy in the specified single color. This will produce a lower cost color copy than one printed in full color.
The original is copied by converting the color differences (apparent color densities) and the gradation levels into density differences of the single color.
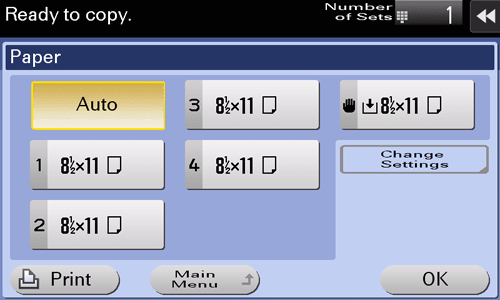
Selecting the size and type of copy paper ([Paper])
This machine selects paper automatically based on the size of the detected original when making a copy. If necessary, you can specify a paper type or size different from that of the original to make a copy.
You can also change the size and type of paper loaded into a paper tray.
Tap [Basic] - [Paper].
Settings
Description
[Auto]
Tap this button to automatically select paper fitting the size of the original when making a copy.
[1] - [4]
Tap this button to specify paper loaded into any of Tray1 to Tray4 to make a copy.
[L]
Tap this button to copy onto the paper loaded into the Large Capacity Unit.
[]
Tap this button to copy onto the paper loaded into the Bypass Tray.
[Change Settings]
If necessary, change the size and type settings of the paper loaded in the selected paper tray.
[Paper Type]: Select the type of the paper loaded into the selected paper tray.
[Paper Size]: Select the size of the paper loaded into the selected paper tray.
Selecting [Auto Detect] automatically detects the size of the loaded paper.
When very few sheets of paper remain in the paper tray, the icon indicating remaining paper quantities appears.
Icon | Description |
|---|---|
| Indicates that very little paper remains in the paper tray. |
| Indicates that there is no paper in the paper tray. |


When paper other than plain paper or recycled paper is loaded into the paper tray, the icon indicating the paper type appears.
Icon | Paper type |
|---|---|
| Single Side Only |
| Thin paper |
| Special Paper |
| Thick 1 |
| Thick 1+ |
| Thick 2 |
| Thick 3 |
| Thick 4 |
| Transparency |
| Letterhead |
| Colored Paper |
| Envelope |
| Index paper |
| User Paper 1 |
| User Paper 2 |
| User Paper 3 |
| User Paper 4 |
| User Paper 5 |
| User Paper 6 |
| Plain paper (Duplex 2nd Side) |
| Thick 1 (Duplex 2nd Side) |
| Thick 1+ (Duplex 2nd Side) |
| Thick 2 (Duplex 2nd Side) |
| Thick 3 (Duplex 2nd Side) |
| Thick 4 (Duplex 2nd Side) |
| User Paper 1 (Duplex 2nd Side) |
| User Paper 2 (Duplex 2nd Side) |
| User Paper 3 (Duplex 2nd Side) |
| User Paper 4 (Duplex 2nd Side) |
| User Paper 5 (Duplex 2nd Side) |
| User Paper 6 (Duplex 2nd Side) |


User paper is a special paper of which the weight and media adjustment settings are registered. For details, contact your service representative.
Enlarging or reducing an original image with any zoom ratio ([Zoom])
Enlarge or reduce an image with the specified zoom ratio to make a copy.
You can automatically specify the zoom ratio according to the original size and paper size by selecting from the registered zoom ratios, or by manually entering an arbitrary zoom ratio.
Tap [Basic] - [Zoom].

Settings
Description
[Auto Zoom]
Tap this button to automatically make a copy with the optimal zoom ratio to match the image of the original with the paper size. It is convenient that you do not need to specify the zoom ratio.
[Full Size]
Tap this button to copy an original image with the same size as for the original (x1.0).
[Enlarge]
Tap this button to select a preset zoom when enlarging a standard-size original onto a standard-size piece of paper for copying.
[Reduce]
Tap this button to select a preset zoom when reducing a standard-size original onto a standard-size piece of paper for copying.
[Minimal]
Tap this button to place an original image in the center after slightly reducing the original size when copying.
This function is available when copying the entire original image, including its edges.
[Manual]
Enter any zoom ratio using the Keypad.
[Set Zoom Ratio]
Tap this button to make a copy at the registered zoom ratio.
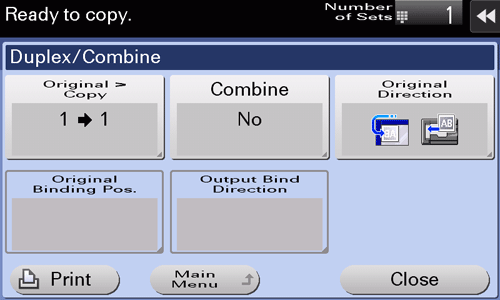
Using the Duplex/Combine function ([Duplex/Combine])
Copy an original onto both sides of the paper. A two-page original is reduced and copied on the same side of a single sheet of paper.
Tap [Basic] - [Duplex/Combine].
Settings
Description
[Original > Copy]
Select a combination of the original to be loaded (1-sided original or 2-sided original) and the copy method (1-sided copy or 2-sided copy).
To scan a 2-sided original, specify whether to set the original to Top Bind or Left Bind/Right Bind in [Original Binding Pos.] To make a 2-sided copy, specify whether to set a copy to Top Bind or Left Bind/Right Bind in [Output Bind Direction].
[Combine]
Select whether to reduce and copy a two-page original on the same side of a single sheet of paper.
[Original Direction]
Specify the orientation of the loaded original.
[Original Binding Pos.]
Select the original binding position when a 2-sided original is loaded.
[Auto]: The binding position is specified automatically. When the long side of the original is 11-11/16 inches (297 mm) or less, the binding position is set to the long side of the paper. When the long side of the original exceeds 11-11/16 inches (297 mm), the binding position is set to the short side of the paper.
[Top]: Select this option when the binding position is set to the top of the original.
[Left Bind]: Select this option when the binding position is set to the left of the original.
[Right Bind]: Select this option when the binding position is set to the right of the original.
[Output Bind Direction]
Select the binding position when printing onto both sides of sheets of paper.
[Auto]: The binding position of a copy is specified automatically. When the long side of the original is 11-11/16 inches (297 mm) or less, the binding position is set to the long side of the paper. When the long side of the original exceeds 11-11/16 inches (297 mm), the binding position is set to the short side of the paper.
[Top]: Select this option when setting the binding position to the top of a copy.
[Left Bind]: Select this option when setting the binding position to the left of a copy.
[Right Bind]: Select this option when setting the binding position to the right of a copy.
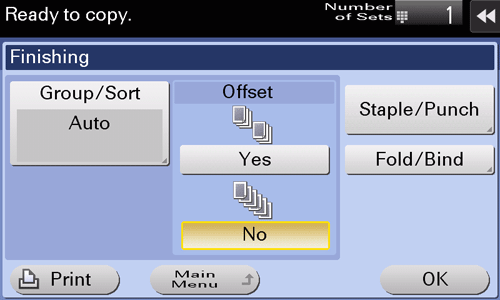
Sorting copied paper ([Finishing])
Specify how to feed out copied sheets of paper.
Tap [Basic] - [Finishing].
Settings
Description
[Group/Sort]
Select the output method when multiple sets of copies are printed.
[Auto]: Automatically switches Group and Sort depending on the number of sheets of the loaded original and the number of copies. If you load originals of multiple pages and specify multiple copies, the mode is automatically switched to Sort in order to process output. If other conditions are set, output processing is carried out in Group mode.
[Collate (By Set)]: Feeds out copies separately one by one like "12345", "12345", "12345".
[Group]: Feeds out copies separately page by page like "111", "222", "333", "444", "555".
[Offset]
Select [Yes] when sorting by copies or by page to feed out paper.
If the Finisher or Job Separator JS-506 is installed, the copies are fed out and stacked on top of each other with each copy or page set staggered to separate them.
If no Finisher or Job Separator JS-506 is installed, printed copies are fed out and sorted in an alternating crisscross pattern when the following conditions are satisfied.
8-1/2 11, A4, or B5 paper is used
Paper of the same size and type is loaded with the orientation in one paper tray and with the orientation in another tray
Specifying Auto Paper for the paper size setting
[Staple/Punch]
[Staple]: Select a binding position to staple sheets.
[Corner]: Each set of printed sheets is stapled in a corner (top left or top right) before it is output.
[2 Position]: Each set of printed sheets is stapled at two positions (in the top, left, or right) before it is output.
[Position Setting]: Select the binding position and original loading direction. If [Auto] is specified for the binding position, the binding position is determined automatically based on the direction of the loaded original.
[Punch]: Select binding positions when punching sheets.
[Position Setting]: Select the punch position and original loading direction. If [Auto] is specified for the punch position, the punch position is determined automatically based on the direction of the loaded original.
[Fold/Bind]
Select how to fold or bind paper.
[Half-Fold]: Feeds out a copied sheet by folding it in two.
[Center Staple & Fold]: Staples and feeds out a copied sheet by folding it in two.
[Tri-Fold]: Feeds out a copied sheet by folding it in three.
[Z-Fold]: Z-folds the long side of a copied sheet before feeding it out. This option is available when printing paper of: 11 17 , 8-1/2 14 , A3 , B4 , or 8K . Selecting 8-1/2 14 folds paper in two instead of Z-folding.
To use the Staple function, the optional Finisher is required.
To use the Punch function, the optional Finisher and Punch Kit are required.
ineo+ 658/558/458:
To use the Half-Fold, Center Staple, or Tri-Fold function, the optional Finisher FS-537 SD or optional Finisher FS-536 SD is required.
To use the Z-Fold function, the optional Finisher FS-537/FS-537 SD and Z Folding Unit are required.ineo+ 368/308/258:
To use the Half-Fold, Center Staple, or Tri-Fold function, the optional Finisher FS-534 SD is required.
Copying the original in the loading direction with no rotation ([Auto Image Rotation])
This machine automatically adjusts the rotation for copying even if the orientations of the original and paper are different. When necessary, you can copy the original without adjusting the rotation.
This function is available when copying only a part of the original.
Tap [Basic] - [Auto Image Rotation].