
Creating a serverless pull printing group configuration file in a local environment
A serverless pull printing group can be created in a local environment in which the MFP is not connected to the network.
Use LK-114_Editor for SetupTool to configure information such as the IP address of the MFP to be assigned to a topology machine in a serverless pull printing group and create a serverless pull printing group configuration file.
When the configuration file is loaded using LK-114_SetupTool, a serverless pull printing group can be registered.
Before starting registration, check the IP address or host name, administrator password, OpenAPI user name, and OpenAPI password of the MFP to be assigned to a topology machine in the serverless pull printing group.
Use LK-114_SetupTool to export the serverless pull printing group configuration file.
For details, refer to Here.
Double-click [LK114EditorForSetupTool.exe].
LK-114_Editor for SetupTool starts.
Click [Read an import file].
Select a serverless pull printing group configuration file, then click [Open].
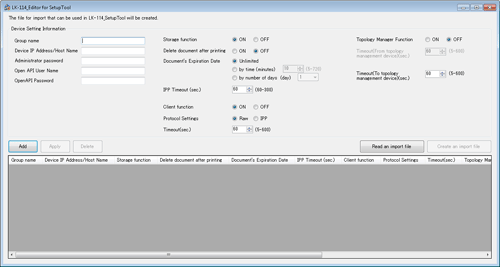
In [Device Setting Information], enter information of the MFP to be assigned to a topology machine in the serverless pull printing group.
[Group name]: Enter the name of the serverless pull printing group to add the MFP to.
[Device IP Address/Host Name]: Enter the IP address or host name of the MFP.
[Administrator password], [Open API User Name], [OpenAPI Password]: Enter the administrator password, OpenAPI user name, and OpenAPI password of the MFP.
Select [ON] in [Topology Manager Function]
[Timeout(From topology management device)(sec.)]: Specify the timeout for a communication from the topology machine when using this machine as the topology machine.
[Timeout(To topology management device)(sec.)]: Specify the timeout period for a communication with the topology machine when using this machine as a client machine.
Click [Add].
MFP information is displayed in the list at the bottom of the screen.
Click [Create an import file].
The configuration file is created in the same folder as for LK-114_SetupTool.
Start LK-114_SetupTool to load the configuration file.
For details on how to load the configuration file, refer to Here.

To change setting information of an already added MFP, select the desired MFP from the list, then change the setting in [Device Setting Information]. Change the setting, then click [Apply].