
Associating with the fax server
Overview
When using a fax server, you can configure the server for registering and using applications.
When using the fax server communicates in the E-mail format, you can configure settings to automatically add a prefix and suffix to a destination number.

You can view and operate the registered application from the Control Panel of this machine. However, the following conditions must be satisfied:
The optional Fax Kit is not installed
The Internet fax function is disabled
Registering applications
Register applications and configure a server for using the application.
This setting is not available when the optional Fax Kit is installed.
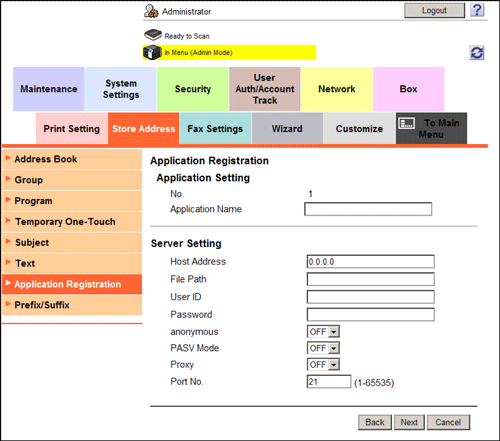
In the administrator mode, select [Store Address] - [Application Registration] to select the location where you wish to register applications, and click [Registration/Edit].
Select [Use application template] and select a template to be used.
If you do not use a template, select [Not use application template].
For details on template that can be used on this machine, refer to Here.
Click [Next].
Register applications and configure the server settings, then click [Next].
Settings
Description
[Application Setting]
Configure an application to be registered.
[Application Name]
Enter the application name (using up to 16 characters).
[Server Setting]
Configure a server for using the application
[Host Address]
Enter the host address of the server for using the application (using up to 15 characters, including a period).
[File Path]
Enter the destination file path (using up to 96 characters).
[User ID]
Enter the user ID used to log in to the server (using up to 47 characters).
[Password]
Enter the password of the user name you entered into [User ID] (using up to 31 characters).
[anonymous]
When authentication is not required in the destination server, select [ON].
[PASV Mode]
When the PASV mode is used in your environment, select [ON].
[Proxy]
When a proxy server is used in your environment, select [ON].
[Port No.]
If necessary, change the port number.
Normally, you can use the original port number.
Select a custom item you wish to configure, and click [Edit].

In the [Function Setting] page of the selected custom item, configure the following settings.
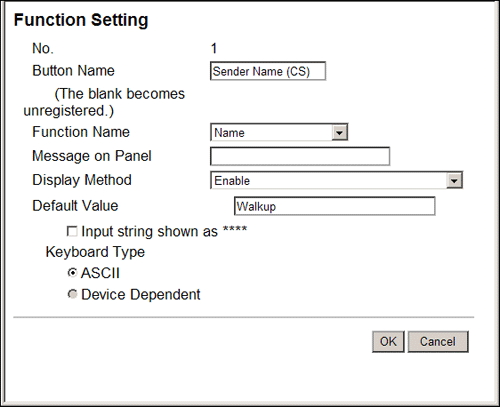
Settings
Description
[Button Name]
Enter the button name (using up to 16 characters).
[Function Name]
Select a function name.
[Message on Panel]
Enter the name to be displayed on the Touch Panel (using up to 32 characters).
[Display Method]
Select a method to display on the Touch Panel.
[Default Value]
Enter the default value. The number of characters that can be entered differs depending on the function selected in [Function Name].
To hide the default value, select the [Input string shown as ****] check box.
[Keyboard Type]
Select a keyboard type displayed on the Touch Panel.
[Options]
Set the option according to the function selected in [Function Name].
Click [OK].
Application setting templates
Web Connection provides the following templates. Each template provides different custom items predefined for each application.
[WalkUp Fax]
[No.] | [Button Name] | [Function Name] | [Keyboard Type] | [initial value] | [Options] |
|---|---|---|---|---|---|
1 | [Sender Name (CS)] | [Name] | [ASCII] | [Walkup] | - |
2 | [Fax Number (CS)] | [PersonalFaxNumber] | [ASCII] | - | - |
3 | [TEL Number (CS)] | [PersonalVoiceNumber] | [ASCII] | - | - |
4 | [Subject] | [Subject] | [ASCII] | - | - |
5 | [Billing Code 1] | [BillingCode1] | [ASCII] | - | - |
6 | [Billing Code 2] | [BillingCode2] | [ASCII] | - | - |
[Fax with Account]
[No.] | [Button Name] | [Function Name] | [Keyboard Type] | [initial value] | [Options] |
|---|---|---|---|---|---|
1 | [User ID] | [ID] | [ASCII] | [Walkup] | - |
2 | [Sender Name (CS)] | [Name] | [ASCII] | - | - |
3 | [Password] | [Password] | [ASCII] | - | - |
4 | [Password Auth#] | [Authentication] | - | - | [None] |
5 | [Subject] | [Subject] | [ASCII] | - | - |
6 | [Billing Code 1] | [BillingCode1] | [ASCII] | - | - |
7 | [Billing Code 2] | [BillingCode2] | [ASCII] | - | - |
8 | [CoverSheet Type] | [CoverSheet] | - | - | - |
9 | [Hold For Preview] | [HoldForPreview] | - | - | [No] |
[Secure Docs]
[No.] | [Button Name] | [Function Name] | [Keyboard Type] | [initial value] | [Options] |
|---|---|---|---|---|---|
1 | [User ID] | [ID] | [ASCII] | [Walkup] | - |
2 | [Password] | [Password] | [ASCII] | - | - |
3 | [Password Auth#] | [Authentication] | - | - | [None] |
4 | [Delivery Method] | [Delivery] | - | - | [Secure] |
5 | [Subject] | [Subject] | [ASCII] | - | - |
6 | [Billing Code 1] | [BillingCode1] | [ASCII] | - | - |
7 | [Billing Code 2] | [BillingCode2] | [ASCII] | - | - |
8 | [CoverSheet Type] | [CoverSheet] | - | - | - |
9 | [Document PW] | [DocumentPassword] | [ASCII] | - | - |
[Certified Delivery]
[No.] | [Button Name] | [Function Name] | [Keyboard Type] | [initial value] | [Options] |
|---|---|---|---|---|---|
1 | [User ID] | [ID] | [ASCII] | [Walkup] | - |
2 | [Password] | [Password] | [ASCII] | - | - |
3 | [Password Auth#] | [Authentication] | - | - | [None] |
4 | [Delivery Method] | [Delivery] | - | - | [Certified] |
5 | [Subject] | [Subject] | [ASCII] | - | - |
6 | [Billing Code 1] | [BillingCode1] | [ASCII] | - | - |
7 | [Billing Code 2] | [BillingCode2] | [ASCII] | - | - |
8 | [CoverSheet Type] | [CoverSheet] | - | - | - |
9 | [Document PW] | [DocumentPassword] | [ASCII] | - | - |
Associating with the fax server communicating in E-Mail format
When using a fax server that communicates in the E-mail format, a prefix and a suffix can be automatically added to the destination number.
In the administrator mode, select [System Settings] - [System Connection Setting], then configure the following settings.
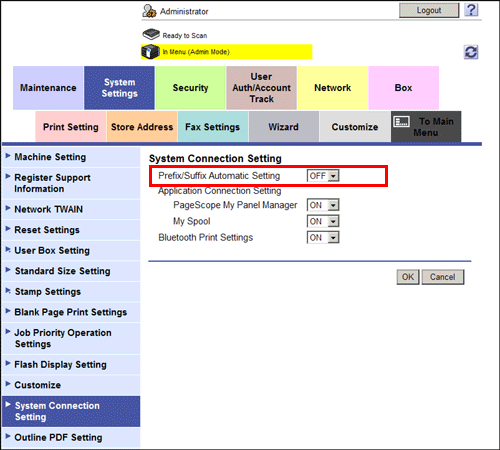
Settings | Description |
|---|---|
[Prefix/Suffix Automatic Setting] | Select whether to automatically add a prefix and suffix to a destination number. If [ON] is selected, characters set in registration No.1 are automatically added in the administrator mode [Store Address] - [Prefix/Suffix]. [OFF] is specified by default. |
If [Prefix/Suffix Automatic Setting] is set to [ON], the following restrictions will be applied:
The [Fax Settings] are not available in the administrator mode (excluding [Destination Check Display Function], [Confirm Address (TX)], [Confirm Address (Register)], and [PC-Fax Permission Setting]).
[Store Address] - [Application Registration] is not available in the administrator mode.
Bulletin Board User Box, Polling TX User Box, Compulsory Memory RX User Box, and Re-Transmission User Box are not available.
Bulletin Board User Box and Relay User Box cannot be registered.
Confidential RX is not available.
The [Off-Hook] key is not available.
You cannot configure [Fax Header Settings], [Line Setting], [Quick Memory TX], [Polling TX], [Polling RX], [Timer TX], [Password TX], and [F-Code TX] in the Scan/Fax mode.
The network fax function is not available.
[Outside], [Tone], [Pause], [-], and [Line Settings] are not available when registering a fax destination in the address book.
You cannot print an activity report, TX report, and RX report from the job display screen of the Control Panel.
Numbers excluding a prefix and suffix are displayed in job history.
Send job types are handled as E-mail.
The Fax TX in the counter is not updated.