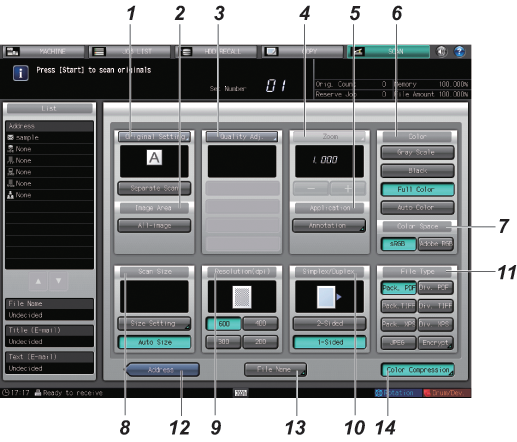
Scan Settings Screen
To display this screen, select or input an address, and then press [Scan Settings] on the [SCAN] screen. You can set various settings such as [Original Setting] and [Quality Adjustment].

No. | Name | Description | Reference | |
|---|---|---|---|---|
1 | [Original Setting] | You can set separate scan, bind direction of two-sided original (whether the top and bottom of both sides are the same, or one side is flipped vertically), original orientation, and original type. | ||
[Separate Scan] | The scan operation is divided into several sessions and turns into a single job. Select [Separate Scan] before making the first scan. | |||
2 | [Image Area] | Sets whether to enable or disable [All-image] as the image area to be scanned. | ||
[All-image] | Sets this option to scan the entire image. | |||
3 | [Quality Adj.] | Adjusts the density, tone and contrast of the entire scan data, and background density and shapes of letters or pictures on an original. If [Black] is selected in [Color], you cannot set it. | ||
4 | [Zoom] | Sets a zoom level. To enable [Zoom], a setting is required. For details, contact your service representative. | ||
[-], [+] | Adjusts the zoom level. The Enlarge function is not available for this machine. | |||
5 | [Application] | [Annotation] | Prints a registered character string on a scanned image. You can adjust the position where the string is printed. | |
6 | [Color] | Selects monochrome, color or gray scale. | ||
[Gray Scale] | Creates monochrome data by using white, gray, and black. | |||
[Black] | Creates monochrome data by using white, gray, and black. | |||
[Full Color] | Creates color data. | |||
[Auto Color] | Creates data that combines full color and monochrome. [Full Color] or [Black] is automatically selected for each page of the original. | |||
7 | [Color Space] | Selects the type of RGB color space. If [Black] is selected in [Color], you cannot set it. | ||
[sRGB] | Creates data with sRGB that is a standard RGB color space. | |||
[Adobe RGB] | Creates data with Adobe RGB that is a color space bigger than sRGB. | |||
8 | [Scan Size] | Sets the size of paper to be scanned. | ||
[Size Setting] | Manually sets the size of paper to be scanned. | |||
[Auto Size] | Automatically sets the size of paper to be scanned. | |||
9 | [Resolution (dpi)] | Selects a resolution. | ||
10 | [Simplex/Duplex] | Selects whether to scan 1-sided or 2-sided. | ||
[2-Sided] | Scans 2-sided. | |||
[1-Sided] | Scans 1-sided. | |||
11 | [File Type] | Selects the file type of the data you want to create. | ||
[Pack. PDF] | Creates data in PDF format. | |||
[Div. PDF] | Creates data in PDF format. | |||
[Pack. TIFF] | Creates data in TIFF format. | |||
[Div. TIFF] | Creates data in TIFF format. | |||
[Pack. XPS] | Creates data in XPS format. | |||
[Div. XPS] | Creates data in XPS format. | |||
[JPEG] | Creates data in JPEG format. | |||
[Encrypt] | Creates data in PDF format. | |||
12 | [Address] | This returns to the [SCAN] screen. | ||
13 | [File Name] | Creates a file name of the scan data. | ||
14 | [Color Compression] | Sets the degree of data compression. If [Black] is selected in [Color], you cannot set it. | ||
