Stops during a Print Job Because of Inconformity in Paper Size or Paper Conditions
If paper of the size or the conditions (other than the paper size) specified for print data currently transmitted is not loaded in any tray, the machine temporarily stops its operation.
The conditions defined here include the following provided as paper setting items:
Type
Weight: Not subject to inconformity when not specified from an image controller
Colored Paper
Punch
Tab Number: Subject to inconformity only when Tab Paper is specified for Paper Size
At this time, one of the following messages is displayed:
When received print data designates a paper tray,
[Paper size does not match / Please load $####### in tray$ / Details can be confirmed with [Confirm Details]]
or
[Please load designated paper in tray$ / To check details, touch [Confirm Details]]
When received print data does not designate a paper tray,
[Please load designated $####### paper / To check details, touch [Confirm Details]]
or
[Please load designated paper or / touch [Confirm Details] and select tray]
To release the machine suspension and start printing, three methods are provided:
 Loading the designated tray with paper
- Specify the tray designated by received print data with the required paper conditions, and load that tray with corresponding paper.
 Loading another tray with paper
- If the message does not mention a tray number, specify a desired tray with paper conditions required by received print data, and then load that tray with corresponding paper.
 Forcibly using paper loaded in a tray
Follow each procedure to start the print job.
Loading the designated tray with paper
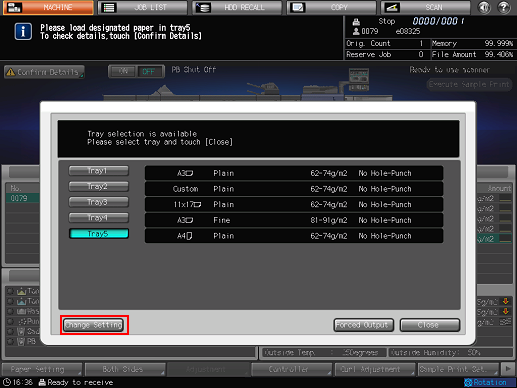
When the message that mentions a tray number is displayed as shown below, change the paper setting of the tray (Current Setting) to that required by the print data (Reserved Setting). Load the tray with paper that conforms to specified conditions, and then start printing.
Press [Confirm Details].
A dialog will be displayed.
Press [Change Setting].

The paper setting of the selected tray (Current Setting) and that required by the print data (Reserved Setting) are displayed.
Load the designated tray with paper of the conditions displayed as [Reserved Setting].
For details on loading paper, refer to Check Amount of Paper Remaining and Prepare Paper.

Be sure to load paper of the specified size. If a different paper size is loaded, the machine cannot start the printing operation. Using a different paper type or weight may cause paper misfeed or machine trouble.
Press [Change Setting] to fix the paper setting required by the print data.
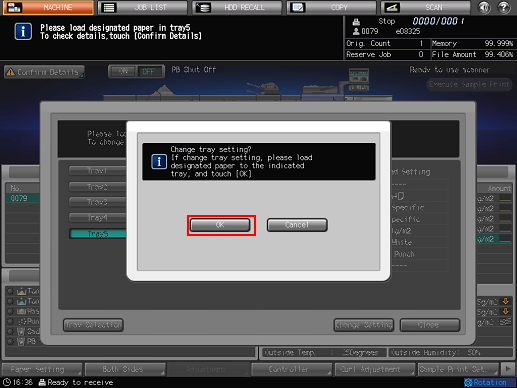
A dialog will be displayed to confirm the setting change of the tray.
Press [OK].

Press [Close].

The [MACHINE] Screen is restored with the message [Press [Start] to restart].
Press Start on the control panel.
The machine will be released from suspension and start the printing operation.
Loading another tray with paper
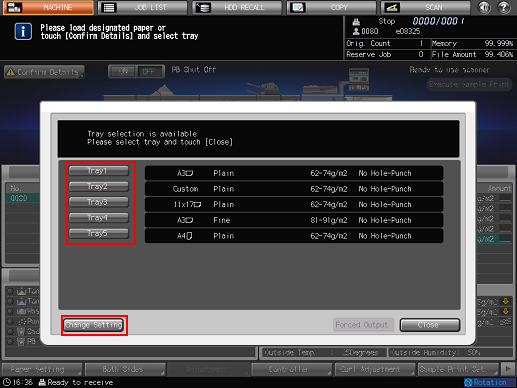
When the message that does not designate the specific tray is displayed as shown below, select a desired tray and change its paper setting (Current Setting) to that required by the print data (Reserved Setting). Load the tray with paper that conforms to specified conditions, and then start printing.
Press [Confirm Details].
A dialog will be displayed.
Press a tray key to be used, and then press [Change Setting].

The paper setting of the selected tray (Current Setting) and that required by the print data (Reserved Setting) are displayed.
Load the tray selected in step 2 with paper of the conditions displayed as [Reserved Setting].
For details on loading paper, refer to Check Amount of Paper Remaining and Prepare Paper.

Be sure to load paper of the specified size. If a different paper size is loaded, the machine cannot start the printing operation. Using a different paper type or weight may cause paper misfeed or machine trouble.
Press [Change Setting] to fix the paper setting required by the print data.
A dialog will be displayed to confirm the setting change of the tray.
Press [OK].

Press [Close].

The [MACHINE] Screen is restored with the message [Press [Start] to restart].
Press Start on the control panel.
Paper will be fed from the tray selected in step 2 to start the printing operation.
Forcibly using paper loaded in a tray
Use a desired tray to start printing, regardless of the paper setting required by the print data.
The tray selected for forced output will be used till that job is completed.
Press [Confirm Details].
A dialog will be displayed.
Press a tray key to be used and then press [Forced Output].

The [MACHINE] Screen is restored with the message [Press [Start] to restart].
Press Start on the control panel.
Paper will be fed from the tray selected in step 2 to start the printing operation.
