Printer P: Specify a Measurement Data and Paper
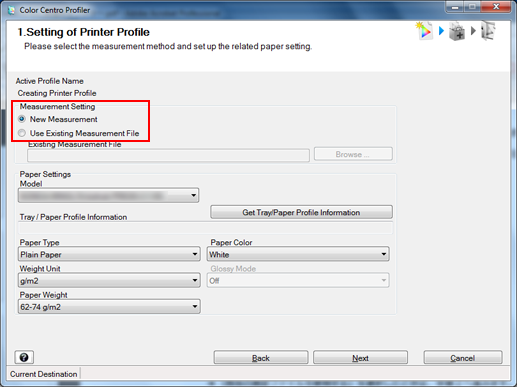
On the Select Measurement Method / Paper Setting screen, you can select the measurement method and set the related paper setting.
From [Measurement Setting], select [New Measurement] or [Use Existing Measurement File].

When you select [New Measurement], go to Step 5.
When you select [Use Existing Measurement File], go to Step 2.
Click [Browse].
[Open] screen appears.
Select the measurement data file (.mcd or .tmd) and click [Open].
The name of the measurement data file appears in [Existing Measurement File].
Click [Get Tray/Paper Profile Information].
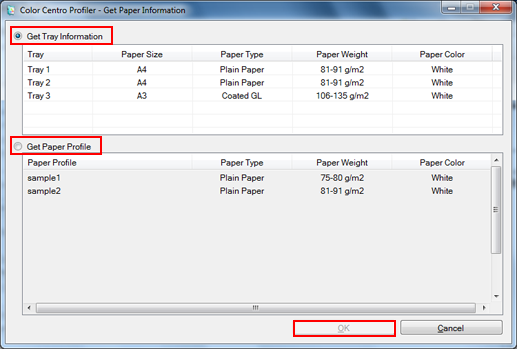
The [Get Paper Information] screen is displayed.
You can specify [Paper Type], [Paper Color], and [Weight Unit] as automatic settings by using information of trays and paper profiles for this machine.
When you connect to the image controller which is for the selected printer, [Get Tray/Paper Profile Information] is available.
When you use [Get Tray/Paper Profile Information], go to Step 6.
To specify [Paper Type], [Paper Color], and [Paper Weight] manually, go to Step 7.
On [Get paper Information] screen, select [Get Tray Information] or [Get Paper Profile] and select the tray information or paper profile which you use then click [OK].

The information that you acquire is displayed in [Tray / Paper Profile Information].
And then, [Paper Type], [Paper Color], and [Weight Unit] are automatically specified.
Select [Paper Type], [Weight Unit], [Paper Weight], and [Paper Color].
If you are using [Get Tray/Paper Profile Information], these options are automatically set.
Click [Next].
When you select [New Measurement] from [Measurement Setting], the Chart Measurement screen appears. In this case, go to Printer P: Measure a Chart.
When you select [Use Existing Measurement File] from [Measurement Setting], the UCR/GCR Setting screen appears. In this case, go to Printer P: Select a Level of UCR and GCR.
