
Managing the copy protect data
Copy Protect is a function that prints a text such as "Copy" and "Private" as a concealed text in all pages.
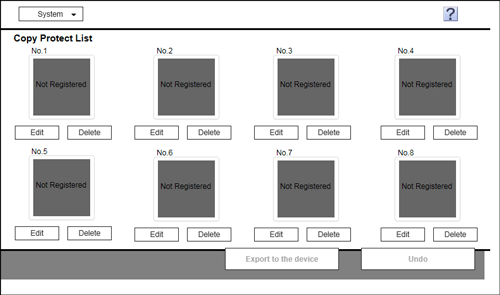
You can register or edit copy protect data using Data Managing Utility. Up to eight units of copy protect data can be managed.
This function is available when the Web browser function is disabled. When the optional Extension Memory is installed, this function is available regardless of whether the Web browser function is enabled or disabled. Some models provide Extension Memory as standard. For details, refer to Here.
In the Web Connection login page, start the [Manage Copy Protect Data].
The copy protect data list registered on this machine appears.
To register or edit the copy protect data, click [Edit].
Clicking [Delete] deletes the registered copy protect data. The copy protect data will not be deleted until you click [Export to the device] and write it to this machine.
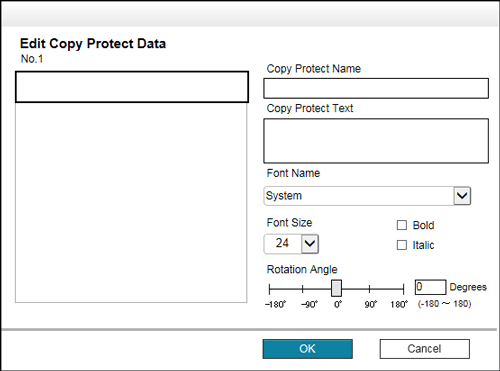
Register or edit the copy protect data, and click [OK].
You can edit data while checking the result in the preview.
Settings
Description
[Copy Protect Name]
Enter the Copy Protect name using up to 16 characters.
[Copy Protect Text]
Enter a text to be printed (using up to 32 characters).
[Font Name]
Select the font type of the text.
[Font Size]
Select the size of the text to be printed.
[Bold]
Select this check box to display the text in bold.
[Italic]
Select this check box to display the text in italic.
[Rotation Angle]
Specify the rotation angle of the text. The angle can be adjusted in increments of one degree.
Click [Export to the device].
Clicking [Undo] returns to the state before the change.
The registered or edited copy protect data is written to this machine.

Clicking [System] displays the system menu. The following menu items are available in the system menu.
[Auto Protect Setting]: Lock the computer screen if a specified amount of time has elapsed without the machine being operated. You can change the time until the screen is locked.
[Export]: Save the data registered on this machine to the computer as a file.
[Export to SMB]: Save the data registered on this machine to the SMB sharing folder as a file.
[Import]: Write the data stored in a file to this machine.
[Exit]: Exit the utility.