
Checking the Name and Function of each Part in this Machine
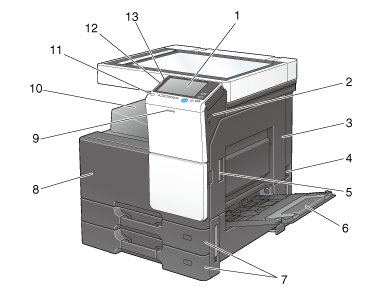
Front
No. | Name | Description |
|---|---|---|
1 | Control Panel | Used to configure various settings in this machine. |
2 | USB Port (Type A) USB2.0/1.1 | Used to connect an external memory unit (USB memory unit) to this machine. |
3 | Right Door | Open this door to clear a paper jam. |
4 | Main Power Switch | Press this switch to turn the machine on or off. |
5 | Right Door Release Lever | Used to lock the Right Door. |
6 | Bypass Tray | Used to print data on irregularly size paper, thick paper, transparencies, postcards (4 6 (A6 Card)), envelopes, or label sheets. The Bypass Tray can hold up to 100 sheets of plain paper, 20 sheets of Thick 1, 20 sheets of Thick 1+, 20 sheets of Thick 2, 20 sheets of Thick 3, 20 transparencies, 20 postcards (4 6 (A6 Card)), label sheets, or index paper, and 10 envelopes. |
7 | Tray1, Tray2 | Allows you to load up to 500 sheets. These trays can hold up to 150 sheets respectively of Thick 1, Thick 1+, Thick 2, and Thick 3. |
8 | Front Door | Open this door to replace the Toner Cartridge, Waste Toner Box, or Drum Unit. |
9 | Data Indicator | Flashes or lights up to indicate the data receiving status on this machine. For details, refer to Here. |
10 | Output Tray | Outputs printed pages. |
11 | Power key | Press this key to switch to the Power Save mode. During the normal operation, the key lights up blue. During the power save mode, the key flashes blue or lights up orange. |
12 | Stylus Pen | Used to select a menu on the Touch Panel, or enter characters. |
13 | Warning Indicator | Flashes or lights up to indicate that a problem has occurred in this machine. For details, refer to Here. |
Side/rear
No. | Name | Description |
|---|---|---|
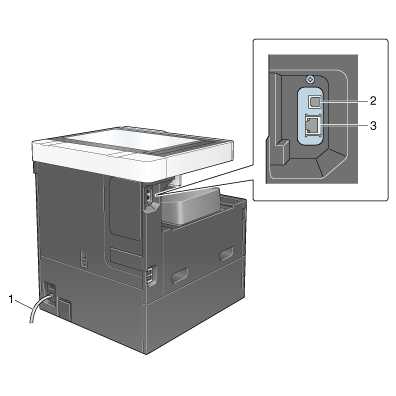
1 | Power Cord | Used to supply power to this machine. |
2 | USB Port (Type B) USB2.0/1.1 | Connect to this port when using this machine as a USB-connected printer. |
3 | Network Connector (10Base-T/100Base-TX/1000Base-T) | Connect to this port when using this machine as a network printer or network scanner. |

The network port of this product is following No.2 and No.3. A port is activated when a network port inserts a cable.
Inside
No. | Name | Description |
|---|---|---|
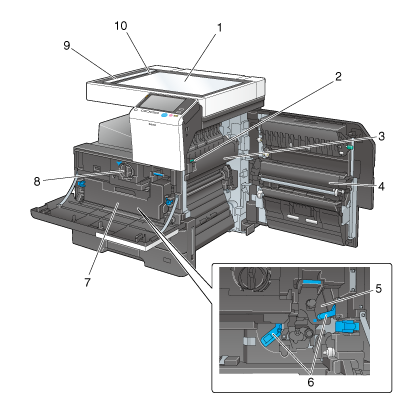
1 | Original Glass | Used to load the original. |
2 | Fusing Unit Cover Lever | Open this lever when clearing a paper jam in the fusing unit. |
3 | Fusing Unit | Used to fuse toner to paper using heat and pressure. |
4 | Transfer Unit | Used to transcribe toner onto paper. |
5 | Drum Unit | Used to create a print image. |
6 | Lock Release Tab | Used to remove the Drum Unit. |
7 | Waste Toner Box | Used to collect used waste toners. |
8 | Toner Cartridge | Contains toner, with which a print image is created. |
9 | Slit Scan Glass | Used to scan an original image when using the ADF. |
10 | Original Scale | Load the original along this scale. This scale is also used to check the size of the loaded original. |