
Authenticating with IC Card
This section describes the operation to gain authentication with an IC card using the Authentication Unit (IC Card Type) AU-201.
To use the Authentication Unit (IC Card Type) AU-201, contact your service representative.
The machine can be set to operate User Authentication by IC cards. In this case, users can gain User Authentication also by entering a [User Name] and User [Password].
If you proceed to UTILITY - [User Setting] - [System Setting] - [Service Port Device Setting], and then set [OFF] for [Service Port Device], the machine no longer recognizes the Authentication Unit (IC Card Type) AU-201, resulting in unavailability of IC card authentication.
If you disconnect the USB cable of Authentication Unit (IC Card Type) AU-201 from the main body while registering the authentication data, the Auth. Device button is grayed out on the authentication screen to show unavailability.
One IC card can be registered per user. A user cannot register multiple IC cards. To register a new IC card for a previously registered user, overwrite the existing IC card information.
Five types of IC cards can be used - FeliCa, TypeA, SSFC, FCF (General), and FCF (Campus). The machine can be set to accept five types of IC cards, however, a user can register only one type.
The same IC card cannot be registered for different users.
The card information registered with the IC card can be deleted.
When the machine is set up to use IC cards for user authentication/account track, it displays one of the following two screens depending on the setting. Please follow the instructions provided for each screen.
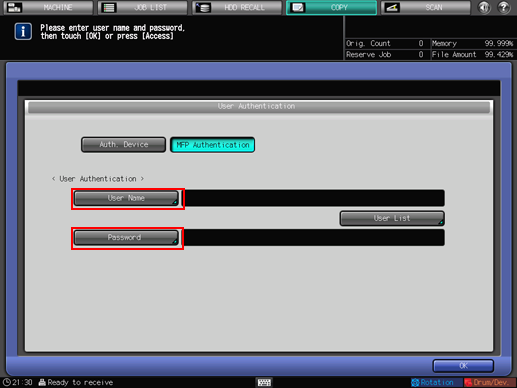
The screen shown below is for users who have been assigned a user name and user password. Some users may have a specified account.
Press [Auth. Device] and hold the IC card which has been registered in the user registration over the Authentication Unit (IC Card Type) AU-201.
Even without an IC card, users can also be authenticated by pressing [MFP Authentication] and entering a [User Name] and User [Password]. However, when the administrator selects [Synchronize] for the Synchronize User/Account Track, users are not authenticated even if they enter a [User Name] and User [Password], unless an account is registered in the user registration in advance.
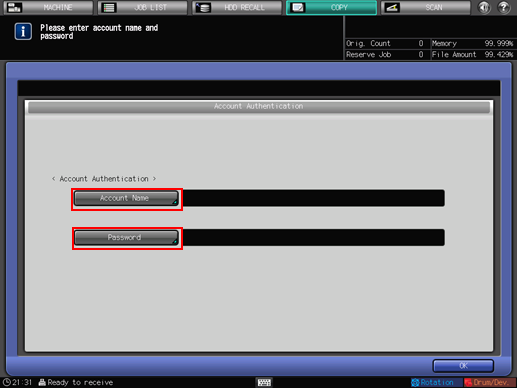
The screen shown below is for users who have been assigned an Account [password].
The [User Authentication] screen is displayed first. Hold the registered IC card over the Authentication Unit (IC Card Type) AU-201 and the [Account Authentication] screen is displayed.
Enter the Account [Password] and you are authenticated. You are not authenticated if an Account [Password] is not registered at the time of account registration.
Press [OK].
The screen you attempt to access will be displayed.
The message [Exceeds User Limit] may be displayed and the machine may become unusable. Contact your administrator.
Even if authenticated, some of the [Copy], [Scan], [Printer], and [HDD Hold] functions may not be allowed by the administrator. Contact your administrator.
Start operation.
You can use the machine normally.
If reset is activated, the screen changes to the [MACHINE] screen. You need to gain authentication again when accessing screens that require authentication.
When complete, press Access on the control panel.
You need to gain authentication again when accessing screens that require authentication. Otherwise, you cannot access and work on these screens