
PFU Air Assist Adjustment: Adjusting the Amount of Air Blow
There are air nozzles on the apical part of the feeder and the side guides of each tray in Paper Feeder Unit PF-707 and Paper Feeder Unit PF-708. Air blown from the nozzles makes feeding go smoothly by handling papers.
Depending on the paper type, smooth feeding may be difficult, and it may cause a paper jam. In this case, manually change the air assist settings. You can manually adjust the settings by opening the air nozzle confirmation window and checking the condition of air blow.

PFU Air Assist Adjustment is not displayed by default. To use this setting, please contact your service representative.
Do not open the air nozzle confirmation window of Trays 1, 4 and 7. To make the Air Assist settings for Trays 1, 4, and 7, manually configure the settings for a tray other than those three trays, then set the same adjustment value.

Do not put your hand into the open air nozzle confirmation window when the machine is working. Otherwise, an unexpected accident may happen.
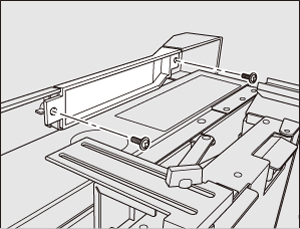
Open the air nozzle confirmation window of the tray for which you will manually check and adjust the conditions of the air assist.
Pull out the tray, remove the two screws, and then open the air nozzle confirmation window.
Return the tray to the original position.
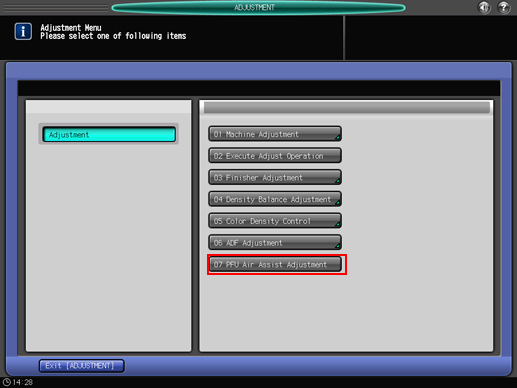
Press [Adjustment] on the [MACHINE] screen to display the [Adjustment Menu] screen.
Press [PFU Air Assist Adjustment].
Select the tray to be adjusted.
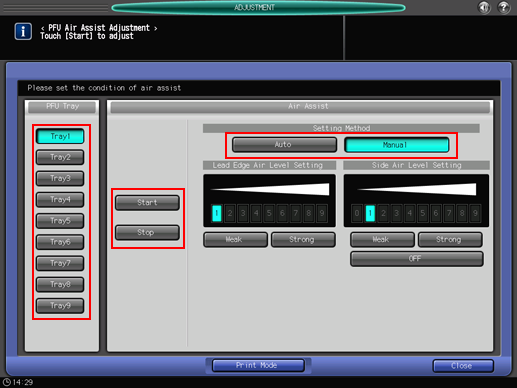
Select [Auto] or [Manual] in Setting Method.
When selecting [Auto], [Lead Edge Air Level Setting] and [Side Air Level Setting] is set automatically depending on paper size, paper type, and paper weight.
Press [Start].
Air starts blowing.
When selecting [Auto] in step 5, and then check the air level and go to step 9.
When selecting [Manual] in step 5, and then go to step 7.
Adjust [Lead Edge Air Level Setting].
Adjust while confirming the amount of paper float from the air nozzle confirmation window.
Adjustment Range: 1 ([Weak]) to 9 ([Strong])
When pressing [Weak], the air blow of the lead edge becomes weak and it may improve the feeding for thin paper. When pressing [Strong], the air blow of the lead edge becomes strong and it may improve the feeding for thick paper.
Adjust [Side Air Level Setting].
Adjust while confirming the amount of paper float from the air nozzle confirmation window.
Adjustment Range: [OFF], 1 ([Weak]) to 9 ([Strong])
When pressing [Weak], the air blow of the side becomes weak and it may improve the feeding for thin paper. When pressing [Strong], the air blow of the side becomes strong and it may improve the feeding for thick paper. Press [OFF] to turn off the air blow of the side.
Press [Stop].
Air stops blowing.
Press [Print Mode].
The tray to be adjusted is automatically selected.
Press Start on the control panel.
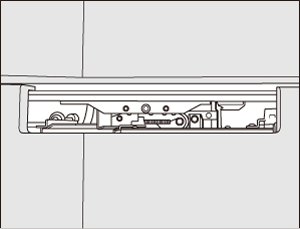
Confirm the condition of the paper feeding from the air nozzle confirmation window.
Press [Exit PrintMode].
Repeat steps 5 to 12 until the desired result is obtained.
Press [Close].
The screen returns to the [Adjustment Menu] screen.
Put the air nozzle confirmation window back into place.