
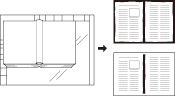
Frame Center Erase: Eliminating Black Copy Mark around Border and Center of Book
When the original is scanned from the original glass, black copy marks may be produced along borders and center line. Use this function to eliminate them from the copies and lower the toner consumption at the same time.
Setting options | Description |
|---|---|
[Frame Erase] | Erases black copy marks along borders of the original image. |
[Center Erase] | Erases black copy marks along the center line of the original. |

You can set from 1 mm to 300 mm for Frame Erase width and from 1 mm to 99 mm for Center Erase width in 1 mm increments.
[Frame Erase] and [Center Erase] can be used in combination.
[Frame Erase] has two options; [Erase/All Sides] to erase the same width on all four sides of the paper and [Erase/Each Side] to set the width to be erased for each side.
Position the original.
Both ADF and original glass are available.

When lowering the ADF onto thick original (e.g. open book) placed on the original glass, do not press it down too hard. Keep the ADF open, if required.
Press [Application] on the [COPY] screen.
Press [FrameCenterErase] on the [Application] screen.
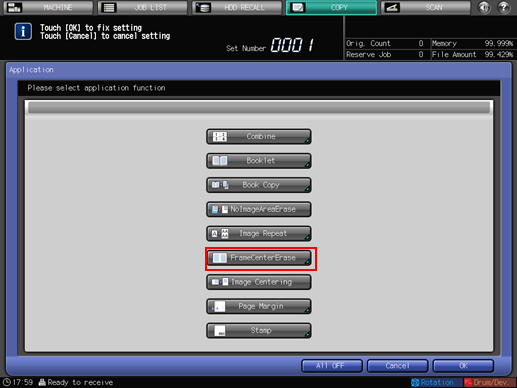
Select [Erase/All Sides], [Erase/Each Side], or [Center Erase] provided under [Function Selection].
[Frame Erase] and [Center Erase] can be used concurrently.

To set Erase/All Sides, proceed to step 5.
To set Erase/Each Side, proceed to step 6.
To set Center Erase, proceed to step 7.
Enter the erasure width for [Erase/All Sides].
Check that all numeric values under [Erase Width Setting] are highlighted.
Use the touch panel keypad or [
 ][
][ ] to enter the desired erasure width.
With [Center Erase] selected at the same time, select [Frame] under [Erase Width Setting] first before entering an erasure width.

Set the erasure width for [Erase/Each Side].
Select [Top], [Bottom], [Right], or [Left] under [Erase Width Setting]. Use the touch panel keypad or [
][] to enter the desired erasure width for each.
If [Center Erase] is also selected, select [Frame] under [Erase Width Setting] before entering each value.

Enter the erasure width for [Center Erase].
Check that the center erase width under [Erase Width Setting] is highlighted. Use the touch panel keypad or [
][] to enter the desired erasure width.
With [Frame Erase] selected at the same time, select [Center] under [Erase Width Setting] first before entering an erasure width.

Press [OK] to complete the setting.
To resume the original settings, press [Cancel].
To cancel the Frame Center Erase function with the current setting saved, press [Function OFF].
Press [OK] on the [Application] screen to return to the [COPY] screen.
The [Frame Center Erase] icon is displayed under [Application] on the [COPY] screen.
Enter the desired print quantity from the keypad on the control panel.
Press Start on the control panel.
Printing does not start without returning to the [COPY] screen. Be sure to display the [COPY] screen.