
Loading Paper into the Bypass Tray
How to load paper into the Bypass Tray
When selecting a paper size other than for paper trays or printing on envelopes or transparencies, use the Bypass Tray.
To use the Bypass Tray, load paper and specify the paper type.
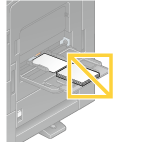
Do not load the following paper into the Bypass Tray. Doing so may cause a paper jam or damage to the machine.
Folded, torn or creased paper, or bundles of sheets of different sizes

Open the Bypass Tray.

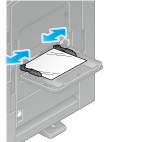
To load large-sized paper, pull out the Tray Extension.

Be careful not to touch the surface of the Paper Feed Rollers with your hand.
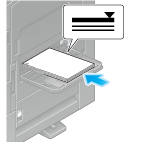
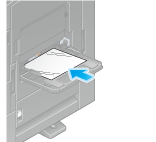
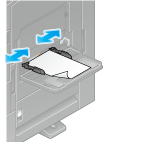
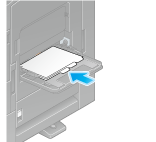
Load paper into the tray with the print side facing down.
Insert paper into the tray until their edges are pressed against the back.
For details on the available paper sizes, refer to Here.
Do not load an excessive number of sheets such that the top of the stack is higher than the
 mark.
mark.If paper is curled, flatten it before loading it.
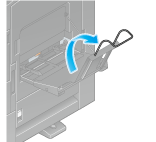
Slide the Lateral Guide to fit the size of the loaded paper.
When you change the paper type or change to custom size paper, proceed to step 4 to change the setting on this machine.
When you do not change the paper type or change to custom size paper when adding paper, you can use the current setting without making any changes.If necessary, change the paper setting of the tray on the Paper Setting screen.
The paper type is detected automatically. Intelligent media sensor (mounted in the standard) is required to use this function. For details on Intelligent media sensor, refer to Here.
To disable the automatic paper type detection, set [Paper type auto detection settings] or [Auto envelope detection sett.] to OFF. For details, refer to [Paper type auto detection settings] (Here) or [Auto envelope detection sett.] (Here).
When not using the automatic paper type detection, manually specify the paper type. For details, refer to Here.
When loading custom sized paper, change the paper type setting. For details, refer to Here.
Loading postcards
Up to 20 postcards can be loaded into the tray. The following example explains how to load a postcard of 4 6 (A6 Card).
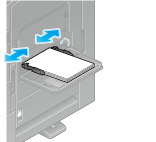
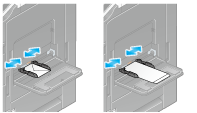
With the print side facing down, load postcards in the direction as shown in the figure.
Insert postcards into the tray until their edges are pressed against the back.
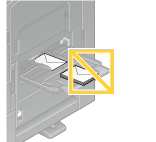
When loading postcards into the Bypass Tray, note the following points.
When loading curled postcards, uncurl the postcards as shown in the figure in advance.

Slide the Lateral Guide to fit the size of the loaded paper.
When using the Bypass Tray, note the following points.
Do not put spare postcards in the Bypass Tray. Doing so causes a size detection error.
When the screen of copy mode is displayed on this machine, the screen for selecting the paper type and paper size appears.
Change tray paper settings on the Paper Settings screen.
Select the postcard size from [Envelope/4 6] ([Envelope/A6 Card]) of [Paper Size]. For details, refer to Here.
If the postcard size is selected in [Paper Size], [Paper Type] is automatically set to [Thick3].
When the screen of copy mode is displayed on this machine, refer to Here.
Loading transparencies
Transparency is a transparent film to project an enlarged image on the screen.
Up to 20 transparencies can be loaded into the tray.
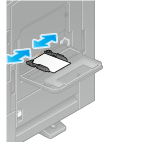
With the print side facing down, load transparencies in the direction as shown in the figure.
Insert transparencies into the tray until their edges are pressed against the back.
Slide the Lateral Guide to fit the size of the loaded paper.
When the screen of copy mode is displayed on this machine, the screen for selecting the paper type and paper size appears.
If necessary, change the paper setting of the tray on the Paper Setting screen.
The paper type is detected automatically. Intelligent media sensor (mounted in the standard) is required to use this function. For details on Intelligent media sensor, refer to Here.
To disable the automatic paper type detection, set [Paper type auto detection settings] or [Auto envelope detection sett.] to OFF. For details, refer to [Paper type auto detection settings] (Here) or [Auto envelope detection sett.] (Here).
When not using the automatic paper type detection, manually specify the paper type. For details, refer to Here.
When the screen of copy mode is displayed on this machine, refer to Here.
Transparencies can only be printed in black. When the color function is other than black and [Transparency] is selected, check the displayed message, and tap [Yes].
Loading envelopes
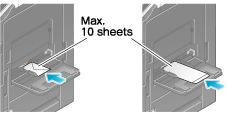
Up to 10 envelopes can be loaded into the tray.
Image of a long envelope
Image of a Western-style envelope
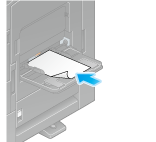
Position the flap part face up, and load envelopes as shown in the figure.
Insert envelopes into the tray until their edges are pressed against the back.
The flap side of envelopes cannot be printed on.
When loading envelopes into the Bypass Tray, note the following points.
When loading envelopes, remove air from them, and securely press along the flap fold line. Otherwise, it will result in an envelope wrinkle or paper jam.

Do not use envelopes that have glue or release paper on the flap or the part covered by the flap on the body. Otherwise, the machine may be damaged or a failure may occur.
Slide the Lateral Guide to fit the size of the loaded paper.
When using the Bypass Tray, note the following points.
Do not put spare envelopes into the Bypass Tray. Doing so causes a size detection error.
When the screen of copy mode is displayed on this machine, the screen for selecting the paper type and paper size appears.
If necessary, change the paper setting of the tray on the Paper Setting screen.
Various sizes of envelopes are available. Specify the correct paper size for the envelopes you have loaded. For details, refer to Here.
The paper type is detected automatically. Intelligent media sensor (mounted in the standard) is required to use this function. For details on Intelligent media sensor, refer to Here.
To disable the automatic paper type detection, set [Paper type auto detection settings] or [Auto envelope detection sett.] to OFF. For details, refer to [Paper type auto detection settings] (Here) or [Auto envelope detection sett.] (Here).
When not using the automatic paper type detection, manually specify the paper type. For details, refer to Here.
When the screen of copy mode is displayed on this machine, refer to Here.
When loading envelopes with flaps opened, also select the standard size that matches them. You do not have to measure the size of the envelope with the flap opened to set the size as a custom-sized envelope.
Loading label sheets
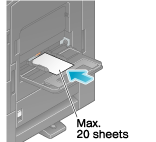
A label sheet consists of the printing surface (print side), sticking layer, and pasteboard (template). Peel off the pasteboard, then you can stick the label to other objects. Up to 20 label sheets can be loaded into the tray.
With the print side facing down, load label sheets in the direction as shown in the figure.
Insert label sheets into the tray until their edges are pressed against the back.
Slide the Lateral Guide to fit the size of the loaded paper.
When the screen of copy mode is displayed on this machine, the screen for selecting the paper type and paper size appears.
If necessary, change the paper setting of the tray on the Paper Setting screen.
The paper type is detected automatically. Intelligent media sensor (mounted in the standard) is required to use this function. For details on Intelligent media sensor, refer to Here.
To disable the automatic paper type detection, set [Paper type auto detection settings] or [Auto envelope detection sett.] to OFF. For details, refer to [Paper type auto detection settings] (Here) or [Auto envelope detection sett.] (Here).
When not using the automatic paper type detection, manually specify the paper type. For details, refer to Here.
When the screen of copy mode is displayed on this machine, refer to Here.
Loading index papers
Up to 20 index papers can be loaded into the tray.
With the print side facing down, align the tab side to the opposite side of this machine.
Insert index papers into the tray until their edges are pressed against the back.
Slide the Lateral Guide to fit the size of the loaded paper.

When the screen of copy mode is displayed on this machine, the screen for selecting the paper type and paper size appears.
Change tray paper settings on the Paper Settings screen.
Select [Index Paper] in [Paper Type]. For details, refer to Here.
When the screen of copy mode is displayed on this machine, refer to Here.
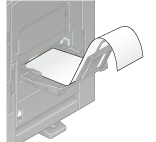
Loading banner papers
This machine prints data stored in a computer on paper that is up to 47-1/4 inches (1200 mm) in length. Up to 10 banner sheets can be loaded into the Bypass Tray.
Install the Banner Paper Loading Guide into the Bypass Tray.

Set the Guide of the Banner Paper Loading Guide.
Load paper into the tray with the print side facing down.
Insert paper into the tray until their edges are pressed against the back.
Slide the Lateral Guide to fit the size of the loaded paper.
