
Specifying a Destination
Directly entering the destination
Tapping the Direct Input tab ( ) displays the fax number entry screen. Directly enter destination information.
Enter the fax number of the destination.
[Tone] or [*]: Enter the fax number when issuing a push signal in dial-up line mode (while [Dialing Method] is set to [10pps] or [20pps]) ([T] is displayed).
[Pause]: Enter this when you want to insert a wait time between dials ([P] is displayed).
[-]: Enter this to separate a dial number. It does not affect the dialing of the number.
[Outside]: Insert an outside line number ([E-] is displayed) when connecting this machine to PBX (private branch exchange). This option is displayed when [PBX Connection Setting] (Here) is set.

Tap [OK] or [Next Dest.].

Using Address Book
Selecting the Destination tab ( ) displays a list of destinations registered on this machine. Switch the display using an index, and specify the target destination. For details, refer to Here.

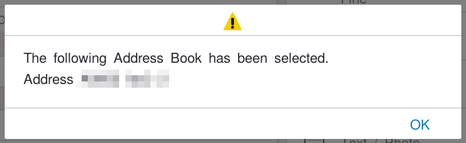
Setting [Address Selection Confirmation Display] (Here) to ON enables you to display the screen to confirm the registered contents of the selected destination. When permitting the specification of multiple destinations, it is recommended you to display and confirm the registered contents to prevent a transmission failure.
Searching for the registered destination
Tapping the Search tab ( ) displays the destination search screen. If a large number of destinations are registered, the system searches for the registered name of the destination or characters of the address to find the target destination. For details, refer to Here.
Specifying the target from the destinations registered in the LDAP server (LDAP Search)
Tapping the Search tab () displays the destination search screen. If the LDAP server or the Active Directory of Windows Server is used for user management, you can search for destination information registered in the server and specify the desired destination. For details, refer to Here.
Using Job History
Tapping the History tab ( ) displays a list of transmission logs. Specify the target destination from the previous five job histories. For details, refer to Here.