Post Inserter operations
Keys on Control Panel
When the Post Inserter PI-507 is installed on the Finisher FS-537, you can manually operate the Finisher FS-537 using the Post Inserter Control Panel.

No. | Name | Description |
|---|---|---|
1 | Corner Staple Lamp | Indicates that the corner staple is selected. |
2 | Center Staple & Fold Lamp | Indicates that Center Staple is selected. |
3 | Finishing | Press this key to select finishing. |
4 | 2-Hole Lamp | Indicates that 2-Hole is selected. |
5 | 3-Hole Lamp | Indicates that 3-Hole is selected. |
6 | Select punch | Press this key to select the punch hole type. |
7 | Start/stop | Press this key to start post inserter operations. If you press this key during operation, this unit will stop. |
8 | 4-Hole Lamp | Indicates that 4-Hole is selected. |
9 | Tri-Fold Lamp | Indicates that Tri-Fold is selected. |
10 | 2 position staple lamp | Indicates that 2-position staple is selected. |
Using the Post Inserter for finishing
 Only the Lower Tray can be used as the paper tray. The Upper Tray is not available for use.
Load paper into the Lower Tray of the Post Inserter, then align the lateral guide with the paper size.
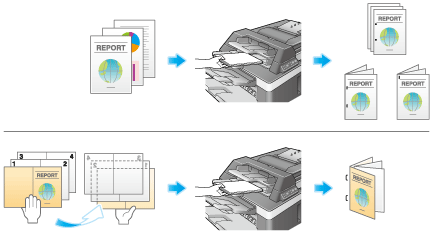
 Load the original by placing it so that its top side faces the back of the machine.To use the corner staple or 2-staple option, load the paper face up.To perform Punch, load the paper face up.To perform Bind, load the front side of the bound paper face down.To perform Tri-Fold, load the outside of the tri-folded paper face down.If the paper to be loaded is curled significantly, flatten the paper before loading it. Doing so may cause a paper jam or damage to the machine.To reuse paper that has been folded once, firmly flatten any creases before loading it. If paper remains creased, it may cause a folding-position misalignment or paper jam, or damage to the machine.
Press the Finishing key and Select punch key, and select the desired finishing.
To configure Finishing settings, press the Finishing key to turn the LED on. To configure punch settings, press the Select punch key to turn the LED on.Punch settings are available together with the corner staple or 2-staple option.Press the Start/stop key.
If the Start/stop key is pressed during operation, the operation will be stopped.