Operations Required to Use Fax Functions
Checking the modular cable connection
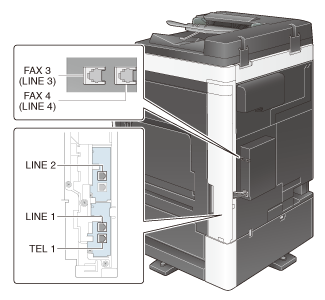
Check that a modular cable is connected between the LINE port and the appropriate telephone line. Use LINE port 1 if only one line is operating.
 Tips
Tips The illustration shows a unit with optional Fax Kit FK-514, FAX Kit FK-515, and Fax Mount Kit MK-742 installed. FAX3 (LINE port 3) and FAX4 (LINE port 4) can be used on North America models because these models support FAX Kit FK-515 and Fax Mount Kit MK-742.
 If multiple lines are used, modular cables are required according to the number of lines to be used.
 Use the TEL port for connecting a telephone cord. Even if multiple lines are used, connect a telephone cord to TEL port 1. A telephone cord cannot be connected to the TEL port on the additional line side.
Specifying the type of telephone line
Specify the type (dialing method) of telephone line to which this machine is to be connected. The dialing method must be correctly specified to ensure communications.
For details on how to configure the settings, refer to [Dialing Method] .
Making preparations for using the machine in a Private Branch Exchange (PBX) environment
When you use this machine in a PBX environment, register an outside line number.
For details on how to configure the settings, refer to [PBX Connection Setting] .
Selecting a receiving method
Methods of receiving faxes include the following: This machine receives faxes automatically, and the user receives faxes manually. Set the receiving method to your environment.
 It is helpful to set this machine to automatically receive faxes if the line is dedicated for faxing. For details, refer to [Receiving Faxes Automatically (Using the Machine Solely for Fax Operations)] .
 When you are connecting a telephone to this machine and share the line for the telephone and fax, we recommend that you use the following functions depending on how your telephone is used.
 If you are using this machine mostly as a phone and if you always prefer to receive faxes manually, it is convenient to have the Manual RX settings configured beforehand. For details, refer to [Manual Reception] .
Registering Header Position
Register the name of this machine and the company name (sender name) as well as the fax number of the machine.
The information you registered is added to faxes to be sent and output to faxes as a sender record when being printed on receiving machines.
For details on how to register, refer to [Header Information] .
Setting the date and time for the machine
Set the date and time in this machine to have them printed on sent and received faxes. The date and time you set will be the reference time for the Timer TX that enables communication at a preset time.
For details on how to configure the settings, refer to [Date/Time Settings] .
 Reference
 If an NTP (Network Time Protocol) is used to set the time, the date and time on this machine can be automatically adjusted. How to configure the setting is explained using Web Connection. For details, refer to [Automatically configuring settings using NTP] .