Papier in die Stapelanlage/den Spezialeinzug einlegen
How to load paper into the Bypass Tray
When selecting a paper size other than for paper trays or printing on envelopes or transparencies, use the Bypass Tray.
To use the Bypass Tray, load paper and specify the paper type.
Do not load the following paper into the Bypass Tray. Doing so may cause a paper jam or damage to the machine.
Folded, torn or creased paper, or bundles of sheets of different sizes

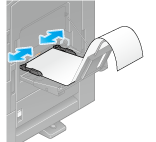
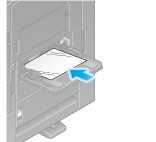
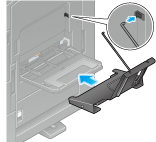
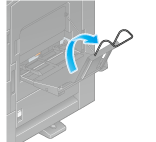
Open the Bypass Tray.
To load large-sized paper, pull out the Tray Extension.

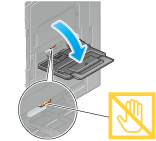
Be careful not to touch the surface of the Paper Feed Rollers with your hand.
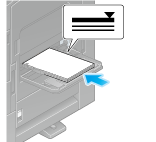
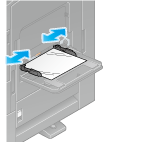
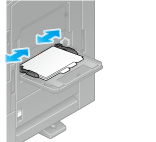
Load paper into the tray with the print side facing down.
Insert paper into the tray until their edges are pressed against the back.
For details on the available paper sizes, refer to Hier.
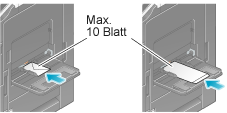
Do not load an excessive number of sheets such that the top of the stack is higher than the
 mark.
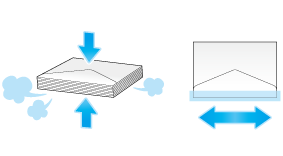
mark.If paper is curled, flatten it before loading it.
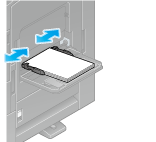
Slide the Lateral Guide to fit the size of the loaded paper.
When you change the paper type or change to custom size paper, proceed to step 4 to change the setting on this machine.
When you do not change the paper type or change to custom size paper when adding paper, you can use the current setting without making any changes.If necessary, change the paper setting of the tray on the Paper Setting screen.
The paper type is detected automatically. Intelligent media sensor (mounted in the standard) is required to use this function. For details on Intelligent media sensor, refer to Hier.
To disable the automatic paper type detection, set [Paper type auto detection settings] or [Auto envelope detection sett.] to OFF. For details, refer to [Paper type auto detection settings] (Hier) or [Auto envelope detection sett.] (Hier).
When not using the automatic paper type detection, manually specify the paper type. For details, refer to Hier.
When loading custom sized paper, change the paper type setting. For details, refer to Hier.
Einlegen von Postkarten
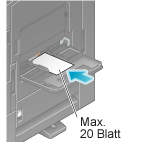
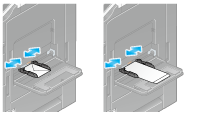
Maximal 20 Postkarten können in das Fach eingelegt werden. Das folgende Beispiel zeigt, wie eine Postkarte im Format 4 6 (A6 Karte) eingelegt werden muss.
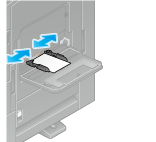
Legen Sie Postkarten wie abgebildet mit der zu bedruckenden Seite nach unten mit der Ausrichtung ein.
Legen Sie Postkarten so weit in das Fach ein, bis die Kanten an der Rückseite anliegen.
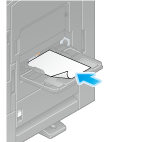
Beachten Sie beim Einlegen von Postkarten in die Stapelanlage/den Spezialeinzug die folgenden Punkte.
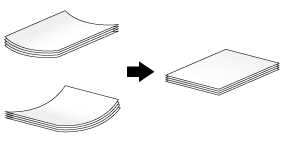
Streichen Sie wellige Postkarten vor dem Einlegen glatt, so wie in der Abbildung gezeigt.
Schieben Sie die seitliche Führung an die Position, die dem Format des eingelegten Papiers entspricht.
Beachten Sie bei Verwendung der Stapelanlage/des Spezialeinzugs die folgenden Punkte.
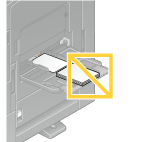
Legen Sie keine Ersatzpostkarten in die Stapelanlage/den Spezialeinzug ein. Andernfalls kann ein Fehler bei der Formaterkennung auftreten.
Wenn der Bildschirm des Kopiermodus auf diesem System angezeigt wird, wird der Bildschirm für die Auswahl des Papiertyps und des Papierformats eingeblendet.
Ändern Sie die Papiereinstellungen für Fächer im Papiereinstellungsbildschirm.
Wählen Sie die Postkartengröße aus den Optionen [Umschlag/4 6] ([Umschlag/A6-Karte]) unter [Papierformat] aus. Ausführliche Informationen finden Sie Hier.
Wenn das Postkartenformat unter [Papierformat] ausgewählt ist, wird der [Papiertyp] automatisch auf [Karton 3] eingestellt.
Wenn der Bildschirm des Kopiermodus auf diesem System angezeigt wird, siehe Hier.
Loading transparencies
Transparency is a transparent film to project an enlarged image on the screen.
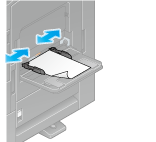
Up to 20 transparencies can be loaded into the tray.
With the print side facing down, load transparencies in the direction as shown in the figure.
Insert transparencies into the tray until their edges are pressed against the back.
Slide the Lateral Guide to fit the size of the loaded paper.
When the screen of copy mode is displayed on this machine, the screen for selecting the paper type and paper size appears.
If necessary, change the paper setting of the tray on the Paper Setting screen.
The paper type is detected automatically. Intelligent media sensor (mounted in the standard) is required to use this function. For details on Intelligent media sensor, refer to Hier.
To disable the automatic paper type detection, set [Paper type auto detection settings] or [Auto envelope detection sett.] to OFF. For details, refer to [Paper type auto detection settings] (Hier) or [Auto envelope detection sett.] (Hier).
When not using the automatic paper type detection, manually specify the paper type. For details, refer to Hier.
When the screen of copy mode is displayed on this machine, refer to Hier.
Transparencies can only be printed in black. When the color function is other than black and [Transparency] is selected, check the displayed message, and tap [Yes].
Loading envelopes
Up to 10 envelopes can be loaded into the tray.
Image of a long envelope
Image of a Western-style envelope
Position the flap part face up, and load envelopes as shown in the figure.
Insert envelopes into the tray until their edges are pressed against the back.
The flap side of envelopes cannot be printed on.
When loading envelopes into the Bypass Tray, note the following points.
When loading envelopes, remove air from them, and securely press along the flap fold line. Otherwise, it will result in an envelope wrinkle or paper jam.
Do not use envelopes that have glue or release paper on the flap or the part covered by the flap on the body. Otherwise, the machine may be damaged or a failure may occur.
Slide the Lateral Guide to fit the size of the loaded paper.
When using the Bypass Tray, note the following points.
Do not put spare envelopes into the Bypass Tray. Doing so causes a size detection error.

When the screen of copy mode is displayed on this machine, the screen for selecting the paper type and paper size appears.
If necessary, change the paper setting of the tray on the Paper Setting screen.
Various sizes of envelopes are available. Specify the correct paper size for the envelopes you have loaded. For details, refer to Hier.
The paper type is detected automatically. Intelligent media sensor (mounted in the standard) is required to use this function. For details on Intelligent media sensor, refer to Hier.
To disable the automatic paper type detection, set [Paper type auto detection settings] or [Auto envelope detection sett.] to OFF. For details, refer to [Paper type auto detection settings] (Hier) or [Auto envelope detection sett.] (Hier).
When not using the automatic paper type detection, manually specify the paper type. For details, refer to Hier.
When the screen of copy mode is displayed on this machine, refer to Hier.
When loading envelopes with flaps opened, also select the standard size that matches them. You do not have to measure the size of the envelope with the flap opened to set the size as a custom-sized envelope.
Loading label sheets
A label sheet consists of the printing surface (print side), sticking layer, and pasteboard (template). Peel off the pasteboard, then you can stick the label to other objects. Up to 20 label sheets can be loaded into the tray.
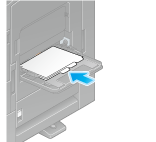
With the print side facing down, load label sheets in the direction as shown in the figure.
Insert label sheets into the tray until their edges are pressed against the back.
Slide the Lateral Guide to fit the size of the loaded paper.
When the screen of copy mode is displayed on this machine, the screen for selecting the paper type and paper size appears.
If necessary, change the paper setting of the tray on the Paper Setting screen.
The paper type is detected automatically. Intelligent media sensor (mounted in the standard) is required to use this function. For details on Intelligent media sensor, refer to Hier.
To disable the automatic paper type detection, set [Paper type auto detection settings] or [Auto envelope detection sett.] to OFF. For details, refer to [Paper type auto detection settings] (Hier) or [Auto envelope detection sett.] (Hier).
When not using the automatic paper type detection, manually specify the paper type. For details, refer to Hier.
When the screen of copy mode is displayed on this machine, refer to Hier.
Indexpapier einlegen
Maximal 20 Seiten Indexpapier können in das Fach eingelegt werden.
Legen Sie das Papier mit der zu bedruckenden Seite nach unten ein und richten Sie die Registerseite an der gegenüber liegenden Seite des Systems aus.
Legen Sie Indexblätter so weit in das Fach ein, bis die Kanten an der Rückseite anliegen.
Schieben Sie die seitliche Führung an die Position, die dem Format des eingelegten Papiers entspricht.
Wenn der Bildschirm des Kopiermodus auf diesem System angezeigt wird, wird der Bildschirm für die Auswahl des Papiertyps und des Papierformats eingeblendet.
Ändern Sie die Papiereinstellungen für Fächer im Papiereinstellungsbildschirm.
Wählen Sie [Registerpapier] unter [Papiertyp]. Ausführliche Informationen finden Sie Hier.
Wenn der Bildschirm des Kopiermodus auf diesem System angezeigt wird, siehe Hier.
Bannerpapier einlegen
Mit diesem System können auf einem Computer gespeicherte Daten auf Papier mit einer Länge von maximal 47-1/4 Zoll (1200 mm) gedruckt werden. Maximal 10 Bannerseiten können in die Stapelanlage/den Spezialeinzug eingelegt werden.
Installieren Sie die Bannerpapier-Einlegeführung in der Stapelanlage/dem Spezialeinzug.
Stellen Sie die Führung der Bannerpapier-Einlegeführung ein.
Legen Sie das Papier mit der zu bedruckenden Seite nach unten in das Fach ein.
Legen Sie das Papier so weit in das Fach ein, bis die Kanten an der Rückseite anliegen.

Schieben Sie die seitliche Führung an die Position, die dem Format des eingelegten Papiers entspricht.