
Printing at the Same Time as Authentication (ID & Print)
ID & Print
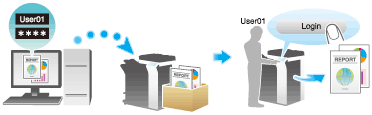
The ID & Print function saves print data in a box on this machine in an environment where user authentication is employed. Because the data is not printed within a short time period, this function prevents printed materials from being missing or left unattended.
Since you need to be authenticated in this machine to print the data saved in the box, this function is suitable for safely printing highly confidential documents. When you are successfully authenticated, the print data of the login user is automatically printed. This enhances security as well as ensures smooth operation.

How to print from the computer
A single job allows you to print out a document of up to 2999 pages in length.
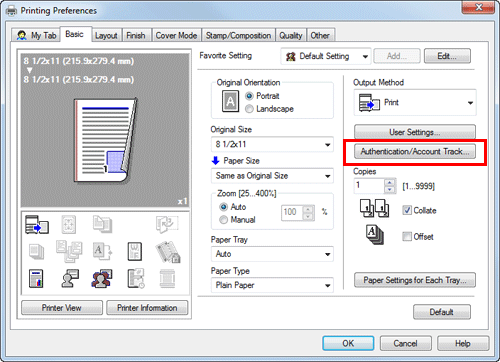
In the [Basic] tab, click [Authentication/Account Track...].
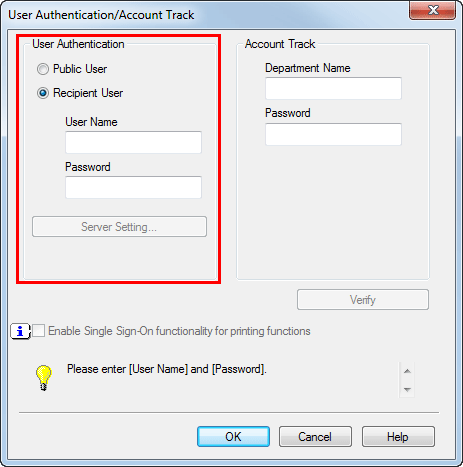
Enter the authentication information, and click [OK].
For details, refer to Here.
In [Output Method], select [ID&Print].

Execute printing.
The data is saved in the ID & Print User Box. Continue to "Operations on this machine".
You can issue a print instruction from the Control Panel before print data scanning on this machine is completed. However, printing is executed after print data scanning on this machine has been completed.
Operations on this machine
Tap the [User Name] field or keyboard icon, and enter the user name and password.
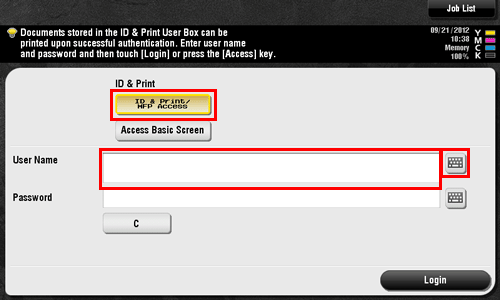
Check that [ID & Print/MFP Access] is selected in [ID & Print], and tap [Login].
When you are successfully authenticated, all data items saved in the ID & Print User Box are printed.
After data has been printed, do not log in to the machine.
When you select [Access Basic Screen] in [ID & Print], you can log in without starting printing.
You can change the default value for [ID & Print] (Default: [ID & Print/MFP Access]) if necessary. For details, refer to Here.

To print a particular data item in the ID & Print User Box, open the ID & Print User Box and select the data item. For details on how to print, refer to Here.
Operations on this machine (when an Authentication Unit is used)
When an optional Authentication Unit (biometric type) or Authentication Unit (IC card type) is used, you can execute printing just by touching the authentication unit with your finger or IC card.
You may be required to enter the user name and password before touching the unit with your finger or IC card due to the authentication settings. Tap the [User Name] or [Password] field or keyboard icon, and enter the user name or password.
Check that [Authentication Device] is selected in [Authentication Method].
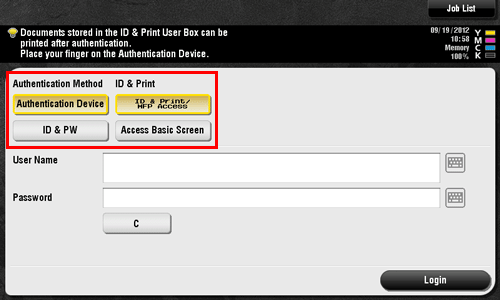
Check that [ID & Print/MFP Access] is selected in [ID & Print], and touch the Authentication Unit with your finger or IC card.
When you are successfully authenticated, all data items saved in the ID & Print User Box are printed.
After data has been printed, do not log in to the machine.
When you select [Access Basic Screen] in [ID & Print], you can log in without starting printing.
You can change the default value for [ID & Print] (Default: [Print & Access Basic Screen]) if necessary. For details, refer to Here.