Viewing Current Job or Job History
Displaying the Job screen
A job refers to an individual operation unit such as printing, sending, receiving, or saving.
Tap [Job List] on the main menu or on the main screen of each mode to view current job or job history, or to print a sending-receiving result report.
Viewing Current Jobs
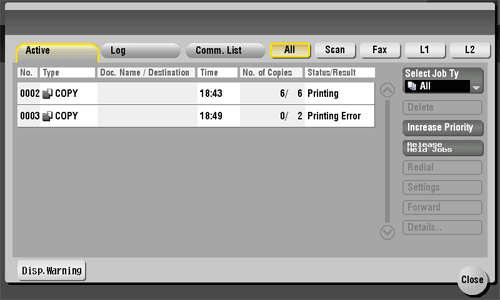
Tap the [In Progress] button to display current or standby jobs on this machine. As necessary, you can reorder print jobs or delete a standby job.
| Item | Description |
|---|---|
[All], [Scan], [Fax], [L1], [L2] | Used to filter jobs to be displayed in the list based on the following conditions.
|
[Select Job Ty] | Used to filter jobs to be displayed in the list based on the job type such as a print job or send job. |
[Delete] | Press this button to delete a job selected in the list. |
[Increase Priority] (Print Job) | Press this button to change the printing priority when print jobs are queued. Select a job to be printed first in the list of queued print jobs, then tap [Start].
|
[Release Held Jobs] (Print Job) | Press this button to configure the proof print function and display a list of executed print jobs using the printer driver. When printing, select a desired print job, then tap [Start]. If necessary, you can change print settings or delete a job.
|
[Redial] | Press this button to manually send a redial waiting fax you select from the list. A redial waiting fax is sent automatically by the auto redial function after the specified time lapsed; however, you can manually start sending without waiting for automatic sending. |
[Settings] | Press this button to view the setting of a job selected in the list. |
[Forward] | Press this button to forward a fax received by the in-memory proxy reception function to another destination. Select a destination in the address book or directly enter it, then tap [Start].
|
[Details..] | Press this button to view detailed information of a job selected in the list. |
[Disp. Warning] | Displays the warning screen for an error when you select a job in which the error occurs. |
Viewing the job history
Tap [Log] to display a list of jobs processed on this machine up till then. You can check a job that could not be ended due to an error.

| Item | Description |
|---|---|
[All], [Scan], [Fax], [L1], [L2] | Used to filter jobs to be displayed in the list based on the following conditions.
|
[Select Job Ty] | Used to filter jobs to be displayed in the list based on the job type such as a print job or send job. Jobs can be further filtered in combination with [Limitation Filter]. |
[Limitation Filter] | Used to filter jobs to be displayed in the list based on the selected conditions.
|
[Details..] | Press this button to view detailed information of a job selected in the list. |
Tips
- If user authentication is installed on this machine, change the authentication method and clear all management data; the job history is deleted.
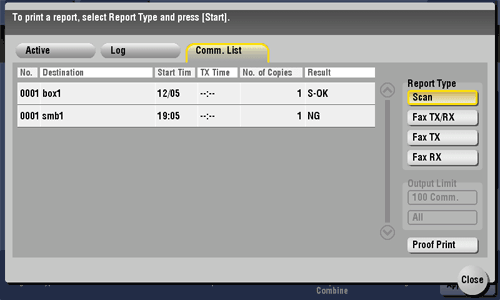
Printing a communication report
Tap [Comm. List] to print a fax report that contains the results of Scan, Fax TX, Fax RX, and fax communication (TX/RX) jobs. For a fax report, you can specify the number of destinations.
To print a fax report, select a target for [Report Type], tap [Proof Print], then press the Start key.