
Configuring the Internet Fax Environment
- Overview
- Configuring basic settings for sending and receiving an Internet fax
- Checking a fax reception
- Specifying the reception ability of this machine
- Configuring default compression type setting for transmission in black and white
- Configuring default compression type setting for transmission in color
- Using SSL/TLS communication
- Using the SMTP authentication
- Using the POP Before SMTP Authentication
Overview
Internet Fax is a function used to send and receive faxes via enterprise network and Internet. Internet fax is sent or received via E-mail. The same network as computer network is used for fax transmission. Therefore, you can send and receive faxes without having to worry about high communication costs to distant locations or to send a large number of pages.
Since this machine supports SSL/TLS encryption, and POP before SMTP authentication, security can be assured.
When the LDAP server or Active Directory is used for user management, you can search for or specify E-mail address from the server.
When using Internet Fax, follow the below procedure to configure the settings.
- These items must be configured by your service representative in advance. For details, contact your service representative.
- Configure settings for connecting to the network such as the IP address of this machine
- For details on configuring the setting, refer to Here.
- Configure basic settings for sending and receiving an Internet fax
- For details on configuring the setting, refer to Here.
- Set the following options according to your environment
Purpose Reference Check of a fax receptionChange of the reception capability of this machine that is notified to a peerChange of default compression type setting for transmission in black and whiteChange of default compression type setting for transmission in colorCommunicate with the E-mail server using SSL/TLSUse of SMTP Authentication when sending E-mailsUse of POP Before SMTP Authentication when sending E-mailsSearch for an E-mail address using the LDAP server or Active Directory
Configuring basic settings for sending and receiving an Internet fax
Enable the Internet fax function. In addition, specify the information of this machine and settings required to send and receive E-mail.
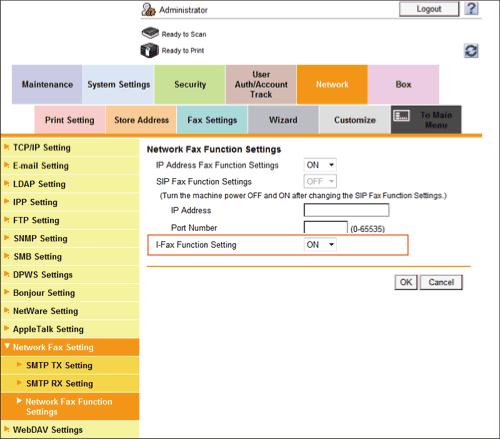
- In the administrator mode, select [Network] - [Network Fax Setting] - [Network Fax Function Settings], and then set [I-Fax Function Setting] to [ON] (Default: [OFF]).
- In the administrator mode, select [System Settings] - [Machine Setting], then configure the following settings.
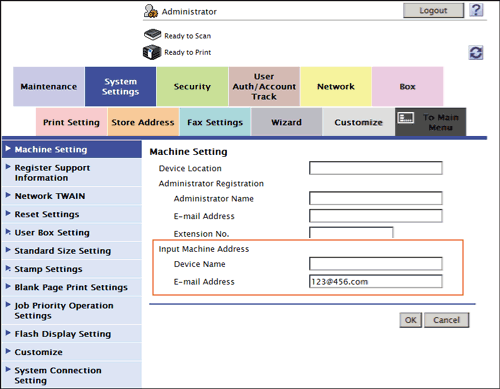
Settings Description [Device Name]Enter the name of this machine (using up to 80 characters, excluding spaces).The name set here is used as a part of the subject of Internet fax.[E-mail Address]Enter the E-mail address of this machine (using up to 320 characters).This E-mail address is used as sender Internet fax address. - In the administrator mode, select [Fax Settings] - [Header Information], then configure the following settings.
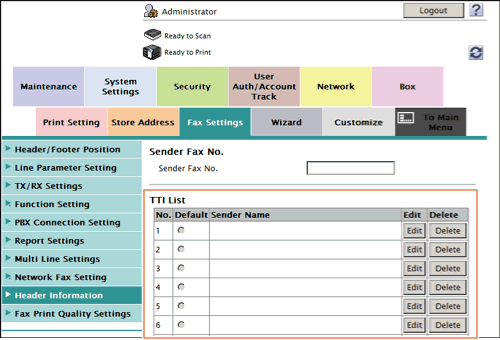
Settings Description [Line 1], [Line 2]Select the default setting for the sender name.The sender name, which is specified by default, is automatically added when a fax is sent.[Sender Name]Displays registered sender names.[Edit]You can register up to 20 sender names.Use this option to use different sender names depending on the destination.[No.]Displays the registration number.[Sender Name]Enter a sender name (using up to 30 characters).[Delete]Click this button to delete the registered sender name. - In the administrator mode, select [Network] - [E-mail Setting] - [E-mail TX (SMTP)], and configure the following settings.
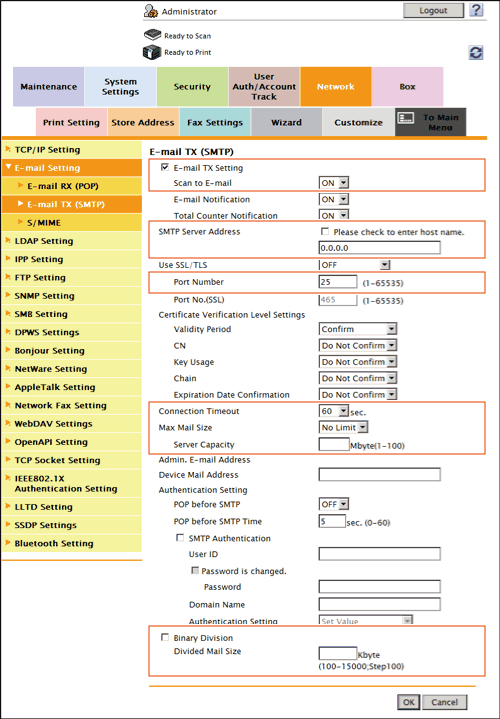
Settings Description [E-mail TX Setting]Select this option to use the Internet fax function.[ON] (selected) is specified by default.[Scan to E-mail]Select [ON] to use Internet fax.[ON] is specified by default.[SMTP Server Address]Enter the address of your E-mail server (SMTP).Use one of the following formats.- Example of host name entry: "host.example.com"
- Example of IP address (IPv4) entry: "192.168.1.1"
- Example of IP address (IPv6) entry: "fe80::220:6bff:fe10:2f16"
[Port Number]If necessary, change the port number of the E-mail server (SMTP).Normally, you can use the original port number.[25] is specified by default.[Connection Timeout]Change the timeout period for a communication with the E-mail server (SMTP), as required.[60] sec. is specified by default.[Max Mail Size]If you restrict the size of an E-mail to be sent in your environment, select [Limit].[No Limit] is specified by default.[Server Capacity]If you select [Limit] at [Max Mail Size], enter the maximum E-mail size including attachment.E-mails exceeding the specified size are discarded.If you select [Binary Division] to divide an E-mail, this setting is invalid.[Binary Division]Select this check box to divide an E-mail. The E-mail is divided according to the size specified at [Divided Mail Size]. This item is necessary if you occasionally send E-mails exceeding the maximum size specified on the E-mail server side.To read a divided E-mail, the mail soft receiving E-mails must have a function to restore the divided E-mail. The mail soft without the restore function may not read the divided E-mail.[OFF] (not selected) is specified by default.[Divided Mail Size]Enter the size to divide an E-mail. This item is necessary when [Binary Division] is enabled. - In the administrator mode, select [Network] - [E-mail Setting] - [E-mail RX (POP)], and configure the following settings.
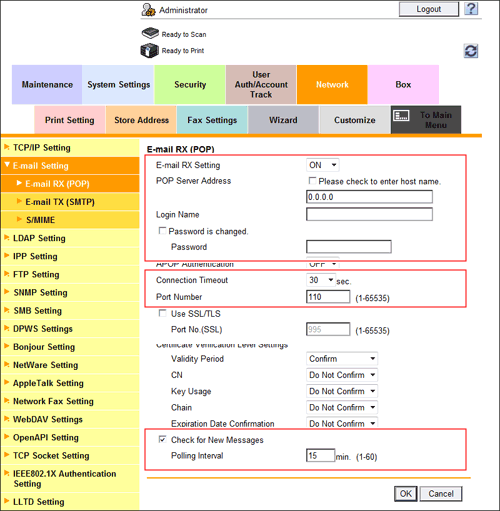
Settings Description [E-mail RX Setting]Select [ON] to use Internet fax.[ON] is specified by default.[POP Server Address]Enter the address of your E-mail server (POP).Use one of the following formats.- Example of host name entry: "host.example.com"
- Example of IP address (IPv4) entry: "192.168.1.1"
- Example of IP address (IPv6) entry: "fe80::220:6bff:fe10:2f16"
[Login Name]Enter the login name when receiving E-mails using the E-mail server (POP) (using up to 63 characters).[Password]Enter the password of the user name you entered into [Login Name] (using up to 15 characters).To enter (change) the password, select the [Password is changed.] check box, then enter a new password.[Connection Timeout]Change the timeout period for a communication with the E-mail server (POP) as required.[30] sec. is specified by default.[Port Number]If necessary, change the port number of the E-mail server (POP).Normally, you can use the original port number.[110] is specified by default.[Check for New Messages]Select this check box to check for incoming faxes by periodically connecting to the E-mail server (POP) on this machine. Also, enter an interval for connecting the E-mail server (POP) at [Polling Interval].[ON] (selected) is specified by default.
Checking a fax reception
Configure the settings for requesting or responding the Internet fax transmission result, and the setting regarding the exchange of capability information between machines.
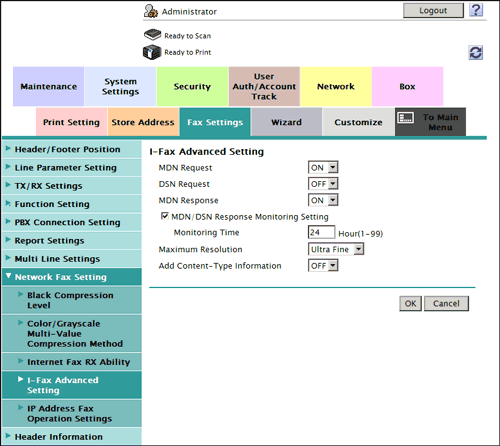
In the administrator mode, select [Fax Settings] - [Network Fax Setting] - [I-Fax Advanced Setting], then configure the following settings.
| Settings | Description |
|---|---|
[MDN Request] | Select whether to request for fax reception result (MDN request) to the destination. If a MDN request is sent, the recipient machine returns a response message upon reception of a fax, so that you can check that the fax is successfully received by the destination. Also, by receiving a response message from the destination, you can obtain the reception capability information of the destination. When new response message is received from a destination registered in the address book, the capability information is overwritten with new one. [ON] is specified by default. |
[DSN Request] | Select whether to request for fax reception result (DSN request) to the destination mail server. If you select [ON] for [MDN Request], priority is given to the MDN request. [OFF] is specified by default. |
[MDN Response] | Select whether to return a response message when a sender requests for fax reception result (MDN request). [ON] is specified by default. |
[MDN/DSN Response Monitoring Setting] | Select this check box to specify the waiting time for a response from the destination after a MDN request or DSN request is sent by this machine. If necessary, change the waiting time for a response from the destination at [Monitoring Time]. If a response message is received after the specified waiting time, the machine ignores the message. [24] hours is specified by default. |
[Maximum Resolution] | If necessary, switch the maximum resolution that this machine can support. [Ultra Fine] is specified by default. |
[Add Content-Type Information] | Select whether to add Content-Type information to an Internet fax when sending it. [OFF] is specified by default. |
Specifying the reception ability of this machine
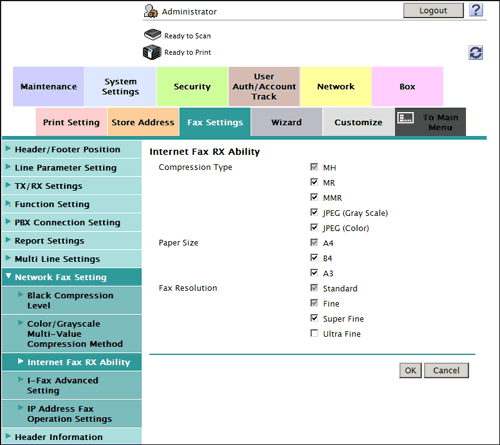
This machine notifies its reception capability when returning a MDN response. Change the contents that are notified upon return of an MDN response as necessary.
In the administrator mode, select [Fax Settings] - [Network Fax Setting] - [Internet Fax RX Ability], then configure the following settings.
| Settings | Description |
|---|---|
[Compression Type] | Select the check boxes of the compression types of a fax job the machine can receive. |
[Paper Size] | Select the check boxes of the paper sizes of a fax job the machine can receive. |
[Fax Resolution] | Select the check box of the resolution of a fax job the machine can receive. |
Configuring default compression type setting for transmission in black and white
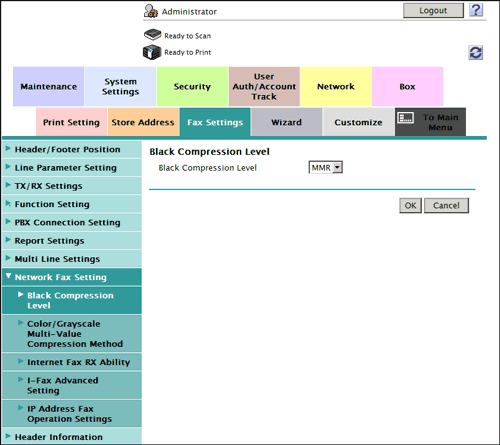
If necessary, change the default compression type setting when sending a fax in black and white.
In the administrator mode, select [Fax Settings] - [Network Fax Setting] - [Black Compression Level], then configure the following settings.
| Settings | Description |
|---|---|
[Black Compression Level] | Select the default compression type for transmission in black and white
[MMR] is specified by default. |
Configuring default compression type setting for transmission in color
If necessary, change the default compression type setting when sending a fax in full color or gray scale.
In the administrator mode, select [Fax Settings] - [Network Fax Setting] - [Color/Grayscale Multi-Value Compression Method], then configure the following settings.
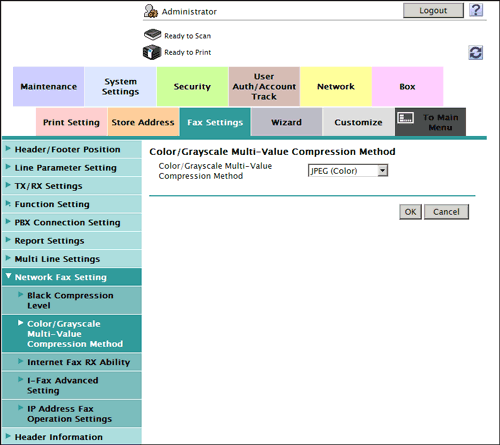
| Settings | Description |
|---|---|
[Color/Grayscale Multi-Value Compression Method] | Select the default compression type for transmission in full color or gray scale.
[JPEG (Color)] is specified by default. |
Using SSL/TLS communication
Encrypt communications between this machine and the E-mail server (SMTP) using SSL or TLS. This machine supports the SMTP over SSL and Start TLS.
Configure the setting if your environment requires SSL/TLS encryption communication with the E-mail server.
In the administrator mode, select [Network] - [E-mail Setting] - [E-mail TX (SMTP)], and configure the following settings.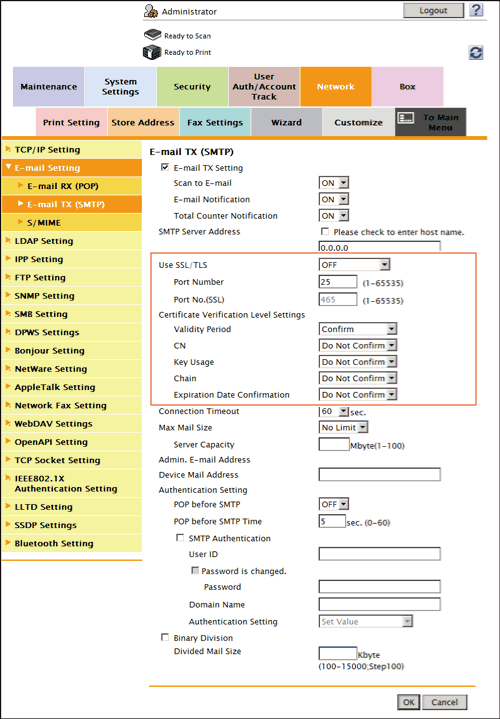
| Settings | Description | |
|---|---|---|
[Use SSL/TLS] | Select the method to encrypt communications with the E-mail server (SMTP). Select [SMTP over SSL] or [Start TLS] according to your environment. [OFF] is specified by default. | |
[Port Number] | If you select [Start TLS] at [Use SSL/TLS], change the communication port number, if necessary. Normally, you can use the original port number. [25] is specified by default. | |
[Port No.(SSL)] | If you select [SMTP over SSL] at [Use SSL/TLS], change the SSL communication port number, if necessary. Normally, you can use the original port number. [465] is specified by default. | |
[Certificate Verification Level Settings] | To verify the certificate, select items to be verified. If you select [Confirm] at each item, the certificate is verified for each item. | |
[Validity Period] | Confirm whether the certificate is still valid. [Confirm] is specified by default. | |
[CN] | Confirm whether CN (Common Name) of the certificate matches the server address. [Do Not Confirm] is specified by default. | |
[Key Usage] | Confirm whether the certificate is used according to the intended purpose approved by the certificate issuer. [Do Not Confirm] is specified by default. | |
[Chain] | Confirm whether there is a problem in the certificate chain (certificate path). The chain is validated by referencing the external certificates managed on this machine. [Do Not Confirm] is specified by default. | |
[Expiration Date Confirmation] | Confirm whether the certificate has expired. Confirm for expiration of the certificate in the following order.
[Do Not Confirm] is specified by default. | |
Reference
- In the administrator mode, select [Security] - [Certificate Verification Settings], then configure whether to verify the certificate. The certificate is verified by default. For details, refer to Here.
Using the SMTP authentication
Configure the setting if your environment requires the SMTP authentication for sending an E-mail.
If the SMTP authentication is used, the user ID and password is sent from this machine when sending an E-mail to perform authentication.
To use the SMTP authentication, enable the SMTP authentication on this machine. In addition, enter information required for authentication.
In the administrator mode, select [Network] - [E-mail Setting] - [E-mail TX (SMTP)], and configure the following settings.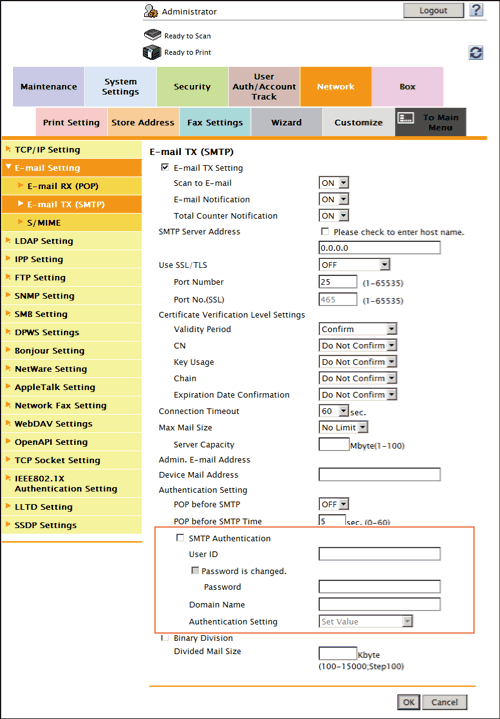
| Settings | Description |
|---|---|
[SMTP Authentication] | Select this check box to use the SMTP authentication. As the authentication method of SMTP authentication, the highest level method supported by your E-mail server (SMTP) is automatically selected from the following methods.
[OFF] (not selected) is specified by default. |
[User ID] | Enter the user ID for SMTP authentication (using up to 64 characters). |
[Password] | Enter the password of the user name you entered into [User ID] (using up to 64 characters, excluding "). To enter (change) the password, select the [Password is changed.] check box, then enter a new password. |
[Domain Name] | Enter the domain name (realm) for SMTP authentication (using up to 253 characters). This item is necessary when the SMTP authentication method is Digest-MD5.
|
[Authentication Setting] | Select whether to synchronize the SMTP authentication with the user authentication of this machine. This item is necessary when the user authentication is installed on this machine.
[Set Value] is specified by default. |
Using the POP Before SMTP Authentication
Configure the setting if your environment requires the POP Before SMTP Authentication for sending an E-mail.
The POP Before SMTP authentication is a function that performs POP authentication using the E-mail server (POP) before sending an E-mail and allows E-mail transmission only when the authentication is successful.
To use the POP Before SMTP authentication, enable the POP Before SMTP on this machine. In addition, configure settings for connecting to the E-mail server (POP) used for authentication.
- In the administrator mode, select [Network] - [E-mail Setting] - [E-mail TX (SMTP)], and configure the following settings.
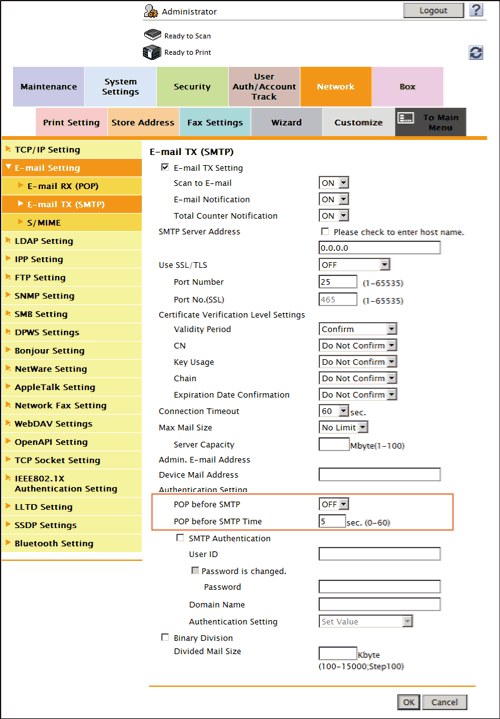
Settings Description [POP before SMTP]Select [ON] to use the POP Before SMTP.[OFF] is specified by default.[POP before SMTP Time]If necessary, change the waiting time until starting E-mail transmission after the POP authentication is successful.Depending on your environment, it may take time before the E-mail transmission is allowed after the POP authentication is successful. In that case, if a time period that is too short is specified, E-mail transmission may fail.[5] sec. is specified by default. - Set the POP over SSL and APOP settings according to your environment. In the administrator mode, select [Network] - [E-mail Setting] - [E-mail RX (POP)], and configure the following settings.
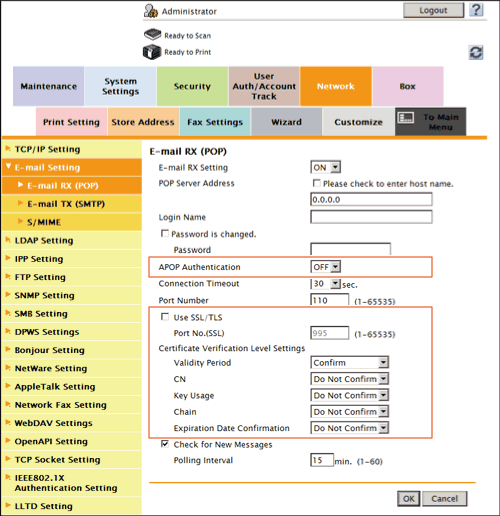
Settings Description [APOP Authentication]If you use APOP in your E-mail server (POP), select [ON].[OFF] is specified by default.[Use SSL/TLS]When using SSL to encrypt a communication with the E-mail server (POP), select this check box.[OFF] (not selected) is specified by default.[Port No.(SSL)]If necessary, change the SSL communication port number.Normally, you can use the original port number.[995] is specified by default.[Certificate Verification Level Settings]To verify the certificate, select items to be verified.If you select [Confirm] at each item, the certificate is verified for each item.[Validity Period]Confirm whether the certificate is still valid.[Confirm] is specified by default.[CN]Confirm whether CN (Common Name) of the certificate matches the server address.[Do Not Confirm] is specified by default.[Key Usage]Confirm whether the certificate is used according to the intended purpose approved by the certificate issuer.[Do Not Confirm] is specified by default.[Chain]Confirm whether there is a problem in the certificate chain (certificate path).The chain is validated by referencing the external certificates managed on this machine.[Do Not Confirm] is specified by default.[Expiration Date Confirmation]Confirm whether the certificate has expired.Confirm for expiration of the certificate in the following order.- OCSP (Online Certificate Status Protocol) service
- CRL (Certificate Revocation List)
[Do Not Confirm] is specified by default.
Reference
- In the administrator mode, select [Security] - [Certificate Verification Settings], then configure whether to verify the certificate. The certificate is verified by default. For details, refer to Here.