
Computer Side: Steps Required to Use This Function
When using Windows 7:
Carry out preparations to send original data scanned by this machine to your computer.
First, check the name of your computer and that of the login user.
- You need to have the administrator privileges to perform this task.
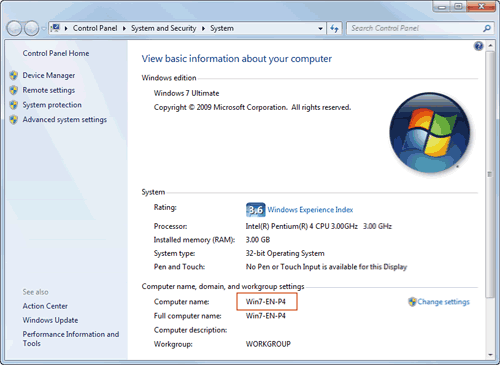
- From the Start menu, click [Computer] - [System Properties].
- Check [Computer name].
- The computer name is required to specify a destination. Write down the computer name.
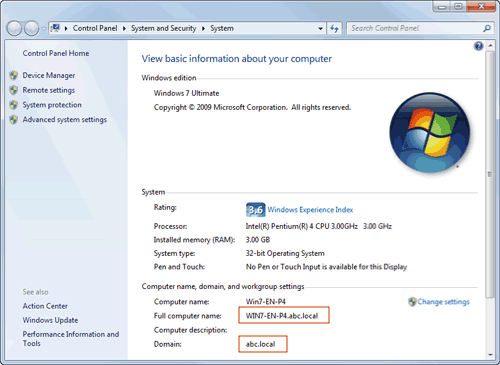
- For domain user, the domain name is required to specify a destination along with the user name. Write down the domain name.
Then, close the window.
- The computer name is required to specify a destination. Write down the computer name.
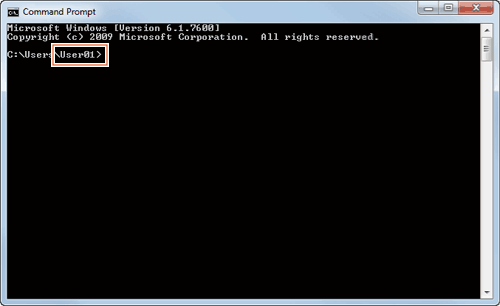
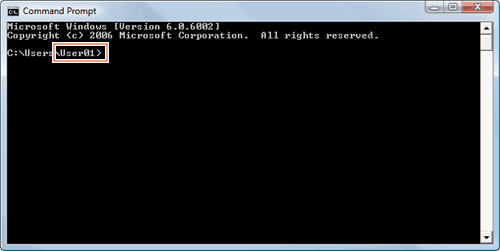
- From the Start menu, click [All Programs] - [Accessories] - [Command Prompt].
- Check the name of the user who logs in to the computer.
- The user name is required to configure folder sharing settings and specify destinations. Write down the user name.
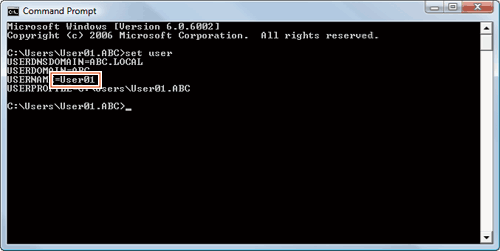
- For domain user, type in "set user", and check the user name.

Then, close the window.
Next, create a folder where to send the scanned original data, and start sharing.
- The user name is required to configure folder sharing settings and specify destinations. Write down the user name.
- From the Start menu, click [Control Panel] - [Network and Internet] - [Network and Sharing Center] - [Advanced sharing settings].
- In the [Change advanced sharing settings] screen, click [Turn on file and printer sharing].
Click [Save Changes], and close the window.
- Create a new folder in any place, and name it.
- The folder name is required to specify a destination. Write down the folder name.
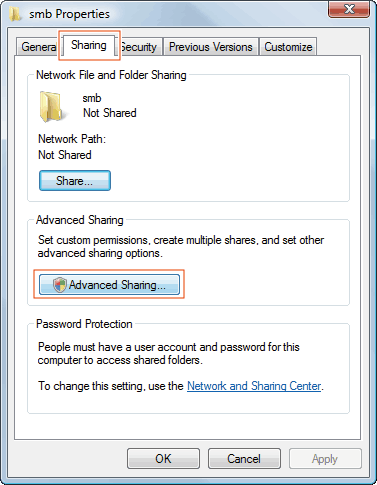
- Right-click on the folder, then click [Properties].
- Click the [Sharing] tab, and also click [Advanced Sharing].
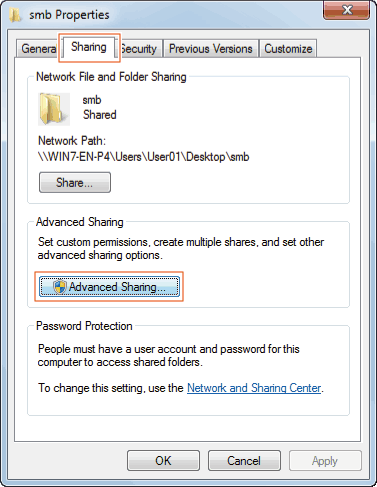
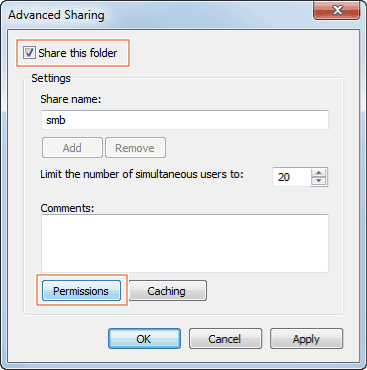
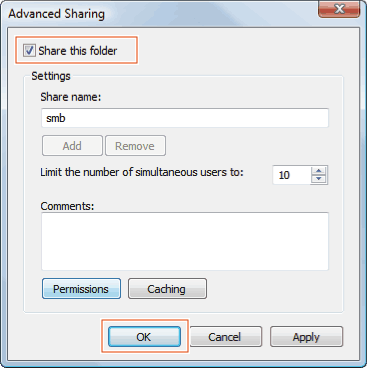
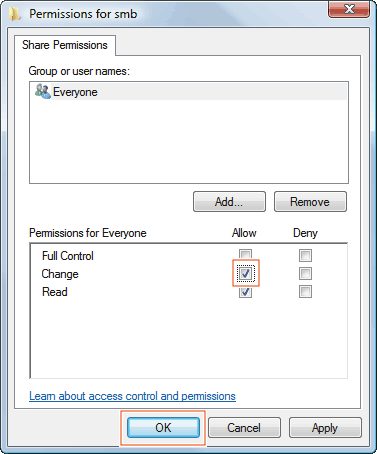
- Select the [Share this folder] check box, then click [Permissions].
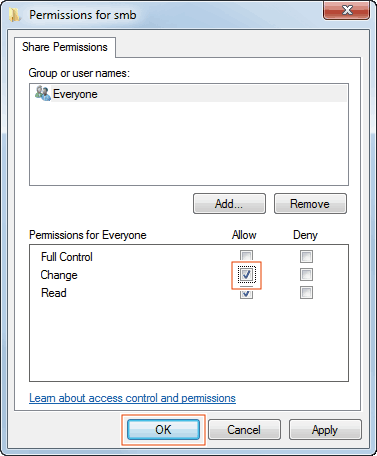
- In [Group or user names], click [Everyone].
- Select the check box to permit [Change], then click [OK].
- Click [OK] or [Close], and close each screen.
The settings on the computer are then completed. The computer, user, and folder names you wrote down in this procedure are required to specify a destination.
When using Windows Vista:
Carry out preparations to send original data scanned by this machine to your computer.
First, check the name of your computer and that of the login user.
- You need to have the administrator privileges to perform this task.
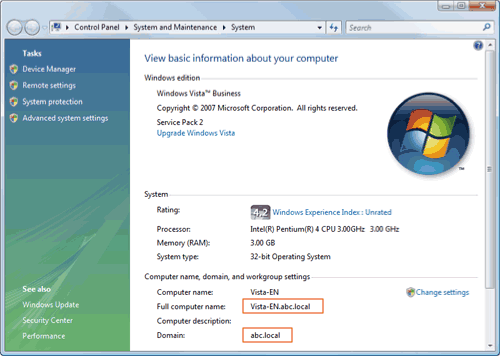
- From the Start menu, click [Computer] - [System properties].
- Check [Computer name].
- The computer name is required to specify a destination. Write down the computer name.
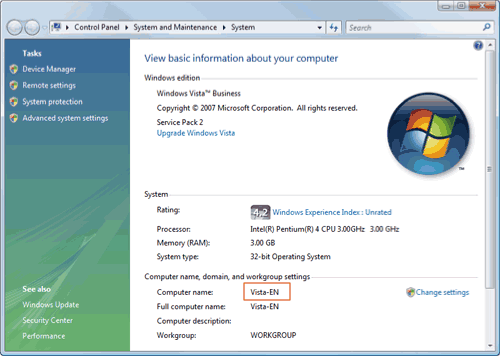
- For domain user, the domain name is required to specify a destination along with the user name. Write down the domain name.
Then, close the window.
- The computer name is required to specify a destination. Write down the computer name.
- From the Start menu, click [All Programs] - [Accessories] - [Command Prompt].
- Check the name of the user who logs in to the computer.
- The user name is required to configure folder sharing settings and specify destinations. Write down the user name.
- For domain user, type in "set user", and check the user name.
Then, close the window.
Next, create a folder where to send the scanned original data, and start sharing.
- The user name is required to configure folder sharing settings and specify destinations. Write down the user name.
- From the Start menu, click [Control Panel] - [Network and Internet] - [Network and Sharing Center].
- In [File sharing] of [Sharing and Discovery], click [Turn on file sharing].
Click [Save Changes], and close the window.
- Create a new folder in any place, and name it.
- The folder name is required to specify a destination. Write down the folder name.
- Right-click on the folder, then click [Properties].
- Click the [Sharing] tab, and also click [Advanced Sharing].
- If you see the screen for reconfirming the start of file sharing, click [Continue].
- Select the [Share this folder] check box, then click [Permissions].
- In [Group or user names], click [Everyone].
- Select the check box to permit [Change], then click [OK].
- Click [OK] or [Close], and close each screen.
The settings on the computer are then completed. The computer, user, and folder names you wrote down in this procedure are required to specify a destination.
When using Windows XP:
Carry out preparations to send original data scanned by this machine to your computer.
First, check the name of your computer and that of the login user.
- You need to have the administrator privileges to perform this task.
- From the Start menu, right-click [Computer], then click [Properties].
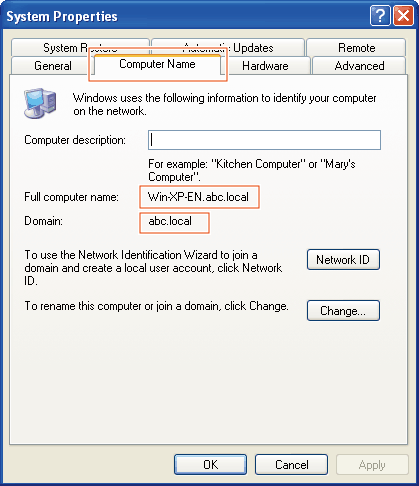
- Click the [Computer Name] tab, and check [Full computer name].
- The computer name is required to specify a destination. Write down the computer name.
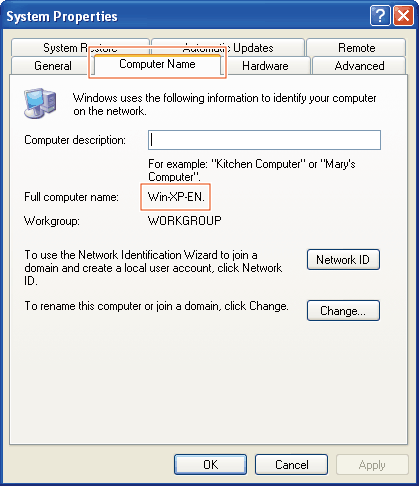
- For domain user, the domain name is required to specify a destination along with the user name. Write down the domain name.
Then, click [Cancel].
- The computer name is required to specify a destination. Write down the computer name.
- From the Start menu, click [All Programs] - [Accessories] - [Command Prompt].
- Check the name of the user who logs in to the computer.
- The user name is required to configure folder sharing settings and specify destinations. Write down the user name.
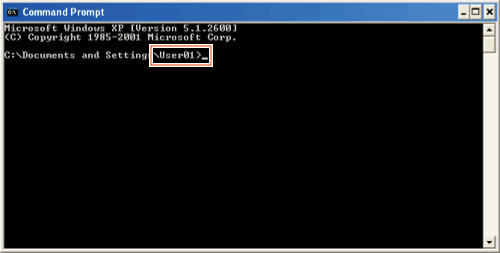
- For domain user, type in "set user", and check the user name.
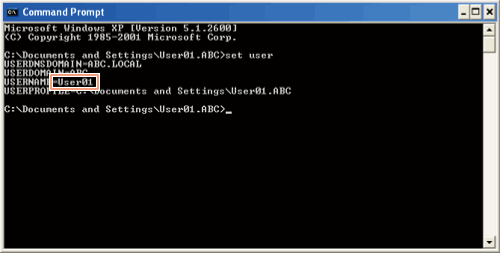
Then, close the window.
Next, create a folder where to send the scanned original data, and start sharing.
- The user name is required to configure folder sharing settings and specify destinations. Write down the user name.
- Create a new folder in any place, and name it.
- The folder name is required to specify a destination. Write down the folder name.
- Double-click the folder, and select [Tools] - [Folder Options...].
- Click the [View] tab, and clear the [Use simple file sharing (Recommended)] check box.
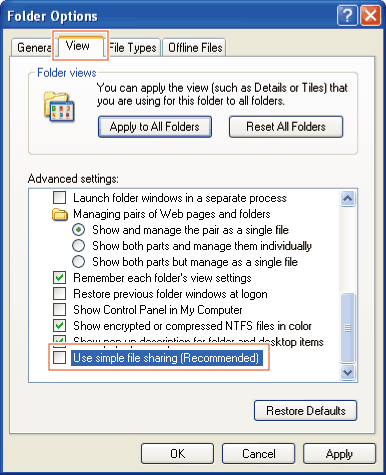
Click [OK], and close the window.
- Right-click on the closed folder, then click [Sharing and Security...].
- Select the [Share this folder] check box, then click [Permissions].
- Do not change [Share name].
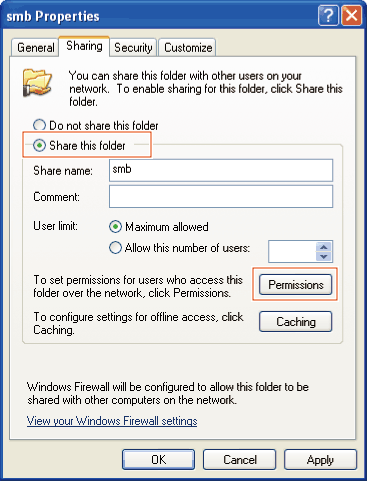
- Do not change [Share name].
- In [Group or user names], click [Everyone].
- Select the check box to permit [Change], then click [OK].
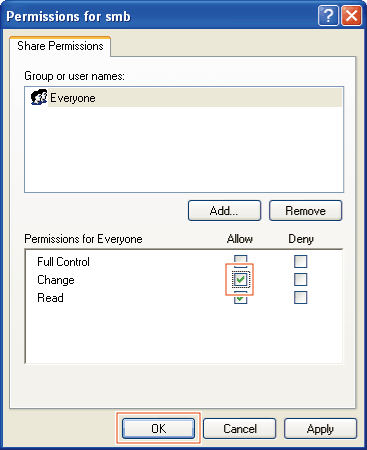
- Click [OK], and close the screen.
The settings on the computer are then completed. The computer, user, and folder names you wrote down in this procedure are required to specify a destination.
When using Mac OS X 10.7/10.6/10.5:
Carry out preparations to send original data scanned by this machine to your computer.
First, create a shared folder that is only to be used to receive scanned original data. Then, check the IP address and user name, and start sharing.
The following shows a procedure example for Mac OS X 10.6.
- You need to have the administrator privileges to perform this task.
- Create a new folder in any place, and name it.
- The folder name is required to specify a destination. Write down the folder name.
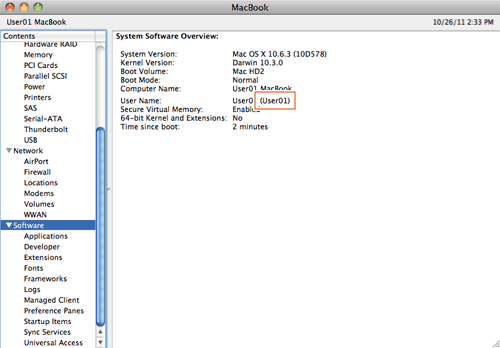
- Select [About This Mac] in the Apple menu.
The [About This Mac] screen appears.
- Click [More Info...].
- In Mac OS X 10.7, click [More Info...] then click [System Report...].
- Check the IP address and the name of the user who logs in to the computer.
- The IP address and user name are required to configure folder sharing settings and specify destinations. Write them both down.
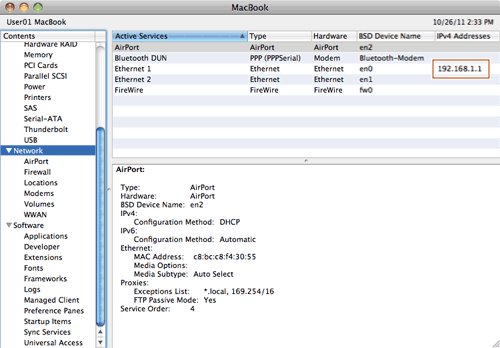
Then, close the window.
- The IP address and user name are required to configure folder sharing settings and specify destinations. Write them both down.
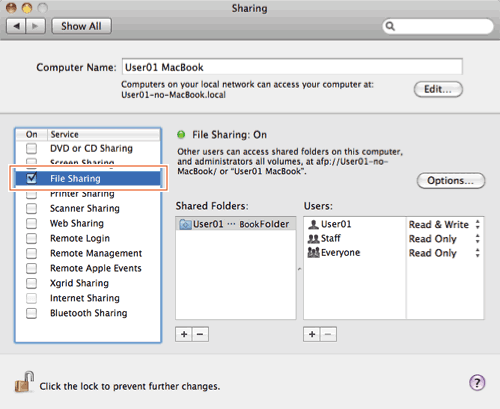
- Select [System Preferences...] in the Apple menu.
- In the [System Preferences...] screen, click [Sharing].
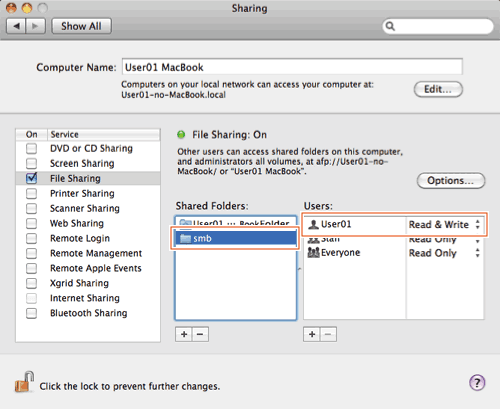
- Select the [File Sharing] check box.
- Click [Options], and select the [Share files and folders using SMB (Windows)]. Then, select the log-in user name (displayed name) check box.
- When [Authentication] screen appears, enter the password of the login user, then click [OK].
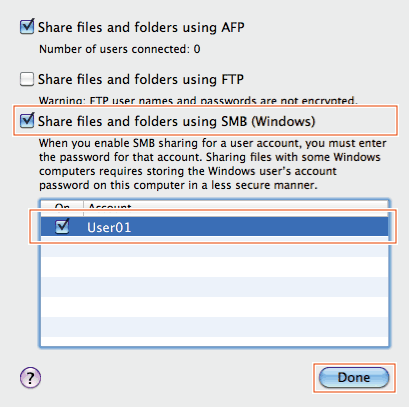
Click [Done], and close the window.
- When [Authentication] screen appears, enter the password of the login user, then click [OK].
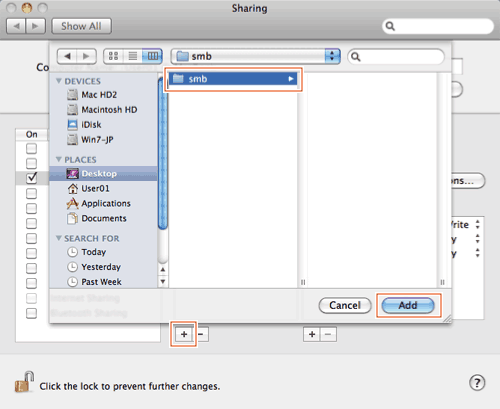
- Click [+]. On the displayed window, select the created folder, then click [Add].
- Check the user name and access rights of the created folder.
- Check that the user name you wrote down in Step 4 is displayed and the access rights are set to [Read & Write].
The settings on the computer are then completed. The IP address, user name, and folder name you wrote down in this procedure are required to specify a destination.
- Check that the user name you wrote down in Step 4 is displayed and the access rights are set to [Read & Write].