Using with an AppleTalk Connection
Operations required to use this function (For administrators)
Configure the AppleTalk operating environment.
For details on how to configure the settings, refer to Here.
In Mac OS X 10.4/10.5
In Mac OS X 10.4/10.5, use the following procedure to add a printer with an AppleTalk connection:
- Select [System Preferences] in the Apple menu.
- Click the [Network] icon.
- The Ethernet setting window appears.
- In Mac OS X 10.5, select [Ethernet], then click [Advanced...].
- In Mac OS X 10.4, select [Built-in Ethernet], then click [Configure...].
- Double-click the [AppleTalk] tab to enable AppleTalk.
- Click the close button at the top left corner of the window.
- When the [This service has unsaved changes] message appears, click [Apply].
Then, add the printer to the computer.
- Select [System Preferences] in the Apple menu.
- Click the [Print & Fax] icon.
- Click [+] on the [Print & Fax] window.
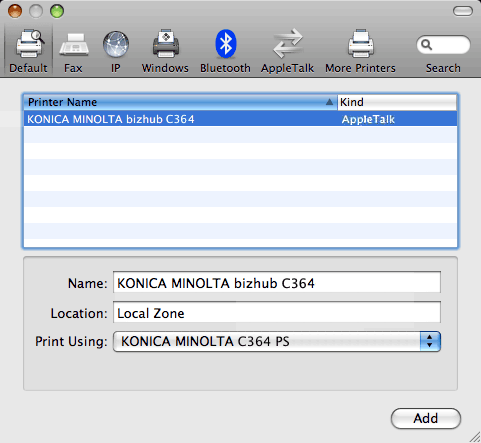
- Click [Default].
Connected printers are detected.
- If no printers are detected, restart this machine.
- From the [Printer Name] list, select the desired printer that is connected via AppleTalk.
- To check the printer name, select [Utility] - [Administrator Settings] - [Network Settings] - [AppleTalk Settings] on this machine.

The printer driver for the selected printer is displayed in [Print Using:].
- When the printer driver is displayed, go to Step 12.
- When the printer driver is not correctly displayed, go to Step 11.
- To check the printer name, select [Utility] - [Administrator Settings] - [Network Settings] - [AppleTalk Settings] on this machine.
- Manually select the printer driver.
- In Mac OS X 10.5, select [Select a driver to use...] in [Print Using:], then click the driver of the desired printer from the list.
- In Mac OS X 10.4, select [KONICA MINOLTA] in [Print Using:], and then click the driver of the desired printer from the list.
- Click [Add].
This completes the addition process of the printer. Then, proceed to the [Installable Options] window to configure the optional environment for this machine. For details, refer to Here.
In Mac OS X 10.2/10.3
In Mac OS X 10.2/10.3, use the following procedure to add a printer with an AppleTalk connection:
- Select [System Preferences] in the Apple menu.
- Click the [Network] icon.
- From [Show:], select [Built-in Ethernet].
- Click the [AppleTalk] tab, and select the [Make AppleTalk Active] check box.
- Click the close button at the top left corner of the window.
- When the [Apply configuration changes] message appears, click [Apply].
Then, add the printer to the computer.
- From [Macintosh HD] - [Applications] - [Utilities], double-click [Printer Setup Utility] or [Print Center] to open it.
- When the [You have no printers available.] window appears, click [Add]. When the printer list appears, click [Add].
- If available printers have already been specified, the [You have no printers available.] window does not appear.
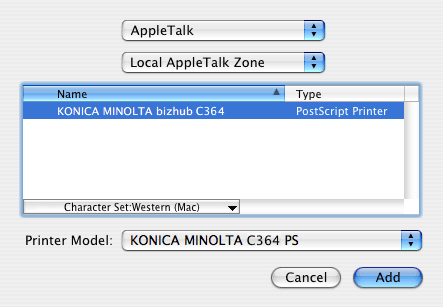
- Select [AppleTalk] for the connection method, then select the zone to which the machine is connected.
Connected printers are detected.
- If no printers are detected, restart this machine.
- From the [Name] list, select the desired printer.
- To check the printer name, select [Utility] - [Administrator Settings] - [Network Settings] - [AppleTalk Settings] on this machine.

- To check the printer name, select [Utility] - [Administrator Settings] - [Network Settings] - [AppleTalk Settings] on this machine.
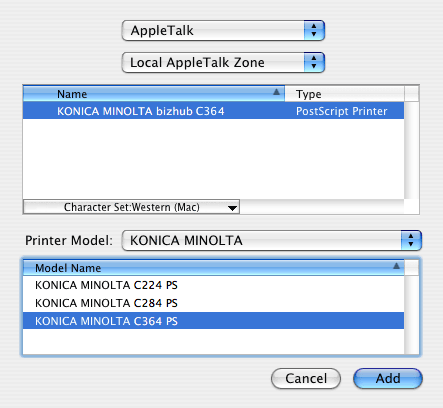
- Manually select the printer driver.
- In [Printer Model:], select [KONICA MINOLTA], then click the driver of the desired printer from the model list.

- In [Printer Model:], select [KONICA MINOLTA], then click the driver of the desired printer from the model list.
- Click [Add].
This completes the addition process of the printer. Then, proceed to the [Installable Options] window to configure the optional environment for this machine. For details, refer to Here.