
How to send
This section describes how to connect an Android terminal to this machine via Remote Access using the NFC function and perform Panel Link Scan.
When using NFC to connect an Android terminal to this machine using Remote Access, connect the Android terminal to this machine or the access point that can be connected to this machine in advance.
Set the destination in advance using Remote Access. For details on how to set the destination, refer to the help of Remote Access.
Load the original.
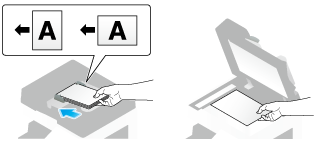
To connect the Android terminal to this machine, place the terminal on the mobile touch area on the Control Panel of this machine.
For details on the operation procedure, refer to Here.
If the Android terminal is in the sleep mode (the screen is off) or the screen is locked, Remote Access cannot start automatically using NFC communication. Cancel the sleep mode of the Android terminal or unlock the screen, and then place the terminal on the mobile touch area.
This starts a pairing process with this machine to automatically connect the Android terminal to this machine.
On the Android terminal's screen, tap [Panel Link Scan] of the main menu.
When necessary, configure scan transmission option settings on the [Panel Link Scan] screen.
On the Android terminal' s screen, tap [Start].
This starts sending data to the storage of the Android terminal or Google drive.

If the language specified for the Android terminal is different from that specified for this machine, the file name of the scanned original data may not be displayed correctly on the screen on the terminal side.
If the primary start mode is set to [Panel Link] to start Remote Access via NFC, the Panel Link screen is displayed automatically. For details on the setting, refer to Here.
For details on how to operate Panel Link Scan, refer to the help of Remote Access.