
Managing the Recipient Information by the Computer (Using the Phone Book)
Register recipients in the Phone Book
If you have registered the frequently calling recipients in the Phone Book, you can quickly call the recipient when sending a fax. Use the [FAX] tab of the fax driver to add recipients to a phone book.
When you use the Phone Book for the first time, create a Phone Book file. When you use the Phone Book for the second or other times, the previously used Phone Book file is opened automatically. When you change the contents of Phone Book, the Phone Book file is overwritten with your changes.
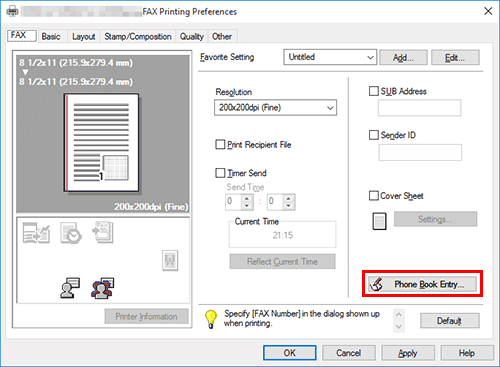
In the [FAX] tab, click [Phone Book Entry...].
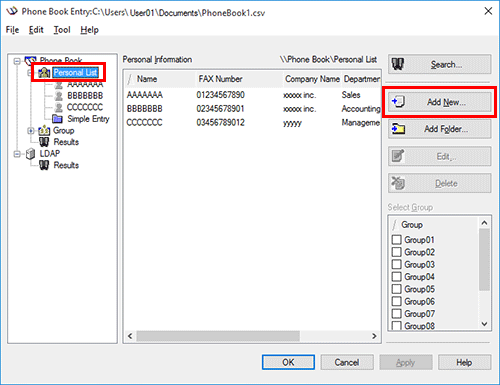
Select [Personal List] from the list at left, then click [Add New...].
Enter the recipient information.
Setting
Description
[Name]
Enter a recipient name (using up to 80 characters).
When you set the recipient name, you can add a title to this name.
[FAX Number]
Enter the destination fax number (using up to 38 digits, with available symbols being a hyphen (-), #, *, P, and T).
When you send a fax to a foreign country, enter the country code before the fax number.
[Company Name]
Enter the company name of the recipient if necessary (using up to 80 characters).
[Department]
Enter the organization name of the recipient if necessary (using up to 80 characters).
[ECM]
Uncheck the ECM box to cancel the Error Correction Mode (ECM).
The ECM is an error correction mode defined by the ITU-T (International Telecommunication Union - Telecommunication Standardization Sector). If fax machines support the ECM, they check for fax data errors while communicating with each other. Image disturbances due to telephone line noise can be suppressed.
This machine uses the ECM based communication by default. However, if the noise is high, communication may take a little longer than communication that does not use ECM checking.
If you need to reduce communication time, cancel the ECM checking and send a fax. However, an image error or communication error may occur depending on the specified communication time value, so change the value to suit conditions.
[International Transmission Mode]
Select the [International Transmission Mode] check box to send a fax to a foreign country.
The Overseas TX Mode function reduces the transmission speed (the information transfer speed) for sending a fax. This is useful when sending a fax to areas where communication conditions are poor.
[V.34 Mode]
Clear the [V.34 Mode] check box to release the V.34 protocol mode.
V.34 is a communication mode used for the Super G3 fax communication. This can reduce communication time and costs because a single page of size-A4 document can be sent within approximately 3 seconds.
This machine uses the V.34 protocol communication by default. This machine cannot use the Super G3 mode communication if this machine or the destination fax is not connected to the PBX line or if the fax line speed is limited. If so, cancel the V.34 mode communication.
[Select Group]
When you add a recipient to the group, select this group check box. You can also add a recipient in multiple groups.
Once added, you can specify recipients by selecting their group (for broadcasting). If you send faxes frequently to particular members, it will be useful to add them to a group.
Click [OK].
The personal information is registered and displayed under [\\Phone Book\Personal List]. If you have selected groups for the recipient, it will be displayed in the groups list.
Click [OK].
The Phone Book is finished from editing. When you are creating a Phone Book, proceed to step 6.
Click [Yes].
Specify the storage location, enter the file name, then click [Save].
The [Save As] screen is opened when you save the Phone Book for the first time. When you change the Phone Book for the second or other times, the [Save As] screen is not opened but the Phone Book file is overwritten with your changes automatically.
The Phone Book is saved as a file (in CSV format).

The saved Phone Book file automatically appears when you open the Phone Book next time. To open another Phone Book file, open the [Phone Book Entry] screen, and select [Open...] from the [File] menu. Saving multiple Phone Book files can switch between these files to locate the desired one.
When you create a Phone Book file, open the [Phone Book Entry] screen and select [New] from the [File] menu. Also, you can save the file to have an alias by selecting [Save As...] from the [File] menu.
Search for destination
You can search for a recipient from the Recipients List registered in the Phone Book.
Part of recipient information or multiple conditions can be used for this search.
When you search for a recipient, click [Search...] from the Phone Book. Your operations are the same when you open the Phone Book to send a fax and when you open the Phone Book to add a recipient to it.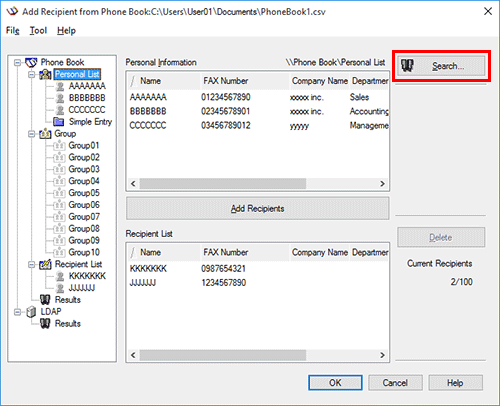
You can use the [Basic] search or [Advanced] search.
The [Basic] search displays recipients which meet any of search conditions. Enter characters to search, then click [Search Now].
The [Advanced] search displays the recipient which matches all of search conditions. Select the [Search Item] and [Condition]. Then, enter characters to search, then click [Add Condition]. Specify multiple search conditions if necessary, then click [Search Now].
Edit the recipient information
You can have an easy to use Phone Book by customizing it. You can edit the recipient information, and edit and file the Phone Book. When you edit the Phone Book, use the Phone Book that you open when adding a recipient.
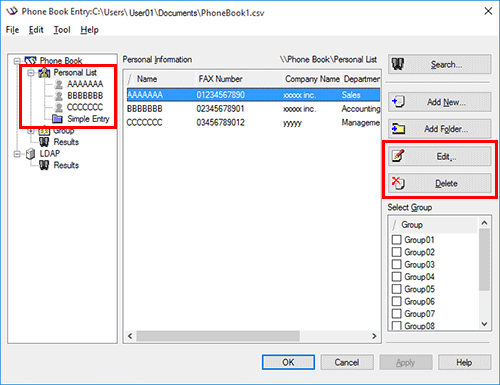
When you edit the recipient information, select a recipient from the [Personal List], then click [Edit...].
To delete a recipient from the Phone Book, select the recipient from the [Personal List], then click [Delete]. During this time, the recipient is also deleted from the registered group.
If you directly enter a recipient name and fax number when sending a fax and if you register them by the [Register To Phone Book], the name and fax number are displayed in the [Simple Entry] folder.
Change the recipient group
When you change a group, use the Phone Book that you open when adding a recipient.
From the [Personal List], select a recipient that you wish to move to another group, and select the check box of the desired group number shown at the right of the screen.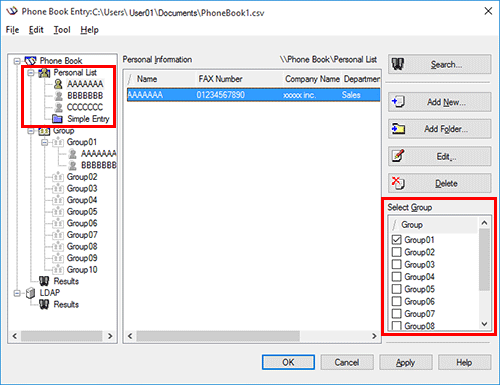
You can also register a recipient by dragging the name from the [Personal List] to a group. However, you cannot delete the recipient from the group by dragging the name.
You can register up to 100 recipients to one group.
Changing a group name
From the [Group] list on the left-hand side of the Phone Book, select a group you wish to rename and select [Rename Group...] from the [Edit] menu. Rename the group in the displayed screen.
Control the recipients using folders
You can control the recipients compositely by combining a folder and a group.
Select [Personal List], then click [Add Folder...] to create a folder. You can also select [Add Folder...] in the [Edit] menu to create a folder.
You can move a recipient name from the [Personal List] to another folder by dragging it.
To rename a folder, select it, then click [Edit...].
To delete a folder, select it, then click [Delete].
You can also move a recipient to another folder by selecting the [Copy] or [Cut] from the shortcut menu, and by selecting [Paste] to the desired folder.
You can enter a folder name using up to 40 characters.
You can create folders up to three hierarchy levels.