Original Scan Settings
- Specifying the original size (Scan Size)
- Scanning a 2-sided original (Duplex Settings)
- Scanning a number of originals in several batches (Separate Scan)
- Scanning an original that is thinner than plain paper (Thin Paper Original)
- Scanning originals with folds (Z-Folded Original)
- Detecting double feeding (Multi-Feed Detection)
- Scanning originals of different sizes (Mixed Original)
- Attaching a TX stamp to the scanned original (TX Stamp)
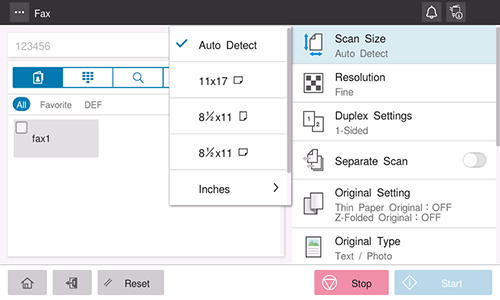
Specifying the original size ([Scan Size])
When the size of the original is not detected correctly, specify the size of the original you want to scan.
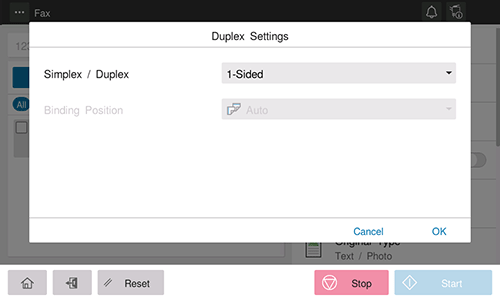
Scanning a 2-sided original ([Duplex Settings])
Select whether to scan one side or both sides of the original.
Setting | Description |
|---|---|
[Simplex/Duplex] | Select the side to scan the original (Simplex/Duplex). |
[Binding Position] | Select the binding position of the original when scanning both sides of the original.
|
Scanning a number of originals in several batches ([Separate Scan])
If the number of original sheets is so large that they cannot be loaded into the ADF at the same time, you can load them in several batches and handle them as one job. You can also scan the original using both ADF and Original Glass alternately.
Load the original.
 NOTICE
 Do not load more than 300 sheets (21-1/4 lb (80 g/m)) at a time into the Original Tray of the ADF, and do not load the sheets up to the point where the top of the stack is higher than the
  mark. Doing so may cause an original paper jam, original damage, or ADF failure.
Set [Separate Scan] to ON.
Use the Start key to start scanning.
Load the next original.
 If necessary, tap [Change Setting] to change the scan settings.
Use the Start key to start scanning.
Repeat steps 4 and 5 to scan all the originals.
After all originals have been scanned, select [Finish].
Use the Start key to start transmission.
 Related setting
- [Separate Scan from Platen] ( [Separate Scan from Platen] )
Scanning an original that is thinner than plain paper ([Thin Paper Original])
When scanning an original that is thinner than plain paper on the ADF, set this option to ON. This function reduces the original feed speed of the ADF to prevent thin paper from getting caught.

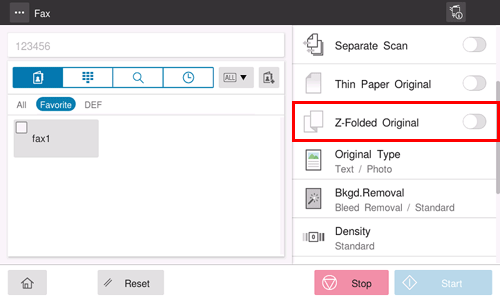
Scanning originals with folds ([Z-Folded Original])
If a folded original is loaded into the ADF, the original size may not be able be detected accurately. To scan the folded original on the ADF, set this option to ON.
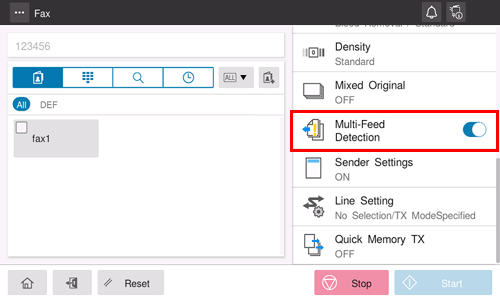
Detecting double feeding ([Multi-Feed Detection])
Selecting [Multi-Feed Detection] to ON stops scanning when the machine detects that the original is multiplexed on the ADF.
You can check the preview of the original, of which scanning was completed, on the double feeding error screen, so scanning can be restarted from that time.
Scanning originals of different sizes ([Mixed Original])
Even for an original with pages of different sizes, by using the ADF, you can scan data while detecting the size of each page. If the widths of the originals are the same, select [Same Width]. If the widths of the originals are different, select [Different Width].

Attaching a TX stamp to the scanned original ([TX Stamp])
When scanning originals using the ADF, a TX Stamp is printed on a scanned original to certify that the original has been scanned.
 NOTICE
- Exercise care not to use this function for an original that you do not want to get dirty.
 Tips
Tips- To use this function, an option is required. For details on the required option, refer to [Fax and Network Fax options] .
- The ink used for stamping is a consumable. If the ink becomes faint, contact your service representative.
Image and Density Settings
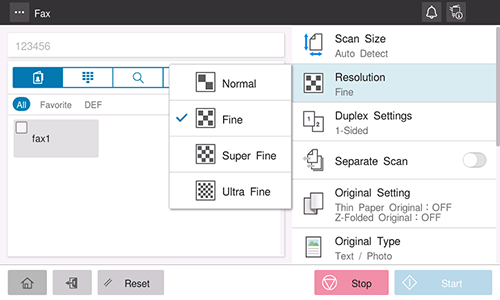
Specifying the resolution to scan the original ([Resolution])
Select a resolution to use to scan the original.
Setting | Description |
|---|---|
[Normal] | Select this option to scan originals that do not require a fine level of image quality, or when you want to send a large number of originals quickly. |
[Fine] | Select this option to scan a standard original. |
[Super Fine] | Select this option to scan originals containing small characters or drawings. |
[Ultra Fine] | Select this option to scan originals that require a fine level of image quality. |
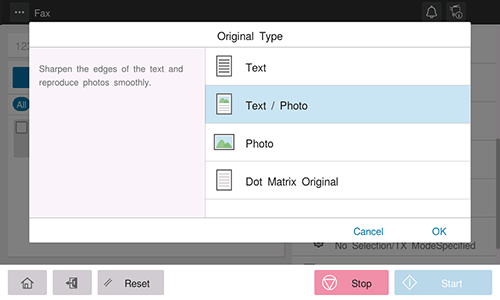
Selecting the appropriate image quality level for the original ([Original Type])
Select the optimum settings for the original to scan it in the optimum image quality.
Setting | Description |
|---|---|
[Text] | Scans an original that consists primarily of text at the optimum level of image quality. This function sharpens the edges of each character, creating easy-to-read images. |
[Text/Photo] | Scans an original consisting primarily of text and photos at the optimum image quality level. This function sharpens the edges of each character and reproduces smoother photos. |
[Photo] | Scans an original consisting of only photos at the optimum image quality level. |
[Dot Matrix] | Scans an original, which consists primarily of text such as thin or faint characters, at the optimum image quality level. This function reproduces text using high pixel density, creating easy-to-read text. |
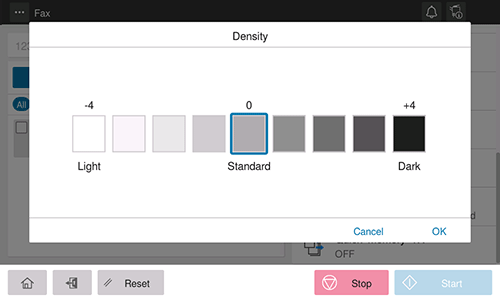
Adjusting the density to scan the original ([Density])
Adjust the density (Dark or Light) to scan the original.
Adjusting the background density of the original to be scanned ([Bkgd. Removal])
You can adjust the density of the background area for originals with colored backgrounds (newspaper, recycled paper, etc.) or originals that are so thin that text or images on the back would be scanned.

Setting | Description |
|---|---|
[Bleed Removal] | Adjust the density of the background color to prevent bleeding of the back of the paper when printing a 2-sided original that is so thin that the contents of the back side would be scanned. Selecting [Auto] automatically determines the density of the background color, and scans an original at the optimum background density level. |
[Discolor Adj.] | Adjust the density of the background color to scan an original with a colored background such as a map. Selecting [Auto] automatically determines the density of the background color, and scans an original at the optimum background density level. |
Fax-Specific Settings
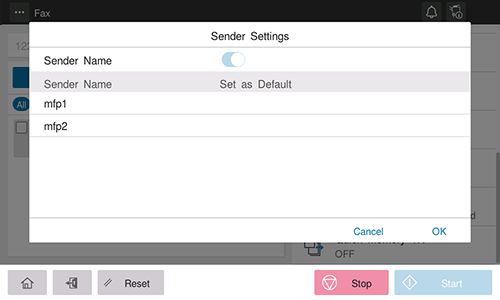
Sending after renaming the sender ([Sender Settings])
Normally, the default sender name is added. However, you can use different sender names as necessary.
If you want to use a sender name that is different from the default name, select a sender name you want to change to, and tap [OK].
 Related setting (for the administrator)
- [Header/Footer Position] ( [Header/Footer Position] )
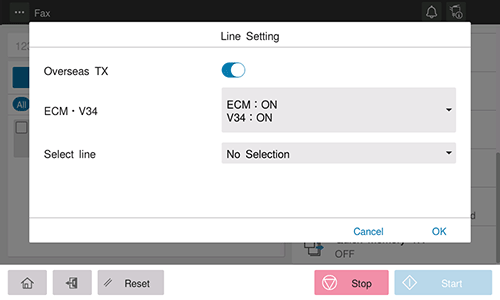
Setting a fax line type ([Line Setting])
Specify how to send a fax based on the line conditions.
Setting | Description |
|---|---|
[Overseas TX] | This mode is used to send a fax to areas where communication conditions are poor. Faxes are sent at a lower speed. |
[ECM V34] | ECM is an error correction mode defined by ITU-T (International Telecommunication Union - Telecommunication Standardization Sector). Fax machines equipped with the ECM feature communicate with each other, confirming that the sent data is free of errors. This prevents image blurring caused by telephone line noise. Communication time can be reduced by setting ECM to OFF for transmission. However, an image error or communication error may occur depending on the specified communication time value, so change the value to suit conditions. V.34 is a communication mode used for the Super G3 fax communication. When the remote machine or this machine is connected to a telephone line via PBX, however, you may not establish a communication in the super G3 mode depending on telephone line conditions. In this case, it is recommended that you turn the V.34 mode off to send data. |
[Select line] | If multiple lines are used, select the line used to send a fax. In general use, use [Line 1]. If [Not selection] is selected, either line, whichever is not busy, is used for transmission. |
Sending one scanned page at a time ([Quick Memory TX])
As one page is scanned, fax transmission starts. Generally, transmission begins after all pages have been scanned and saved in memory (Memory TX). With Quick Memory TX, many pages can be faxed without causing memory overflow.
If you want to show the total number of pages in the Number of Pages column of sender information, set [Specify the Number of Originals] to ON, and enter the total number of pages of the original in [Number of Originals]. With this information, the destination can see the remaining number of pages to be received.
