Main Menu
The main menu in classic style is displayed by switching to the classic style mode. You can customize the keys to be displayed on the main menu freely to suit your requirements.
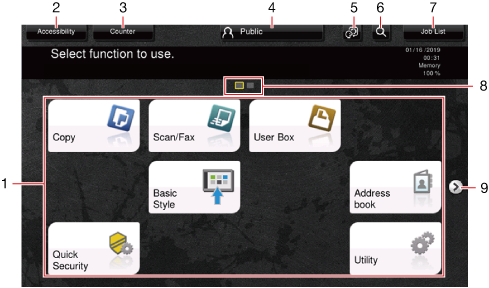
The main menu can be extended to three screens as necessary. It can show 12 shortcut keys in each screen, and up to 25 shortcut keys in three screens. [Utility] is displayed fixed on the lower right of the first page.
If shortcut keys of frequently-used functions are arranged on the main menu, it helps you quickly access a target function. Furthermore, the background of the main menu can be changed according to your preference.
No. | Name | Description |
|---|---|---|
1 | Main menu keys | Displays shortcut keys assigned to any function. Shortcut keys can be customized freely to suit your requirements. You can select the [Main Menu Default (Classic Style)] ( [Main Menu Default (Classic style)] ) to change the shortcut keys displayed on the main screen. |
2 | [Accessibility] | Specify accessibility options of the operating environment such as the adjustment of the Touch Panel or a change of the keying sounds. For details on [Accessibility], refer to [About Accessibility] . |
3 | [Counter] | Enables you to check the total number of pages printed on this machine by function. |
4 | User/Account Name | This area displays the name of the current login user or the account name when User Authentication or Account Track is enabled. When User Authentication and Account Track are used together, the user name is displayed. |
5 | [Language] | Temporarily changes the language to be displayed on the panel. This option is displayed when [Temporarily Change Language] ( [Temporary Change Language] ) is set to ON. |
6 | [Function Search] | Searches for setting items to go to the target function screen from the search result. |
7 | [Job List] | Displays active or standby jobs. If necessary, you can check job logs or print a communication report. This list displays the operation status of the active job when it is running. For details on [Job List], refer to [Job Screen] . |
8 | Page Indicator | Enables you to check which page is currently displayed when main menu keys are assigned to multiple pages. |
9 | Page switching key | Switches pages when main menu keys are assigned to multiple pages. Pages can also be switched by dragging or flicking the screen. |
 Related setting (for the administrator)
 [Main Menu Display Settings] ( [Main Menu Display Settings] )
Help Menu
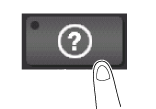
To check an overview or operation procedure of a specific function while operating this machine, you can tap [Guidance] in the side menu to view the explanation corresponding to the currently displayed screen on the Touch Panel. For example, by tapping the [Guidance] key while [Finishing] is displayed, you can view a description of the finishing function.
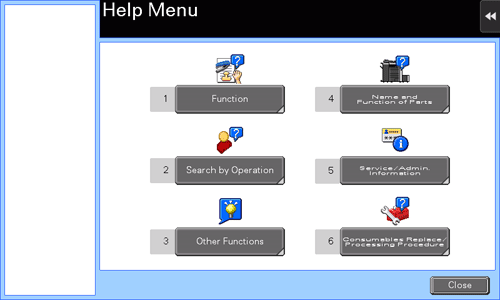
When Help Menu (main menu of Help) is displayed, you can search for a target based on an objective or function. The Help Menu consists of the following items. View and check an overview or operation procedure of a specific function.
Item | Description |
|---|---|
[Function] | Displays the guidance menu that is sorted according to the function names to be displayed on the screen. This menu is useful to learn an overview of a specific function. |
[Search by Operation] | Displays operation examples and explanations of this machine sorted by function. Tapping [Go to function] jumps to the screen to configure the displayed function.
|
[Other Functions] | Displays the guidance menu of the functions and settings that make it easier to use this machine. Tapping [Go to function] jumps to the screen to configure the displayed function. |
[Name and Function of Parts] | Displays the keys of the Control Panel or the keys of the optional units installed on this machine, enabling you to view their functions. |
[Service/Admin. Information] | Displays the name, extension number, and E-mail address for the administrator of this machine. |
[Consumables Replace/Processing Procedure] | Check how to replace consumables or dispose of punch scraps. Tapping [Start Guidance] starts the guidance. |
 Tips
Tips- By using Bookmark in the left panel, you can check a position of the currently displayed Guidance screen.
- Tap [Close] on the Guidance screen to move up one level in the menu structure. When [Exit] is tapped, the guide function terminates and the screen returns to the display that was shown before the Guidance screen was displayed.
- Tap [To Menu] on the Guidance screen or [Help Menu] on Bookmark to display the Help Menu.
- The Guidance screens cannot be displayed when the following operations are being performed:
Scanning, printing a proof copy, preview of a finished copy, operating in Enlarge Display mode, or operating in Accessibility mode
Icon Types
Icons indicating the status of this machine
Icons indicating the status of this machine may appear in the icon display area. The types of icons to be displayed are as follows.
Icon | Description |
|---|---|
| Indicates that a USB memory device is connected to this machine. Tapping this icon displays the screen to select a function (print, save, or scan) supported by the USB memory. |
| Indicates that a USB connection is disabled because a nonstandard USB memory device is connected to this machine. |
| Indicates that there are messages related to the consumables replacement or device maintenance. Tap this icon to check the message and perform the relevant replacement or maintenance procedure. |
| Indicates that an error occurred in relation to print or scanner functions. Tap this icon to change to a screen that shows a warning code. |
| Indicates that the machine is waiting for the fax redial. |
| Indicates that the machine is receiving data, regardless of the current mode. |
| Indicates that data is being sent from the machine, regardless of the current mode. |
| Indicates that an error has occurred in a connection to the E-mail server (POP). |
| Indicates that enhanced security mode is enabled. |


Icons to change to entry or selection screen
When you enter text or select a registered item while operating this machine, the following icons may be displayed. Tap the target icon to change to the screen on which you want to enter text or select a registered item.
Icon | Description |
|---|---|
| Displays the text entry (keyboard) screen. This icon is referred to as a "keyboard icon" in the manual. |
| Displays a screen through which a program address can be directly entered. This icon is referred to as an "entry icon" in the manual. |
| Displays a list of registered items. This icon is referred to as a "list icon" in the manual. |
| Displays a screen to configure detailed settings. This icon is referred to as a "detail icon" in the manual. |


Icons indicating the type of an active job
When a job is active, its icon and operation status are displayed in the header area on the main menu or the main screen of each mode. The types of icons to be displayed are as follows.
Icon | Description |
|---|---|
| Indicates that the active job is an E-mail transfer job. |
| Indicates that the active job is an FTP send job. |
| Indicates that the active job is an SMB send job. |
| Indicates that the active job is a WebDAV send job. |
| Indicates that the active job is a TWAIN scan job. |
| Indicates that the active job is a fax job, Internet fax job, or IP address fax job. |
| Indicates that the active job is a copy job or print job. |
| Indicates that the active job is a save job. |


