
Copy
Q. Can I copy on an envelope or postcard?
A. Yes, you can also copy on an envelope and postcard.
Load envelopes or postcards into Tray 1 or the Bypass Tray, then specify the paper type and paper size of the Bypass Tray.
Q. Can I copy on an envelope or postcard?
Operation procedure: Copying on envelopes (Tray 1)
Up to 70 envelopes can be loaded into the Tray 1.
Load the original.
Tap [Copy] on the home screen.
Pull out Tray 1.

When loading envelopes of which the length is 182 mm or less, mount the Attachment on the Lateral Guide.

Position the flap part face down, and load envelopes as shown in the figure.
The flap side of envelopes cannot be printed on.


When loading envelopes into the Tray 1, note the following points.
When loading envelopes, remove air from them, and securely press along the flap fold line. Otherwise, it will result in an envelope wrinkle or paper jam.

Do not use envelopes that have glue or release paper on the flap or the part covered by the flap on the body. Otherwise, the machine may be damaged or a failure may occur.
Slide the Lateral Guide to fit the size of the loaded paper.

Close Tray 1.
Tap [Envelope/4 6] ([Envelope/A6 Card]) from [Paper Size].

Select the size of the envelope.
Various sizes of envelopes are available. Specify the correct paper size for the envelopes you have loaded.


When loading envelopes with flaps opened, also select the standard size that matches them. You do not have to measure the size of the envelope with the flap opened to set the size as a custom-sized envelope.
Tap [OK].
Use the Start key to start copying.
Operation procedure: Copying on envelopes (Bypass Tray)
Up to 10 envelopes can be loaded into the Bypass Tray.
Load the original.
Tap [Copy] on the home screen.
Load envelopes into the Bypass Tray with the print side facing down.
Insert envelopes into the tray until their edges are pressed against the back.

When loading envelopes into the Bypass Tray, note the following points.
When loading envelopes, remove air from them, and securely press along the flap fold line. Otherwise, it will result in an envelope wrinkle or paper jam.

Do not use envelopes that have glue or release paper on the flap or the part covered by the flap on the body. Otherwise, the machine may be damaged or a failure may occur.
Slide the Lateral Guide to fit the size of the loaded paper.
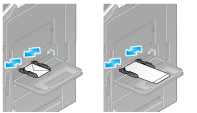

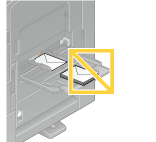
When using the Bypass Tray, note the following points.
Do not put spare envelopes into the Bypass Tray. Doing so causes a size detection error.
The screen for selecting the paper type and paper size appears.
Tap [Envelope/4 6] ([Envelope/A6 Card]) from [Paper Size].

Select the size of the envelope.
Various sizes of envelopes are available. Specify the correct paper size for the envelopes you have loaded. When the envelope size is specified, the paper type is automatically set to [Envelope].


When loading envelopes with flaps opened, also select the standard size that matches them. You do not have to measure the size of the envelope with the flap opened to set the size as a custom-sized envelope.
Tap [OK].
Use the Start key to start copying.
Operation procedure: Copying on postcards (Tray 1)
Up to 200 postcards can be loaded into the Tray 1.
Load the original.
Tap [Copy] on the home screen.
Pull out Tray 1.

Mount the Attachment on the Lateral Guide.

With the print side facing up, load postcards in the direction as shown in the figure.


When loading postcards into the Tray 1, note the following points.
When loading curled postcards, uncurl the postcards as shown in the figure in advance.

Slide the Lateral Guide to fit the size of the loaded paper.

Close Tray 1.
Select [4 6] ([A6 Card]) from [Paper Size options].

Tap [OK].
Use the Start key to start copying.
Operation procedure: Copying on postcards (Bypass Tray)
Up to 20 postcards can be loaded into the Bypass Tray.
Load the original.
Tap [Copy] on the home screen.
Load postcards into the Bypass Tray with the print side face down.
Insert postcards into the tray until their edges are pressed against the back.

When loading postcards into the Bypass Tray, note the following points.
When loading curled postcards, uncurl the postcards as shown in the figure in advance.

Slide the Lateral Guide to fit the size of the loaded paper.
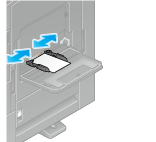

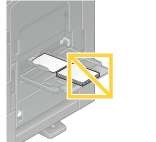
When using the Bypass Tray, note the following points.
Do not put spare postcards in the Bypass Tray. Doing so causes a size detection error.
The screen for selecting the paper type and paper size appears.
Tap [Envelope/4 6] ([Envelope/A6 Card]) from [Paper Size].

Select [4 6] ([A6 Card]) from [Envelope/4 6] ([Envelope/A6 Card]).
When [4 6] ([A6 Card]) is specified for the paper size, the paper type is automatically set to [Thick3].

Tap [OK].
Use the Start key to start copying.
Q. Can I print on custom size paper?
A. The custom-size paper can be loaded into Tray 1, Tray 2, or Bypass Tray.
On the paper screen of copy mode, specify the tray containing custom size paper; this will enable you to print on custom size paper.
It is a good idea to have the frequently used custom size of paper registered in the memory.
Q. Can I print on custom size paper?
Operation procedure: Copying on paper of a custom size
This section explains how to load custom-size paper into the Bypass Tray.
Load the original.
Tap [Copy] on the home screen.
Load custom size paper into the Bypass Tray with the print side facing down.
The screen for selecting the paper type and paper size appears.
On the [Paper] setting screen, tap the setting icon (
 ) of the Bypass Tray.
In [Paper Size], tap [Custom Size].

Specify the width and length of the paper, and tap [OK].

Use the Start key to start copying.
Operation procedure: Registering a custom size of paper in memory
Tap [Copy] on the main menu of classic style.
Tap [Paper], select Tray 1, Tray 2, or Bypass Tray, and tap [Change Tray Setting].

Tap [Paper Size].
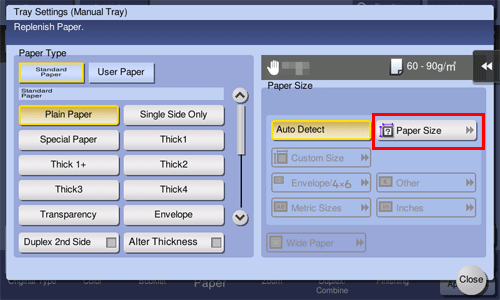
Load a single sheet to be measured on the Original Glass.

If a sheet is loaded on the Original Glass, leave the Original Cover open.
Use the Start key to start the size measuring process.
When measurement is completed, the screen for confirming the measurement result is displayed.
Tap [Store Size].
In [Registered Paper Sizes], select the key of the memory to register data in.
To change the name of the selected memory key, tap [Edit Name].
Tap [OK].
To set the detected size to the paper size, tap [OK].
Operation procedure: Recalling the custom size registered in memory
Tap [Copy] on the main menu of classic style.
Tap [Paper], select Tray 1, Tray 2, or Bypass Tray, and tap [Change Tray Setting].

Tap [Custom Size].
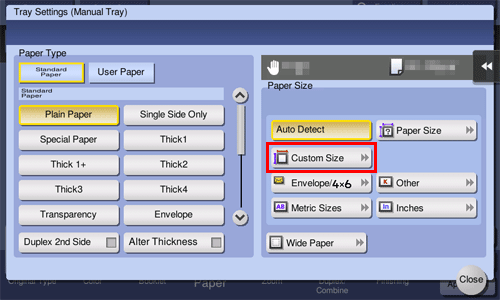
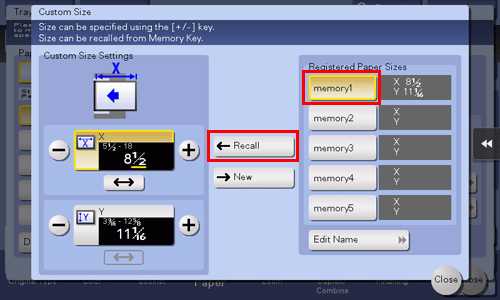
Select the paper size to recall from [Registered Paper Sizes], then tap [Recall].
Q. How can I handle an original that contains too many pages to load in the ADF?
A. To copy an original containing a large number of pages, use the Separate Scan function.
The Separate Scan function enables scanning of an original in installments and handling of the resulting copy jobs as a single job.
For details on the operation procedure, refer to Here.

Q. The orientation of the image will not match that of the original.
A. Check the following settings on this machine:
Is [Auto Rotate] set to ON?
Is [Mixed Original] enabled?
Is not the zoom ratio for copying manually specified?
Is the setting of [Automatic Image Rotation] under Administrator Settings in accordance with the orientation of the loaded original and paper?
Q. The orientation of the image will not match that of the original.
Operation procedure: When [Auto Rotate] is set to OFF
Select [Auto Rotate], and select ON.

Operation procedure: When [Mixed Original] is enabled
Select [Mixed Original].
Select [OFF], then tap [OK].
Operation procedure: When a zoom ratio for copying is manually specified
Tap [Zoom], and select [100.0%].

Operation procedure: When the setting of [Automatic Image Rotation] under Administrator Settings is irrelevant
Tap [Utility], then select [Administrator].
Enter the password, then tap [OK].
Select [Copier Settings] - [Basic Setting].
In [Automatic Image Rotation], select the item in accordance with the current orientation of the paper and original, then tap [OK].
Q. Are there any paper-saving copying methods?
A. You can save paper by printing on both sides of the paper or printing more than one original page onto the same side of a single sheet of paper.
Copying on both sides of paper

Copying multiple pages on the same side of a single sheet

Q. Are there any paper-saving copying methods?
Operation procedure: Copying on both sides of paper
Load the original.
Tap [Copy] on the home screen.
Tap [Duplex Settings], and tap the setting icon (
 ).
).In [Original > Copy], select [1-Sided > 2-Sided], and select a desired bind position for copying in [Output Bind Dir.].

Tap [OK].
Use the Start key to start copying.
Operation procedure: Copying multiple pages on the same side of a single sheet
Load the original.
Tap [Copy] on the home screen.
Tap [Combine], and tap the setting icon (
 ).
).In [Combine], select the number of pages to copy on the same side of a single sheet.
Tap [OK].
Use the Start key to start copying.
Q. Can I register frequently used settings?
A. Yes. You can register settings of the copy function as programs to recall them quickly.
For details on the setting procedure, refer to Here.
Q. Can I check the finish before starting copying?
A. Yes, you can check the finish by outputting a proof copy.
You check either by referring to a preview image or by outputting just one copy for checking how it is actually finished. Using a proof copy helps preventing copy errors.
For details on the setting procedure, refer to Here.
Q. Can I easily copy various cards such as an insurance card or driver license card?
A. Yes, you can copy the front and back sides of a card, side by side, on the same side of one sheet of paper.
For details on the operation procedure, refer to Here.

Q. What measures can I take against unauthorized copying?
A. You can use the copy protection function for printing concealed security watermark for preventing unauthorized copying.

Also, copy guard and password copy functions are provided for higher security functions.
Copy Guard is a copy protection function that prints concealed security watermarks such as "Private" or a date in the background to prevent unauthorized copying, and embeds a copy restriction pattern on all printed sheets.
Password Copy is a copy protection function that prints concealed security watermarks such as "Private" or a date in the background to prevent unauthorized copying, and embeds a password for the password copy function on all printed sheets.
To use the Copy Guard or Password Copy function, the appropriate option is required. For details on the required option, refer to Here.
Q. What measures can I take against unauthorized copying?
Operation method
Load the original.
Tap [Copy] on the main menu of classic style.
Tap [Application] and select [Copy Protect].
Tap [ON] and configure the respective items for the copy protect function.
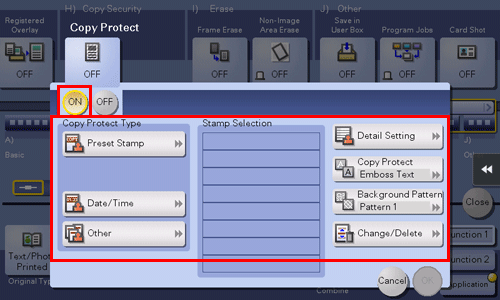
Setting
Description
[Preset Stamp]
Select a concealed security watermark from the 8 options.
[Date/Time]
Select a format for the date and time to be printed.
The date/time as of scanning the original is stamped.
[Other]
[Job Number]
Select Yes to print the copy job number.
[Serial Number]
Select Yes to print the serial number of this machine.
[Distribution Control Number]
Prints the distribution control number. Specify the distribution control number using a value between 1 and 99999999.
[Stamp Selection]
Part of the currently set concealed security watermarks can be listed. You can set up to eight watermarks.
[Detail Setting]
For concealed security watermarks, specify their size, density, and whether to lay them over or under the original text.
[Copy Protect]
Set the pattern and contrast for the concealed security watermarks to print.
[Background Pattern]
Select background patterns for copy protection from eight patterns.
[Change/Delete Position]
You can select an angle to show the text if no more than four used spaces are occupied by the concealed watermarks already set.
To relocate concealed security watermarks, select the designed watermark, then tap [Up] or [Down].
To add a space between concealed security watermarks, select the designed watermark and tap [Insert Above] or [Insert Below].
To delete a concealed security watermark, select the watermark, then tap [Delete].
Tap [OK].
Use the Start key to start copying.
Q. Can I copy with a text such as "Private" or date added?
A. Yes, you can add a text such as "PLEASE REPLY" or "Private", the date and page numbers to a copy job.
Date/time and page numbers

Stamp

If necessary, you can register any stamp in addition to the stamps pre-registered in this machine. The registration procedure is explained using the data management utility in Web Connection. For details, refer to Here.
Q. Can I copy with a text such as "Private" or date added?
Operation method
Load the original.
Tap [Copy] on the main menu of classic style.
To add the date and time, tap [Application] and select [Date/Time].
Tap [ON], set values for [Date Format], [Time Format] and [Pages], then tap [OK].
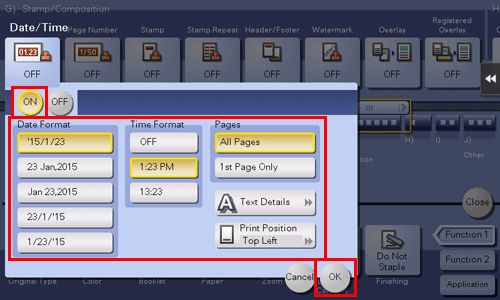
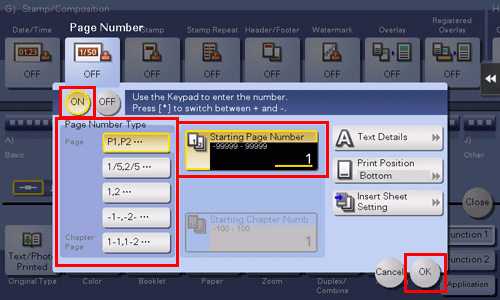
To add page numbers, tap [Application] and select [Page Number].
Tap [ON], set values for [Page Number Type] and [Starting Page Number], then tap [OK].
If you have selected [Chapter Page] for [Page Number Type], specify the chapter number to start printing in [Starting Chapter Number].
When copying with covers, you can set the page numbers to be printed on the covers using [Insert Sheet Setting].
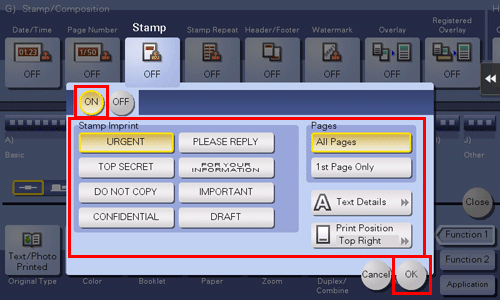
To add a stamp, tap [Application] and select [Stamp].
Tap [ON], set values for [Stamp Imprint] and [Pages], then tap [OK].
When the stamp, date and time, or page numbers cannot be easily read with the initial settings, tap [Text Details] in each of the [Date/Time], [Page Number] and [Stamp] setting screens to set the text size and font.
If the stamp, date and time, or page numbers are over the text of the original, tap [Print Position] in each of the [Date/Time], [Page Number] and [Stamp] setting screens to set the printing positions.
Use the Start key to start copying.
Q. Can I copy the original with its headers and punch holes erased?
A. Yes. Enable the frame erase function and the machine copies the original by erasing unwanted sections on the four sides of the original.

Q. Can I copy the original with its headers and punch holes erased?
Operation method
Load the original.
Tap [Copy] on the main menu of classic style.
Tap [Application] and select [Frame Erase].
Tap [ON].
To erase the four sides of the original by the same width, specify the width to be erased.
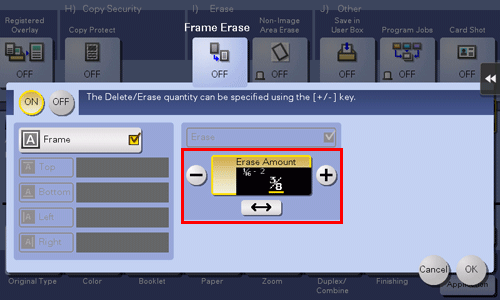
To specify the width of the frame to be erased individually, set [Frame] to OFF, select a target side, then specify the width to be erased.
When specifying the erase width individually, you can set to exclude a side from erasing by selecting the side and canceling the setting of [Erase] for that side.
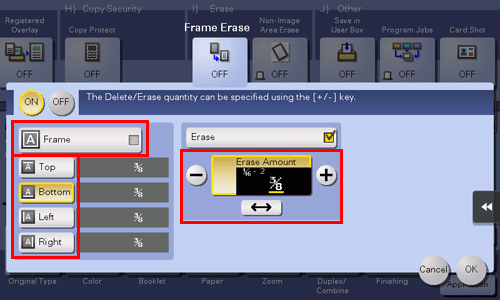
Tap [OK].
Use the Start key to start copying.
Q. Can I erase marks from fold lines when copying a book?
A. Yes, you can erase the marks by specifying the fold width.
This setting is preferable for copying a book nicely.
Q. Can I erase marks from fold lines when copying a book?
Operation method
Place the original on the Original Glass.
Tap [Copy] on the main menu of classic style.
Tap [Application] and select [Book Original].
Tap [ON], select [Book Spread], then tap [Center Erase].
When paper is set to [Auto], a message appears to notify that the paper tray will be switched. Tap [Yes].
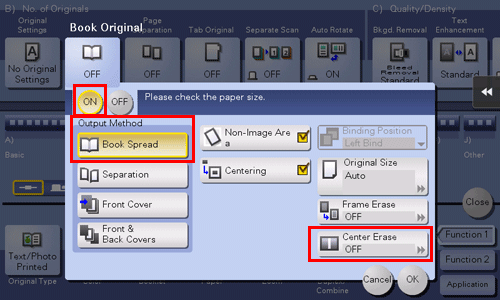
Tap [ON] and enter the width of the fold lines to erase, then tap [OK].
Use the Start key to start copying.
Q. Is enlarged or reduced copying according to the paper size enabled?
A. Yes. You can automatically make a copy with the optimal zoom ratio to fit the paper size by simply selecting the paper size you want to apply to the loaded original.
Q. Is enlarged or reduced copying according to the paper size enabled?
Operation method
Load the original.
Tap [Copy] on the home screen.
In [Paper], select the tray loaded with paper you want to enlarge or reduce, and tap [OK].

Use the Start key to start copying.
Q. Can I adjust the copying position to make filing easier?
A. Yes. You can shift and adjust the position of the entire copy image by setting the binding margin.

Q. Can I adjust the copying position to make filing easier?
Operation method
Load the original so that the top of the page is placed at the back.
Tap [Copy] on the main menu of classic style.
Tap [Application] and select [Page Margin].
Tap [ON] and configure the respective items for page margins.
To perform copying on both sides of the sheet, set [Margin Position] and [Original Direction] to ensure that the original is copied in the correct vertical orientation.
Take care as part of the image may be cut off depending on the margin setting.
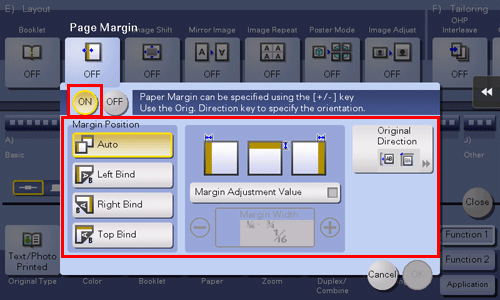
Setting
Description
[Margin Position]
Select the position for creating the page margin for binding.
When [Auto] is selected, the binding position is automatically set.
[Margin Adjustment Value]
Enter the page margin.
[Original Direction]
Select the original loading direction.
Tap [OK].
Use the Start key to start copying.
Q. Can I perform copying with stapling or punching?
A. Yes, you can. Install relevant optional products on this machine to perform copying with stapling or punching.
Staple
Stapling is enabled to bind at a corner or at two positions. This method is useful for printing handout material among other things.
To use the staple function, an option is required. For details on the required option, refer to Here.
Punch
Punching is enabled for filing holes.
To use the punch function, an option is required. For details on the required option, refer to Here.
You can staple and punch copies at the same time.
Q. Can I perform copying with stapling or punching?
Operation method
Load the original.
Tap [Copy] on the home screen.
Tap [Staple] or [Punch], and tap the setting icon (
 ).
).Configure each item for finishing.

Setting
Description
[Staple]
To staple sheets, select the stapling method.
[Punch]
To punch sheets, select the required number of punch holes.
[Position Setting]
Select a desired staple or hole-punch position.
Setting to [Auto] automatically determines the stapling and punching positions based on the direction of the loaded original.
[Original Orientation]
Specify the orientation to load the original.
Tap [OK].
Use the Start key to start copying.
Q. Can I use the offset function without installing a Finisher or Job Separator on the machine?
A. Yes. Provided that the following requirements are met, outputs can be alternately ejected in transversal and longitudinal orientations set by set. This function is useful for making a large number of copies as it eliminates offsetting after copying.
Using paper of 8-1/2 11, A4 or B5
Loading paper of the same size and type in the transversal and longitudinal orientations
Setting [Auto] for paper
Q. Can I use the offset function without installing a Finisher or Job Separator on the machine?
Operation method
Load the original.
Tap [Copy] on the home screen.
Tap [Group/Sort].
Select [Group/Sort] - [Sort], and also select [Offset] - [Offset].

Tap [OK].
Use the Start key to start copying.
Q. Can I use a magazine-like finish for a copy job?
A. Yes, you can copy and staple the sheets of paper in their center like a magazine or catalog.
The original pages loaded are automatically arranged into an order appropriate for center binding, and the 2in1 function is activated to copy on both sides of the paper.
To use the Center Staple and Fold function, an option is required. For details on the required option, refer to Here.
Q. Can I use a magazine-like finish for a copy job?
Operation method
Load the original.
Tap [Copy] on the main menu of classic style.
Tap [Application] and select [Booklet].
Tap [ON] and configure the respective items for print and bind operation.
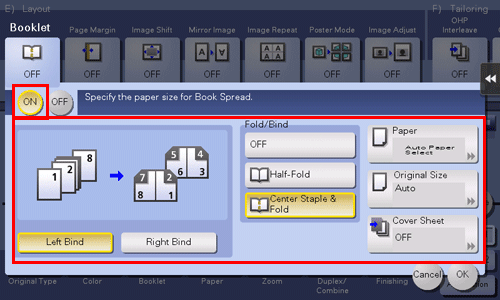
Setting
Description
[Left Bind]/[Right Bind]
Select the binding position for the outputs.
[Fold/Bind]
Select [Center Staple & Fold]. This function staples copies at two places along the center and folds the copies in half before feeding them out.
[Paper]
Select the paper tray where paper for copying is loaded.
[Original Size]
Select the size of the original to be copied.
[Cover Sheet]
Use this option to copy the front and back covers onto separate paper when copying an original with a front or back cover. When copying an original without a front or back cover, you can use this function to have blank sheets of paper inserted as the front and back covers.
Tap [OK].
Use the Start key to start copying.
Q. Can I add the company name or its logo to a copy job?
A. Yes. You can register the logos and favorite images in the storage of this machine to add such overlay images to copy outputs.

Q. Can I add the company name or its logo to a copy job?
Operation method
Tap [Copy] on the main menu of classic style.
Tap [Application] and select [Registered Overlay].
Tap [ON], then tap [Register/Delete].
When paper is set to [Auto], a message appears to notify that the paper tray will be switched. Tap [Yes].
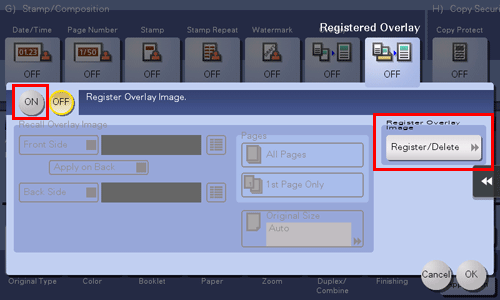
Tap [New], enter the overlay image name, then tap [OK].
Load the original containing the overlay image to be registered, change image settings as necessary, then tap [Start].
The original you have set is registered as an overlay image.

Tap [Close].
To continue to register overlay images, repeat step 4.
To overwrite a registered overlay image with another image, select the target overlay image and tap [Overwrite]. Tap [Yes], then repeat step 5.
To delete a registered overlay image, select the overlay image, tap [Delete], then tap [Yes].
Select the check box for the side the image is to be overlaid on, then tap
 to select the overlay image.
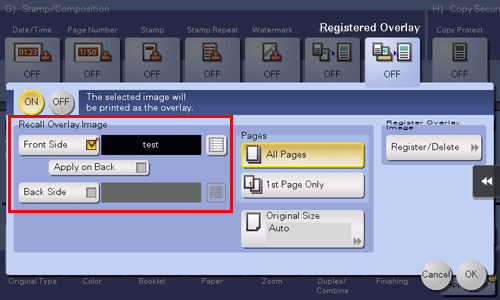
Select the pages to print the image on and the original size, then tap [OK].
Load the original.
Use the Start key to start copying.
Q. Can I copy the right and left pages of two-page spreads like books or catalogs onto separate sheets?
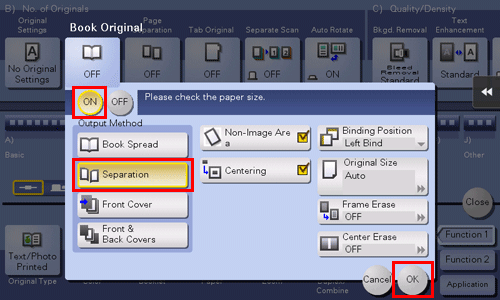
A. Yes. Specify the scanning method to Separation to have spread pages copied one by one on separate pages.

Q. Can I copy the right and left pages of two-page spreads like books or catalogs onto separate sheets?
Operation method
Place the original on the Original Glass.
Tap [Copy] on the main menu of classic style.
Tap [Application] and select [Book Original].
Tap [ON], select [Separation], then tap [OK].
When paper is set to [Auto], a message appears to notify that the paper tray will be switched. Tap [Yes].
Use the Start key to start copying.
Q. Can I use a different paper type for the covers?
A. Yes. Use the cover sheet function to use a different paper type for copying the covers other than that used for the text body.

Use paper of the same size for the body text and cover sheets, and ensure paper in the same orientation is used for both purposes.
Q. Can I use a different paper type for the covers?
Operation method
Load the original.
Tap [Copy] on the main menu of classic style.
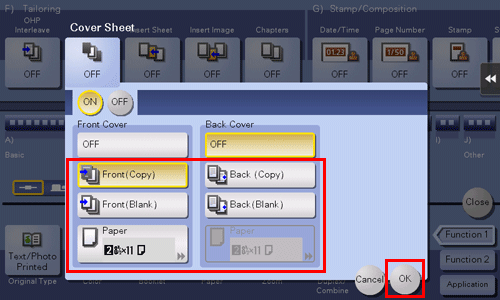
Tap [Application] and select [Cover Sheet].
Tap [ON].
Configure the respective settings for the front and back covers, then tap [OK].
Use the Start key to start copying.
Q. Can I interrupt a printing job to execute an urgent copy job for another original?
A. Yes. Tap [Interrupt] in the side menu of classic style to pause printing once, then execute the urgent copy job first.
When the copy job is completed, a paused print job is restarted.
For details on the operation procedure, refer to Here.
Q. Can I arrange so that the margin does not come out in black when copying with the ADF opened?
A. Yes. Enable the Non-Image Area Erase Operation function, and the margin outside the original is copied in white. This function is also useful to reduce toner consumption as it erases everything other than the original.

Q. Can I arrange so that the margin does not come out in black when copying with the ADF opened?
Operation method
Place the original on the Original Glass.
Tap [Copy] on the main menu of classic style.
Tap [Application], select [Non-Image Area Erase], then select [ON].

Use the Start key to start copying.
The original size of 3/8 inches 3/8 inches (10 mm 10 mm) or more can be detected automatically. If the detection fails, a blank sheet of paper is output.
The original image may be cut off at its top or end.
Q. Can I save image data after copying is completed?
A. Yes. You can print the copied image data and also save it to a User Box.
The saved data can be printed when necessary.
Q. Can I save image data after copying is completed?
Operation method
Register the target User Box in advance. For details on the registration procedure, refer to Here.
Load the original.
Tap [Copy] on the main menu of classic style.
Tap [Application] and select [Save in User Box].
Tap [ON], select a User Box to use for saving in [User Box], then tap [OK].
To rename data to save in a User Box, rename it using [File Name].
To save data in a User Box and print the data at the same time, select the [Save & Print] check box.
Tap [New] when selecting a User Box for saving data, and you can save the data in a newly created User Box with only the User Box number specified.

Use the Start key to start saving.


