
Print Option Settings
- Enlarging or reducing an original image (Zoom)
- Specifying the paper tray (Paper)
- Printing on both sides of paper (Simplex/Duplex)
- Printing multiple pages on the same side of a single sheet (Combine)
- Stapling paper (Staple)
- Punching (Punch)
- Folding/Binding (Fold/Bind)
- Outputting by sets (Group/Sort)
- Staggering the feed-out position by set (Offset)
- Printing an XLSX file sheet or book (Sheet/Book Print)
- Printing a multi-page PDF, XPS, or OOXML file on the same side of a single sheet (Combination)
- Printing in a booklet format (Booklet)
- Adding a margin on pages (Page Margin)
- Fine-tuning the print position (Image Shift)
- Inserting front and back covers (Cover Sheet)
- Inserting a different sheet into the specified page (Insert Sheet)
- Arranging the first page of the chapter on the front side (Chapters)
- Adding the print date/time (Date/Time)
- Adding a page number (Page Number)
- Adding a stamp (Stamp)
- Adding a stamp on the entire page (Stamp Repeat)
- Adding information to the header/footer (Header/Footer)
- Composing registered images (Registered Overlay)
- Printing a concealed security watermark (Copy Protect)
- Adding copy restriction information (Copy Guard)
- Adding a password (Password Copy)
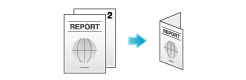
Enlarging or reducing an original image ([Zoom])
Copy an original image enlarged or reduced by an arbitrary zoom ratio.

Setting | Description |
|---|---|
[Settings when saving] | Prints an original image in the zoom ratio you have set during image saving. |
Manual Input | Enter the zoom ratio manually. |
Fixed Zoom | Select a fixed zoom ratio to print on the standard-size paper. |
[Minimal] | Slightly reduces the size of the original, places the original image at the center position, and prints it out. Use this option to print the entire original image including its edges. |
[Zoom Ratio] | Prints the original in the preset scale. |

This function is not available when you want to make prints from the following User Boxes.
ID & Print User Box, External Memory
Specifying the paper tray ([Paper])
Selecting [Auto] automatically selects a tray that contains paper of the same size as the original.
When you want to make a print on paper of a size different from the original or make a print on paper in the Bypass Tray, specify the desired tray manually.
This function is available when data is printed from USB memory.
Printing on both sides of paper ([Simplex/Duplex])
The original is printed either on a single side or on both sides of paper.

Setting | Description |
|---|---|
[Simplex/Duplex] | Select to print on a single side or both sides of a sheet of paper. |
[Continuous Print]*1 | This is available when [Simplex/Duplex] is set to [2-Sided]. Select this option to print the next file on the rear side of paper after you have printed out a file consisting of odd-numbered pages. |
[Binding Position]*2 | This is available when [Simplex/Duplex] is set to [2-Sided]. Select the binding position. |
*1[Continuous Print] is displayed when Combine is selected for the User Box.
*2[Binding Position] is displayed when data is printed from a USB memory.
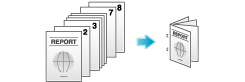
Printing multiple pages on the same side of a single sheet ([Combine])
Multiple pages (2 pages, 4 pages, or 8 pages) are reduced and printed on the same side of one sheet.
If [4in1] or [8in1] is selected, you can select the combined page layout from [Horizontal] or [Vertical].

This function is not available when you want to make prints from a USB memory.
Stapling paper ([Staple])
The printed sheets are stapled.

Setting | Description |
|---|---|
[Corner] | Each set of printed sheets is stapled in a corner (top left or top right) before it is output. |
[2 Position] | Each set of printed sheets is stapled at two positions (in the top, left, or right) before it is output. |
[Position Setting] | Select the binding position. If [Auto] is specified for the binding position, the binding position is determined automatically based on the direction of print file. |
To use this function, an option is required. For details on the required option, refer to Here.
Punching ([Punch])
Punch the printed sheets for filing.

Setting | Description |
|---|---|
[Position Setting] | Select a position to punch. If the punch position is set to [Auto], the position to punch is determined automatically based on the direction of print file. |
To use this function, an option is required. For details on the required option, refer to Here.
The number of punched holes varies depending on the area you are in.
Folding/Binding ([Fold/Bind])
Fold or fold and staple printed sheets before feeding out them.
Half-Fold
Feeds out a printed sheet by folding it in two. Also select the unit by which the paper is folded from [By Copy Job (Multiple Sheets)], [1 Unit], and [By Page]. When you set [By Page], specify the number of pages to be folded at one time.
Tri-Fold
Feeds out a printed sheet by folding it in three. Also select the unit by which the paper is folded from [By Copy Job (Multiple Sheets)], [1 Unit], and [By Page]. When you set [By Page], specify the number of pages to be folded at one time.
Center Staple and Fold
Staples and feeds out a printed sheet by folding it in two.
To use this function, an option is required. For details on the required option, refer to Here.
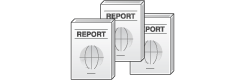
Outputting by sets ([Group/Sort])
Select whether to sort the output sheets or group them when printing multiple sets of copies.

Setting | Description |
|---|---|
[Group] | Feeds out copies separately page by page, for example: "111", "222", "333", "444", and "555". |
[Sort] | Feeds out copies separately one by one, for example: "12345", "12345", and "12345". |
Staggering the feed-out position by set ([Offset])
If [Offset] is specified while the Finisher or Job Separator is installed, the printed sheets are fed out and stacked on top of each other with each copy or page set staggered to separate them.
If the Finisher or Job Separator is not installed, the printed sheets are fed out and sorted by copies or page in an alternating crisscross pattern when [Offset] is specified while the following conditions are satisfied.
8-1/2 11, A4, or B5 paper is used
Loading paper of the same size and type in the and directions
Specifying Auto Paper for the paper size setting
Printing an XLSX file sheet or book ([Sheet/Book Print])
Select whether to print the currently selected sheet or the entire book when printing an XLSX file of OOXML format.
Setting | Description |
|---|---|
[All Sheets] | Prints all sheets of the book. |
[Current Sheet] | Prints the currently selected sheet only. |
This function is available when data is printed from USB memory.
Printing a multi-page PDF, XPS, or OOXML file on the same side of a single sheet ([Combination])
Combine a multi-page PDF, XPS, or OOXML file into a single page and to print it out.
Setting | Description |
|---|---|
[ON]/[OFF] | Select [ON] to set Combination. |
[No. of Page Combinations] | Specify the number of lines and columns (using up to 5 lines 5 columns) of the original images to be placed on a single page. |
[Combination Method] | Select the page layout of either [Horizontal] or [Vertical] layout. |
[Combination Direction] | Set the layout of original images to be placed. |
[Layout Settings] | Set a space between images, a zoom ratio of images, and page margin.
|
This function is available when data is printed from USB memory.
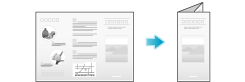
Printing in a booklet format ([Booklet])
The pages in the original data are arranged and spread out in booklet format and printed on both sides of sheets. You can also specify the binding position, or insert front and back covers.

Setting | Description |
|---|---|
[ON]/[OFF] | Select [ON] to specify Booklet. |
[Left Bind]/[Right Bind] | Select the binding position of the printed sheets. |
[Fold/Bind] | Staples printed sheets in the center or fold them in the center before discharging.
|
[Cover Sheet] | Specify this option to insert a different sheet of paper from text pages as the front cover of a booklet.
|
The option is required to use [Fold/Bind]. For details on the required option, refer to Here.
This function is not available when you want to make prints from the following User Boxes.
ID & Print User Box, External Memory
Adding a margin on pages ([Page Margin])
Add a binding margin to each page to bind printed sheets.

Setting | Description |
|---|---|
[ON]/[OFF] | Select [ON] to specify Binding Margin. |
[Margin Position] | Select the paper binding position.
|
[Margin Adjustment Value] | Select [Margin Adjustment Value], and specify the margin value in [Margin Width]. |
If an image is partially lost due to incorrect margin setting, reduce the image size to print.
This function is not available when you want to make prints from the following User Boxes.
ID & Print User Box, External Memory
Fine-tuning the print position ([Image Shift])
You can fine tune the image position by shifting it in a horizontal or vertical direction according to the paper size. Use this function when you want to make a fine adjustment, such as changing the print position a little or printing images in different positions between the front and back sides.

Setting | Description |
|---|---|
[ON]/[OFF] | Select [ON] to shift an image. |
[Front Side]/[Back Side] | Adjusts the image position on the print paper by shifting it in horizontal or vertical direction.
|
[Apply on Back] | Set this item to use the same settings as used on the front side for the rear side of the print paper. |
This function is not available when you want to make prints from the following User Boxes.
ID & Print User Box, External Memory
Inserting front and back covers ([Cover Sheet])
You can insert a cover sheet before the first page or after the last page of the text. The front and rear cover sheets can be a paper different from body pages (in paper color and thickness). You can print them at a time.

Setting | Description |
|---|---|
[ON]/[OFF] | Select [ON] to set Cover Sheet. |
[Front Cover] | Specify the method to insert a front cover.
|
[Back Cover] | Specify the method to insert a back cover.
|
Use the same size cover and body sheets, and stack them in the same orientation.
This function is not available when you want to make prints from the following User Boxes.
ID & Print User Box, External Memory
Inserting a different sheet into the specified page ([Insert Sheet])
Paper different from other pages is inserted into the specified pages. You can insert a color paper and a thick paper. Also, you can print or not print the original data on the inserted sheet.

Setting | Description |
|---|---|
[ON]/[OFF] | Select [ON] to set Insert Sheet. |
[Insert Position] | Set a page number where you wish to insert a different sheet.
|
[Insert Paper] | Select the paper tray loaded with the paper to be inserted. Use the same size of paper for the insert pages and text pages, and set them in the same direction. |
[Insert Type] | Specify to print a file on the insertion papers or not. |
You can specify up to 30 positions for insert sheets.
Use insert sheets and text sheets of the same size, and stack them in the same orientation.
This function is not available when you want to make prints from the following User Boxes.
ID & Print User Box, External Memory
Arranging the first page of the chapter on the front side ([Chapters])
During 2-Side printing, the first page of each chapter is always printed on the front side of the sheet of paper used. The first page of each chapter and the text pages are printed on the same sheets. Also, you can use a sheet different from text sheets for the first page of each chapter.

Setting | Description |
|---|---|
[ON]/[OFF] | Select [ON] to set Chapters. |
[Chapter Position] | Specify the chapter page to be printed on the front side.
|
[Insert Chapter] | Select whether to use the same page or a different page for the chapter and the text.
|
[Chapter Paper] | If [Insert Chapter] is set to [Copy Insert], select the paper tray where the Chapter Paper is stacked. If the type of paper used for chapter papers and text papers differs, use the same size paper and stack them in the appropriate direction. |
You can set up to 30 positions for the first page of chapters.
Make sure that the paper loaded for the first page of the chapter and for text copies are of the same size and orientation.
When you set the Chapters function, the [Duplex/Combine] option is set to [2-Sided] automatically.
This function is not available when you want to make prints from the following User Boxes.
ID & Print User Box, External Memory
Adding the print date/time ([Date/Time])
Add the print date/time to the first page or all pages.

Setting | Description |
|---|---|
[ON]/[OFF] | Select [ON] to add the date/time. |
[Date Format] | Select the date printing format. |
[Time Format] | Select the time printing format. If you do not want to print the time, select [OFF]. |
[Pages] | Select the range of pages to print. |
[Text Details] | If necessary, select the text printing format. |
[Print Position] | If necessary, select the print position of the text. You can more finely adjust the print position in [Adjust Position]. |
This function is not available when you want to make prints from the ID & Print User Box.
Adding a page number ([Page Number])
Adds page and chapter numbers on printed sheets. Page and chapter numbers are printed on all pages.

Setting | Description |
|---|---|
[ON]/[OFF] | Select [ON] to set Page Number. |
[Page Number Type] | Select the format of the page number. |
[Starting Page Number] | Specify the starting page number to be printed on the first page. For example, to print page numbers from the third page of the file, enter "-1". The first page of the file is counted as "-1", the second page as "0", and the third page is counted as "1". In [Starting Page Number], a page number is printed on pages 1 and later. If "2" is entered, page numbers are printed from the first page of the file as "2, 3", etc. in order. "-" (minus sign) switches "+" and "-" each time you tap [*]. |
[Starting Chapter Number] | Specify the starting chapter number if a file is divided into chapters, and you want to print chapter numbers from the second chapter. You can specify starting chapter numbers when you have selected [Chapter Page] in [Page Number Type]. For example, to print chapter numbers from the third chapter, enter "-1". The first chapter of the file is counted as "-1", the second chapter as "0", and the third chapter is counted as "1". In [Starting Chapter Number], a chapter number is printed on the chapters that are count as 1 and later. If "2" is entered, a number is printed from the first page of the first chapter of the file as "2-1, 2-2". "-" (minus sign) switches "+" and "-" each time you tap [*]. |
[Text Details] | If necessary, select the text printing format. |
[Print Position] | If necessary, select the print position of the text. You can more finely adjust the print position in [Adjust Position]. |
[Insert Sheet Setting] * | When you insert sheets using the Cover Sheet function of Insert Sheet function, specify whether or not to print a page number on the inserted sheet.
|
*[Insert Sheet Setting] is displayed when data is printed from the following User Boxes.
User Box
Secure Document User Box
Annotation User Box
This function is not available when you want to make prints from the ID & Print User Box.
Adding a stamp ([Stamp])
A text such as "PLEASE REPLY" or "DO NOT COPY" is printed on the first page or all pages. You can select the text to be added from the registered fix stamps and arbitrary registered stamps.

Setting | Description |
|---|---|
[ON]/[OFF] | Select [ON] to specify Stamp. |
[Stamp Imprint] | Select the stamp you want to print. |
[Pages] | Select the range of pages to print. |
[Text Details] | If necessary, select the text printing format. |
[Print Position] | If necessary, select the print position of the text. You can more finely adjust the print position in [Adjust Position]. |
This function is not available when you want to make prints from the ID & Print User Box.
Adding a stamp on the entire page ([Stamp Repeat])
Print a stamp such as "Copy" or "Private" on the entire page.

Setting | Description |
|---|---|
[ON]/[OFF] | Select [ON] to set Stamp Repeat. |
[Stamp Repeat Type] | Select a stamp used. The date and time can also be printed.
|
[Stamp Selection] | The registration status of the stamp is displayed. |
[Detail Setting] | Select the density, size, and pattern overwriting of print characters if necessary. |
[Change/Delete Position] | Allows to check, change or delete the stamp position settings if necessary. You can change the stamp sequence and insert a space between stamps. When you select up to four stamps, you can change their angle (45 degrees). |
This function is not available when you want to make prints from the ID & Print User Box.
Adding information to the header/footer ([Header/Footer])
Adds the date, time, and any desired text in the top and bottom margins (header/footer) of the specified page. You must register the information to be added for the header/footer in advance on this machine.

Setting | Description |
|---|---|
[ON]/[OFF] | Select [ON] to print the header/footer. |
[Recall Header/Footer] | Select the header/footer to be printed. Select the header/footer from among those registered in advance. |
[Check/Change Temporarily] | If necessary, check or temporarily change the details of the program that is selected in [Recall Header/Footer].
|
This function is not available when you want to make prints from the following User Boxes.
ID & Print User Box, External Memory
Composing registered images ([Registered Overlay])
You can recall registered overlay image and compose it to a file image. This is useful for registering frequently used overlay images.

Setting | Description |
|---|---|
[ON]/[OFF] | Select [ON] to set Registered Overlay. |
[Recall Overlay Image] | Specify which side of the paper to compose the overlay image, and select an overlay image to be composed. Check the density, composition method, and preview of overlay image if necessary. If you set [Apply on Back], the image on the front side is composed on the back side of paper. |
[Pages] | Select the range of pages on which an overlay image is composed. |
This function is not available when you want to make prints from the following User Boxes.
ID & Print User Box, External Memory
Printing a concealed security watermark ([Copy Protect])
A text such as "Copy" or "Private" is printed as a concealed text.

Setting | Description |
|---|---|
[ON]/[OFF] | Select [ON] to set Copy Protect. |
[Copy Protect Type] | Select a stamp used. The date and time can also be printed.
|
[Stamp Selection] | The registration status of the stamp is displayed. |
[Detail Setting] | Select the density, size, and pattern overwriting of print characters if necessary. |
[Copy Protect] | Select how to print the copy protect pattern. Also, you can set the pattern contrast if necessary. |
[Background Pattern] | Select a background pattern. |
[Change/Delete Position] | Allows to check, change or delete the stamp position settings if necessary. You can change the stamp sequence and insert a space between stamps. When you select up to four stamps, you can change their angle (45 degrees). |
This function is not available when you want to make prints from the ID & Print User Box.
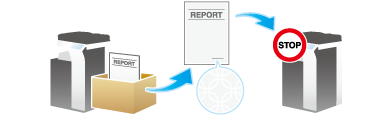
Adding copy restriction information ([Copy Guard])
Copy Guard is a copy protection function that prints concealed security watermarks such as "Private" or a date in the background to prevent unauthorized copying, and embeds a copy restriction pattern on all printed sheets.
If an attempt is made using a device that supports the copy guard function to copy a sheet that has been copy protected, a copy guard pattern is scanned, the copying process is canceled, and the job is deleted.
Setting | Description |
|---|---|
[ON]/[OFF] | Select [ON] to set Copy Guard. |
[Stamp Text] | Select a stamp used. The date and time can also be printed.
|
[Stamp Selection] | The registration status of the stamp is displayed. |
[Detail Setting] | If necessary, select the text printing format. |
[Copy Guard] | If necessary set the contract of a copy guard pattern. |
[Background Pattern] | Select a background pattern. |
To use this function, an option is required. For details on the required option, refer to Here.
To use this function, select [Copy Security] (Here), and set [Copy Guard] to ON.
The Copy Guard function does not support color paper, envelopes and transparencies.
This function is not available when you want to make prints from the ID & Print User Box.
Adding a password ([Password Copy])
Password Copy is a copy protection function that prints concealed security watermarks such as "Private" or a date in the background to prevent unauthorized copying, and embeds a password for the password copy function on all printed sheets.
If an attempt is made using a device that supports the password copy function to copy a sheet that has been prepared for password copy, a password copy pattern is scanned and entry of a password is requested. Copying starts if the correct password is entered.

Setting | Description | |
|---|---|---|
[ON]/[OFF] | Select [ON] to set Password Copy. | |
[Password] | Enter the password to restrict copying. | |
[Stamp Setting] | Set a stamp to be printed on each paper. | |
[Stamp Text] | Select a stamp used. The date and time can also be printed.
| |
[Stamp Selection] | The registration status of the stamp is displayed. | |
[Detail Setting] | If necessary, select the text printing format. | |
[Password Copy Pattern] | Specify the contract of password copy guard pattern if necessary. | |
[Background Pattern] | Select a background pattern. | |
To use this function, an option is required. For details on the required option, refer to Here.
To use this function, select [Copy Security] (Here), and set [Password Copy] to ON.
The Password Copy function does not support color paper, envelopes and transparencies.
This function is not available when you want to make prints from the ID & Print User Box.