
Name and Function of Each Part in Main Unit
Front
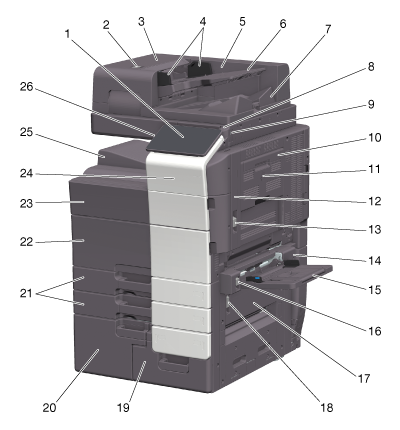
No. | Name | Description |
|---|---|---|
1 | Control Panel | Used to configure various settings in this machine. |
2 | Left Cover Release Lever | Used to open the Left Cover. |
3 | Left Cover | Open the Left Cover when clearing a paper jam. |
4 | Lateral Guide | Adjust this guide along the width of the original. |
5 | Reverse Automatic Document Feeder | Automatically feeds and scans originals by page. This unit scans a 2-sided original by only requiring the paper be fed into the machine once without reversing. This unit is referred to as ADF in the manual. |
6 | Original Tray | Load the original face up in this tray. |
7 | Original Output Tray | The scanned original is fed out onto this tray. |
8 | Stylus Pen | Used to select a menu on the Touch Panel, or enter characters. |
9 | USB Port (Type A) USB2.0/1.1 | Used to connect a USB flash drive to this machine. |
10 | Automatic Duplex Unit Release Lever | Used to lock the Auto Duplex Unit. |
11 | Auto Duplex Unit | Used to reverse paper when performing 2-sided printing. |
12 | Top Right Door | Open this door to clear a paper jam. |
13 | Top Right Door Release Lever | Used to lock the Top Right Door. |
14 | Bypass Tray Door | Open this door when clearing a paper jam in the Bypass Tray. |
15 | Bypass Tray | Used to print data on irregularly size paper, thick paper, transparencies, postcards (4 6 (A6 Card)), envelopes, or label sheets. For details on the available paper, refer to Here. |
16 | Bypass Tray Door Lever | Used to lock the Bypass Tray Door. |
17 | Bottom Right Door | Open this door to clear a paper jam. |
18 | Bottom Right Door Release Lever | Used to lock the Bottom Right Door. |
19 | Tray 4 | Allows you to load up to 1000 sheets of plain paper. For details on the available paper, refer to Here. |
20 | Tray 3 | Allows you to load up to 1500 sheets of plain paper. For details on the available paper, refer to Here. |
21 | Tray 1, Tray 2 | Allows you to load up to 500 sheets of plain paper. For details on the available paper, refer to Here. |
22 | Lower Front Door | Open this door to replace the Waste Toner Box, and to clean the Print Head Glass. |
23 | Upper Front Door | Open this door to replace a Toner Cartridge. |
24 | Mobile Touch Area | This area is used to associate this machine with an NFC-compatible Android terminal or an iOS terminal compatible with Bluetooth LE. |
25 | Output Tray | Outputs printed pages. |
26 | Power key | Switches this machine to the Power Save mode. For details on the Power key, refer to Here. |
Side/rear
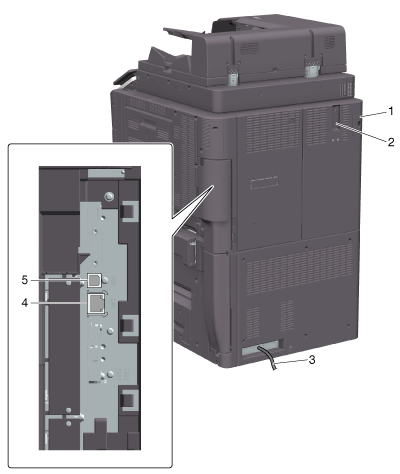
No. | Name | Description |
|---|---|---|
1 | Finisher Connector | Connect the cable of the Finisher. |
2 | Filter | Used to collect toner powders inside the main unit. |
3 | Power Cord | Used to supply power to this machine. |
4 | Network Connector (10Base-T/100Base-TX/1000Base-T) | Connect to this port when using this machine as a network printer or network scanner. |
5 | USB Port (Type B) USB2.0/1.1 | Connect to this port when using this machine as a USB-connected printer. |

The network port of this product is following No.4 and No.5. A port is activated when a network port inserts a cable.
Inside
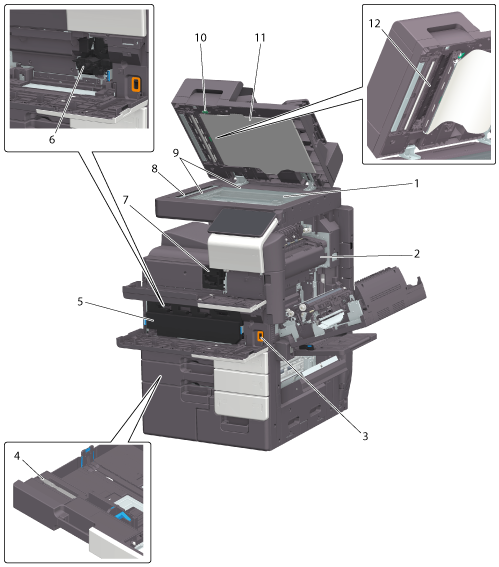
No. | Name | Description |
|---|---|---|
1 | Original Glass | Used to load the original. |
2 | Fusing Unit | Used to fuse toner to paper using heat and pressure. |
3 | Main Power Switch | Press this switch to turn the machine on or off. |
4 | Printhead Cleaner | Used to clean the surface of the Print Head Glass. |
5 | Waste Toner Box | Used to collect used waste toners. |
6 | Developing Unit/Drum Unit | Used to create a print image. |
7 | Toner Cartridge | Contains toner, with which a print image is created. |
8 | Slit Scan Glass | Used to scan an original image when using the ADF. |
9 | Original Scale | Load the original along this scale. This scale is also used to measure the size of the loaded original. |
10 | Opening and Closing Guide | Lever that locks the guide to scan the back side of an original. Open this guide when clearing a paper jam or cleaning the Slit Scan Glass (back). |
11 | Original Pad | Fixes the loaded originals. |
12 | Slit Scan Glass (back) | Used to scan the back side of an original when using the ADF. |