Common Setting: Setting the Various Operations of the Machine
The following features can be provided by switching the selection. This setting can also be performed by selecting [Common Setting] from the User Setting.
Menu item | Description | Setting options (with default bolded) |
|---|---|---|
[One Shot Message Indication Time] | Select the time span to display a shot message, such as [Original size is A4], in the message area of the touch panel. | 3 seconds, 5 seconds |
[Offset by Job Unit] | Specify whether or not to offset the output sheets by job. | ON, OFF Also specify the number of jobs to be offset when selecting ON for this function (default: 1). |
[Continuation Print] | Specify whether or not to output multiple reserve jobs in succession without stopping the machine at a job break. | Copy ON, Copy OFF, Printer ON, Printer OFF |
[Back Side Magnification Adjustment] | Specify whether to enable the lens adjustment mode. | ON, OFF |
[Fusing Stability (Mixed Media)] | Select what to prioritize when fusing. | Best Quality, Better Quality, Speed |
[Prior Paper Type] | Specify the temperature setting of the fusing section on standby. It can shorten the waiting time before printing by selecting a frequently used paper. | Others, Plain |
[Dash Length(Page Stamp)] | Select the length of the dash to be used in a style of [Page No.] in [Stamp]. | Long, Short |
[Center Crop Mark Trim Margin] | Specify the space between the center crop mark and image area (center crop mark trim margin). | 0.0 mm to 20.0 mm (Default: 1.0) |
[Schedule Cross Axis Unit (Default)] | Select the unit of horizontal axis on the [Schedule] screen. | Timetable, Time Frame (m), Sheet Volume |
[Hold Job Status after Output (Default)] | Select the default value to delete or save the data of hold job after outputting. | Delete, Save |
[Offset Output Mode] | Specify how to offset the output sets. | Change Out Pos., Stop Print, Change Out Position + Partition Paper (Tray1 to Tray5, Bypass, PI 1, PI 2), Partition Paper (Tray1 to Tray5, Bypass Tray, PI 1, PI 2) |
[Hold Job Direct Output (Default)] | Select the default for the Direct Output check box under the [Hold Job] screen. [ON] selects the check box, and [OFF] clears the check box. After the change, turn OFF/ON the power switch to apply the setting. | ON, OFF |
[Needless Tab Paper Exit] | Specify whether or not to automatically discharge the oddments of tabbed sheets loaded in a tray as a set for copy job. | ON, OFF |
[Remaining Memory (Measurement Unit)] | Select the unit of displaying the remaining memory. | %, GB |
[Remaining Memory (Warning)] | Select the percentage at which to give warning when the remaining memory is low. | 5% or Less, 10% or Less |
[[Proof Copy] 1 Set/1st Sheet Selection] | If it is turned ON, the confirmation window is opened and you are asked to output one confirmation copy or to output only its first page when the [Proof Copy] is pressed. | ON, OFF |
[Both Sides Rotate/Skew] | If [Disable] is selected, the [Rotate/Skew] adjustment does not become available and does not function. | Enable, Disable |
[Auto Image Adjustment Deviation Check] | Select whether to automatically check a deviation. If you select [ON], enter the specified value of a deviation. | ON (ON: 0.5 mm to 10.0 mm, Default: 2.0), OFF |
[Operation after Deviation Detected] | Select how to perform operations when a deviation is detected. If you select [Continue Output], select the paper tray to output data to and the number of deviation detection times. | Stop, Continue Output, Partition Paper (Tray1 to Tray5), Detection Count (2 to 10 times, Default: 2) |
[Select Chart Type (Auto Image Adj.)] | Select an automatic image adjustment chart for each paper weight. | Type1, Type2 |
The [Dash Length(Page Stamp)] setting is enabled when Image Controller IC-603 is mounted.
[Schedule Cross Axis Unit (Default)] is displayed when Image Controller IC-603 is mounted.
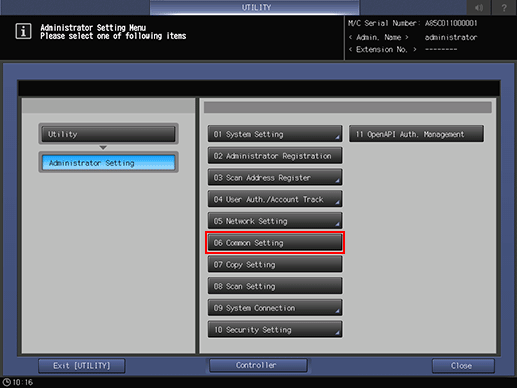
Follow the procedure on Administrator Setting to display the [Administrator Setting Menu] screen.
Press Common Setting on the [Administrator Setting Menu] screen.

The [Common Setting] screen is displayed.
For subsequent operations, follow the same procedure as that in [User Setting] - [Common Setting]. Refer to Common Setting: Setting the Various Operations of the Machine for details.

