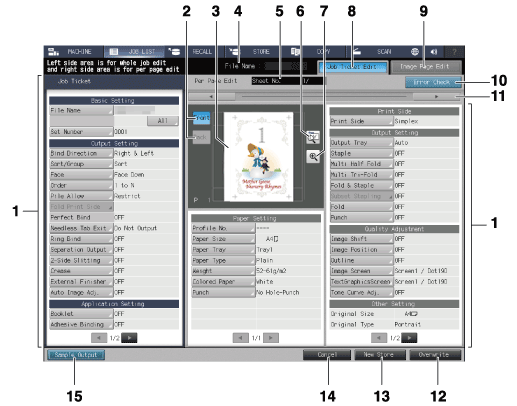
[Job Ticket Edit] Screen
This section describes an outline of the operation of the [Job Ticket Edit] screen. Edit a job by operating in combination with the [Image Page Edit] screen.
If images with different type of job (copy/print) or the controller image compression setting (priority on gradation/priority on resolution) are attached on the image data in the [Image Page Edit] screen, you cannot select [Booklet], [Adhesive Bind] or [Combine] of [Application Setting] cannot be selected in the [Job Ticket Edit] screen.
The description of Register Crop Mark is provided in another section. Refer to Specifying Crop Mark for details.
For details about the controller image compression setting, refer to Controller Image Comp. Set: Adjusting the Jagged Outlines of Text or Line Images.
For details about the [Image Page Edit] screen, refer to Image Page Edit Screen.

No. | Name | Description |
|---|---|---|
1 | Image sheet setting items and set contents | Displays setting items and set contents of the preview image data. Press the key available for selection to change the setting. Use [ |
2 | [Front], [Back] | Press to preview the front and back side of a 2-sided original. |
3 | Preview image display | Displays the preview image of the file selected on the [Hold Job] screen or [Secure Job] screen. |
4 | File Name display | Displays the name of the file selected on the [Hold Job] screen or [Secure Job] screen. |
5 | Sheet No. display | Displays the total sheet count of the file selected on the [Hold Job] screen or [Secure Job] screen, and also the sheet count of the preview images. |
6 | Rotation/Output direction key | Pressed to rotate the preview image, or to check the output direction of the image. |
7 | Enlarged preview key | Press to enlarge a preview image. On the enlarged preview screen, you can set a crop mark or the Image Shift function. |
8 | [Job Ticket Edit] tab | Press to display the [Job Ticket Edit] screen. |
9 | [Image Page Edit] tab | Press to display the [Image Page Edit] screen. |
10 | [Error Check] | Turns orange if a setting that is unavailable for output is detected. Press this key to display the cause. |
11 | [ | Pressed to scroll the preview image. |
12 | [Overwrite] | Overwrites to save the setting changes along with the image data. |
13 | [New Store] | Newly stores the setting changes along with the image data. |
14 | [Cancel] | Press to not save the setting changes. |
15 | [Sample Output] | Press this button to output and check the changed setting. One set, a sheet in the preview, or a sheet can be specified as an output target. |
Items that can be set in the [Job Ticket Edit] screen
Item | Setting | |
|---|---|---|
Left hand of the screen | [Basic Settings] | - [File Name] |
[Output Setting] | - [Bind Direction] | |
[Application Setting] | - [Booklet] | |
[Other Setting] | The following items cannot be changed. | |
Center of the screen | [Paper Setting] | - [Profile No.] |
Right hand of the screen | [Print Side] | Simplex/Duplex can be set. |
[Output Setting] | - [Output Tray] | |
[Quality Adjustment] | - [Image Shift] | |
[Other Setting] | The following items cannot be changed. | |
[Color Sheets in One Set] | The page number of color or black-and-white in the job is displayed. The following items cannot be changed. | |


