Specify Settings of Color Conversion
Specify the Color Conversion setting to use as default for the Color Configuration you create.
In the tree view on the [Color Configuration Management] screen, click a color configuration that is shown in black.
The details are displayed on the right side of the screen.
Click [Setting] in the Color Conversion Option Settings at the bottom of the detail information fields.
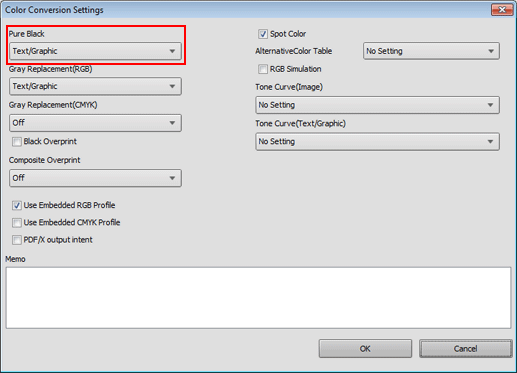
[Color Conversion Settings] screen is displayed.
Select the setting of Pure Black from [Pure Black].

To use gray replacement, select from [Gray Replacement(RGB)] and [Gray Replacement(CMYK)].
To use black overprint, check [Black Overprint].
Select the setting of Composite Overprint from [Composite Overprint].
To use the profile that is embedded for RGB, select [Use Embedded RGB Profile].
It performs color conversion by using profiles that are embedded in objects in print data.
To print by using a profile that you assign on an application (example: Adobe Photoshop), select this.
To use the profile that is embedded for CMYK, select [Use Embedded CMYK Profile].
It performs color conversion by using profiles that are embedded in objects in print data.
To print by using a profile that you assign on an application (example: Adobe Photoshop), select this.
To use output intent of PDF/X, select [PDF/X output intent].
To use spot color, check [Spot Color].
To use alternative colors, select a table in [AlternativeColor Table].
To use the RGB simulation, check [RGB Simulation].
To use tone curve adjustment, select an option from [Tone Curve Adjustment].
When individual adjustment of tone curve is enabled, set [Tone Curve(Image)] and [Tone Curve(Text/Graphic)].
If necessary, enter the description to [Memo].
Click [OK] and return to [Color Configuration Management] screen.
