Paper Setting: Registering the Paper Conditions
Register the frequently used paper setting as a paper profile. You can make print settings of the tray by calling the paper profile.
This section describes how to select a paper size and register the paper profile.
You can also register paper profiles using [Reg./Del. Paper Set.] on the [MACHINE] screen. For details, refer to Register/Delete Paper Setting: Registering/Deleting Profile.
For details about the paper setting of the paper tray, how to register a currently used paper setting as a paper profile, and how to call a paper profile, refer to Paper Setting: Setting Paper for Tray.
Paper setting consists of the following 12 conditions that can be specified as desired.
Setting item | Description | Setting options |
|---|---|---|
Paper Type | The following seven paper types are provided according to the plainness of paper. | Plain, Fine, Color Specific, Coated-GL, Coated-ML, Coated-GO, Coated-MO |
Profile Name | Enter the desired paper profile name. | You can enter up to 50 one-byte characters (25 two-byte characters). |
Document size | Selecting Standard allows you to select the standard size of paper. Selecting Custom allows you to enter the desired dimensions from the screen. This setting can also be made by recalling a custom size previously registered. To specify Tab Paper, select either A4T | Standard: Custom: Lengthwise 100.0 mm to 330.2 mm / 3.93" to 12.98", Widthwise 148.0 mm to 487.7 mm / 5.81" to 16.97" Tab Paper: A4T |
Weight | Select one from 9 types provided on the screen. Four types of coated paper become available when the weight over 81 g/m2 / 22 lb Bond is selected. The unit of weight can be switched. The unit used to register the condition is also used to display that condition on the [MACHINE] screen and the [COPY] screen when called. The speed can be set to High for the paper weight of 176 g/m2 / 47 lb Bond or less. The speed can be set to Low for the paper weight of 177 g/m2 / 48 lb Bond or more. | Weight Setting: 62-74g/m2 / 16-19 lb Bond 75-80g/m2 / 20-21 lb Bond 81-91g/m2 / 22-24 lb Bond 92-105g/m2 / 25-28 lb Bond 106-135g/m2 / 29-36 lb Bond 136-176g/m2 / 37-47 lb Bond 177-216g/m2 / 48-57 lb Bond 217-256g/m2 / 58-68 lb Bond 257-300g/m2 / 69-81 lb Bond Change Unit: g/m2, Duodecimo-Kg, Octavo-Kg, lb Bond, lb Index, lb Cover Speed Setting: High, Middle, Low, Auto Change |
Colored Paper | Specify whether or not the paper is colored. | White, Others |
Punch | Specify whether or not the paper is punched. When pre-punched paper is used, selecting [Punch] for [Output Setting] has no effect. | Pre-Punched, No Hole-Punch |
Both Sides Adjust | Specify magnification ratios (vertical, horizontal) and image shift amounts (up/down, right/left) for both front and back pages in order to align the images printed on front and back pages in duplex printing. Chart Adjustment can be used for adjustment. It is advisable to perform Both Sides Adjust for every paper to be used, as the shrinkage ratio differs according to the paper type, paper brand, or difference in temperature of storage location. It is possible to disable the horizontal zoom setting for the back page in [Common Setting] of the administrator setting. This option also allows you to adjust the registration loop before using the Both Sides Adjust function. | Vertical Zoom: Front/Back -1.00 to +1.00 (1 step = 0.01%) Horizontal Zoom: Front -1.00 to +1.00 (1 step = 0.01%), Back -0.80 to +0.20 (1 step = 0.01%) Image Shift Up/Down: Front/Back -10.0 mm to +10.0 mm (1 step = 0.1 mm) Image Shift Right/Left: Front/Back -3.0 mm to +3.0 mm (1 step = 0.1 mm) Registration Loop: Front/Back -9.9 mm to +9.9 mm (1 step = 0.1 mm) |
Curl Adjustment | The machine mounted with the optional Relay Unit RU-509 provides [Curl Adjustment] on the screen, which allows you to correct the curl (arc-like distortion) of output paper. Also, switching [ON] and [OFF] for Humidifier Setting is available if the relay unit is equipped with Humidifier HM-102. | Curl Adjustment: -2, -1, 0, +1, +2 , OFF Humidifier Setting: ON, OFF |
Thickness | The machine mounted with Image Controller IC-602 provides [Thickness] on the screen, and selecting [Specify] allows the machine to estimate the remaining amount of paper in the tray with greater accuracy. | Not Specify, Specify Adjustment Range: 0.050 mm to 0.500 mm |
Process Adjustment | Process adjustment of transfer/separation/fusing and Up Fusing Initial Temp., 2ndTrans.Pressure, CPM Down, Toner Amount Save, Dens. Adj. Per Tray (YMC), Dens. Adj. Per Tray (K), Mis-centering Detect JAM, Int. Transfer Separation, Thick BK Mode, Feed Correction Level, Output Curl Adjustment, Back on Top Output Curl Adj., Mis-centering Detection, Fusing Air Separation Air Level Setting, Change Fusing Pressure, Hard Paper Mode are available. For details about the Detected Centering JAM setting, refer to Print Job JAM Setting: Setting the Detection of Paper Jam Caused by Misalignment.
[Process Adjustment] is not displayed by default. Contact your service representative. | 2nd Transfer Output Adj. (Front): -50 to +50 2nd Transfer Output Adj. (Back): -50 to +50 2nd Transfer-Lead Edge (Front): -50 to +50 2nd Transfer-Lead Edge (Back): -50 to +50 2nd Transfer-Rear Edge (Front): -50 to +50 2nd Transfer-Rear Edge (Back): -50 to +50 Separation AC (Front): -600 to +600 Separation AC (Back): -600 to +600 Separation DC (Front): -60 to +60 Separation DC (Back): -60 to +60 Upper Fusing Roller Temperature: -20 to +20 Lead Edge Erase Quantity: 0 to +200 Temp. Gap of Fus. Edge and Mid.: -10 to +10 Lower Fusing Roller Temperature: -15 to +10 Rear Edge Erase Quantity: 0 to +200 ADU Reverse Timing: -6 to +6 Fusing Speed (Front Side): -200 to +200 Fusing Speed (Back Side Offset): -200 to +200 Up Fusing Initial Temp.: Auto, OFF 2ndTrans.Pressure: Auto, Normal, Low CPM Down: Normal, Down Toner Amount Save: ON, OFF Dens. Adj. Per Tray (YMC): 0 (standard), +1, +2, +3 (Max.) Dens. Adj. Per Tray (K): 0 (standard), +1, +2, +3 (Max.) Mis-centering Detect JAM: Detect, Not Detect Int. Transfer Separation: Auto, ON, OFF Thick BK Mode: ON, OFF Feed Correction Level: 0 (Normal), -1, -2 Output Curl Adjustment: Auto, 0, +1, +2 Output Curl (Back on Top): Auto, 0, +1, +2 Mis-centering Detection: Standard, Quick, Not Detect Fusing Air Separation Air Level Setting: 1 (Weak) to 7 (Strong), Auto (3) Change Fusing Pressure: Auto, Normal, Low Hard Paper Mode: ON, OFF |
Color density control | The machine mounted with Relay Unit RU-509 provides [Color Density] on the screen. This setting is enabled when [ON] is selected for [Use Color Density Control], which is accessed from the [Adjustment Menu] screen, selecting [Color Density Control] - [Basic Settings]. | Each Paper Type Color Adj.Data: Default Adj.Data, Registered Adj. Data |
Paper Type Descriptions
Paper name | Description |
|---|---|
Plain | The plain paper is used for copying/printing in general and is called "PPC paper." It is usually not recycled paper. Select [Plain] for the plain paper or recycled paper to be used in monochrome copying/printing. |
Fine | The fine paper is non-coated paper generally used for offset printing. This paper type has a high degree of whiteness and used for various purposes. Select [Fine] for the paper having such characteristics as mentioned above. |
Color Specific | Color Specific is the type of paper used in color copying/printing to prevent the color from dulling on fine paper. Specify [Color Specific] for the paper having such characteristics as mentioned above. |
Coated-GL (Gloss Laser) | Glossy paper for laser printing. This paper type is selectable only when the weight is set to 81 g/m2 / 22 lb Bond or more. |
Coated-ML (Mat Laser) | Matte paper for laser printing. This paper type is selectable only when the weight is set to 81 g/m2 / 22 lb Bond or more. |
Coated-GO (Gloss Offset) | Glossy paper for offset printing. This paper type is selectable only when the weight is set to 81 g/m2 / 22 lb Bond or more. |
Coated-MO (Mat Offset) | Matte paper for offset printing. This paper type is selectable only when the weight is set to 81 g/m2 / 22 lb Bond or more. |
Adding/Editing the Paper Conditions Registration
Follow the procedure on User Setting to display the [User Setting Menu] screen.
Press [System Setting] on the [User Setting Menu] screen, and then press [Paper Tray Setting] and [Paper Setting] in sequence.
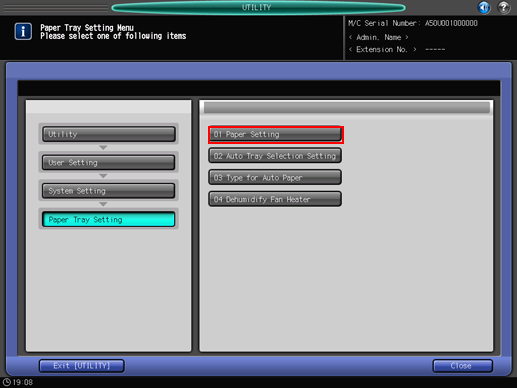
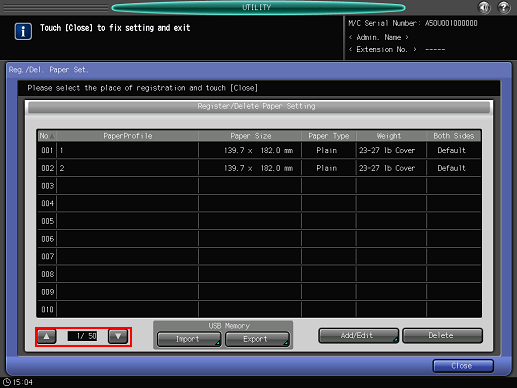
The [Register/Delete Paper Setting] screen is displayed.
Select the destination to register paper conditions.
Use the scroll buttons [
 ] or [
 ] to display the desired destination, select that row, then press [Add/Edit].
To edit the paper conditions previously registered, select that row.
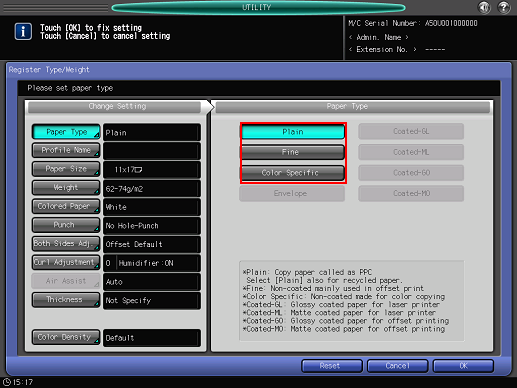
The [Register Type/Weight] screen is displayed.
Select one of the buttons under [Paper Type].
You can select [Coated-GL], [Coated-ML], [Coated-GO], and [Coated-MO] when you set the value of [Weight] to 81 g/m2 / 22 lb Bond or more.
Press [Profile Name].
Enter the desired paper profile name. You can enter up to 50 one-byte characters (25 two-byte characters).
Press [OK].
Press [Paper Size].
The [Paper Size] screen is displayed.
Select the desired button from [Standard], [Custom], and [Tab Paper].
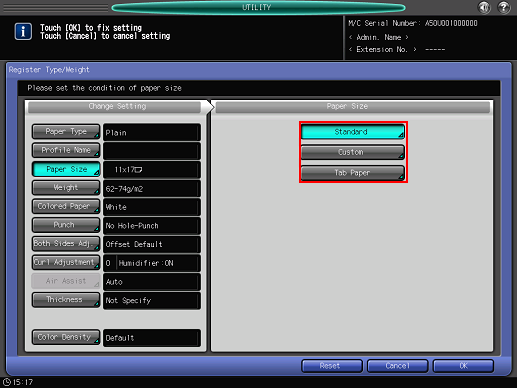
Proceed to step 8 if you selected [Standard].
Proceed to step 9 when selecting [Custom].
Proceed to step 10 when selecting [Tab Paper].
Pressing [Standard] displays the [Standard Size Setting] screen.
Select the desired standard size button.
Press [OK].
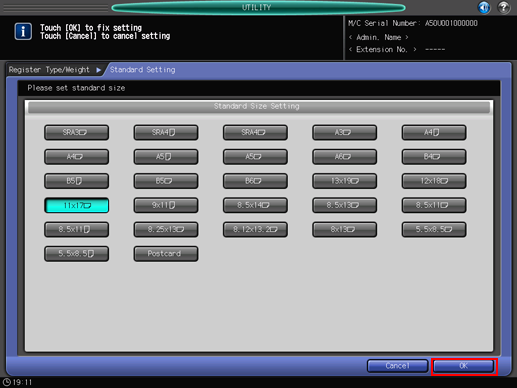
Proceed to step 11.
Selecting [Custom] displays the [Custom Size Setting] screen.
To specify a custom size:
Press [(1)], then use the touch panel keypad, [
 ][
][ ] to enter the desired lengthwise dimension.
Press [(2)], then use the touch panel keypad, [
 ][
][ ] to enter the desired widthwise dimension.
Press [(3)], then use the touch panel keypad, [
 ][
][ ] to enter the desired trimming amount for covers used in Fold & Staple/Multi Half Fold mode. The button to enter the trimming amount is displayed on a machine with Saddle Stitcher SD-506 mounted.
To recall a registered custom size:
Press [Size Recall]. The [Size Recall] screen is displayed.
Use [Previous] and [Next] to scroll to the desired custom size. Entries from [01] to [20] are provided on the screen.
Press the number button of the custom size to be used, then press [OK].
Proceed to step 11.
Selecting [Tab Paper] displays the [Tab Paper Setting] screen.
Select A4T
 or 8.5 x 11T
  .
.Use the touch panel keypad, [
 ][
][ ] to enter the number of tabs. Setting range for the number of tabs is from 1 to 15.
Press [OK].
Press [Weight].
The [Weight] screen is displayed. Select the desired weight key under [Weight Setting].
Select the desired unit button under [Change Unit]. The screen displays the paper weight in the selected unit.
Selecting a paper weight of 256 g/m2 / 68 lb Bond or less enables the buttons provided under [Speed Setting], allowing you to specify the processing speed. Some speed settings cannot be selected depending on the paper weight. Select the desired button.
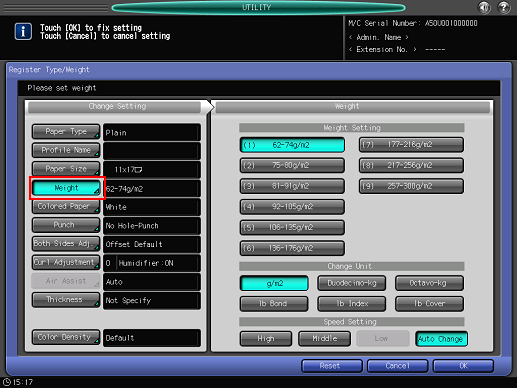
Press [Colored Paper].
Select [Others] for colored paper, or select [White] for white paper.
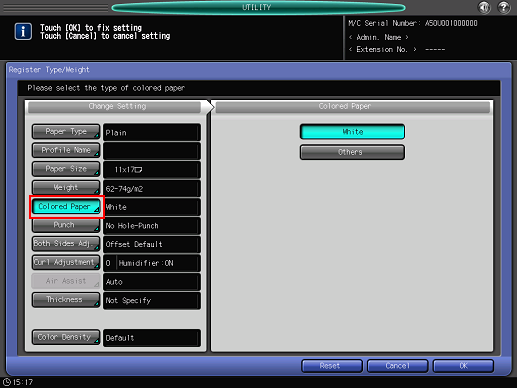
Press [Punch].
Select [Pre-Punched] for punched paper, or select [No Hole-Punch] for paper without punch holes.
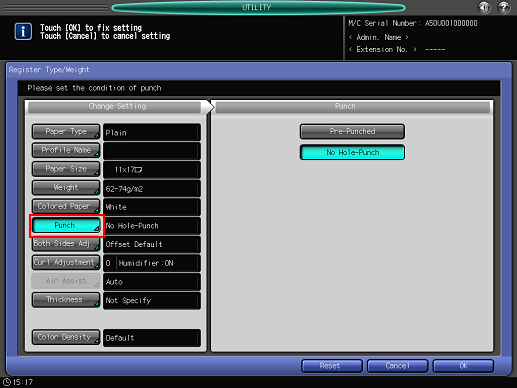
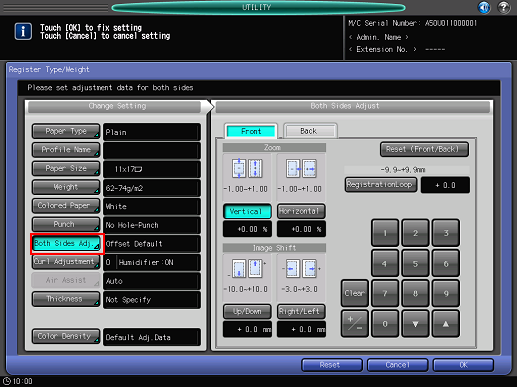
Press [Both Sides Adj.].
For details about Both Sides Adjust, refer to Both Sides Adjust Screen.
If you change the [Zoom] setting for [Front] or [Back], [Image Shift] setting, or [Registration Loop setting], the Both Sides Adjust indication changes to [Offset Changed].
If you press [Reset], all Both Sides Adjust settings are restored to default values.
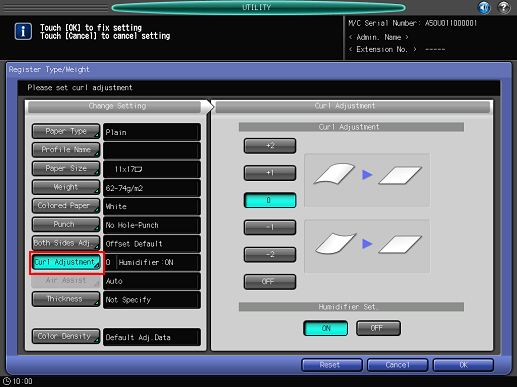
Press [Curl Adjustment].
For details about Curl Adjustment, refer to Curl Adjustment: Reducing Curl (Relay Unit RU-509).
[Curl Adjustment] is available on the machine mounted with Relay Unit RU-509. [Humidifier Setting] of [Curl Adjustment] is available on the machine with Relay Unit RU-509 that has Humidifier HM-102 mounted.
If the paper weight of [Color Specific] is set from 62 to 135 g/m2 / 16 to 36 lb Bond, and the paper weight of [Coated-GL], [Coated-ML], [Coated-GO], and [Coated-MO] is set from 81 to 135 g/m2 / 22 to 36 lb Bond, [Humidifier Setting] and [ON]/[OFF] selection become unavailable.
Press [Thickness].
[Thickness] is displayed when Image Controller IC-602 is mounted.
Select the desired button from under [Thickness].
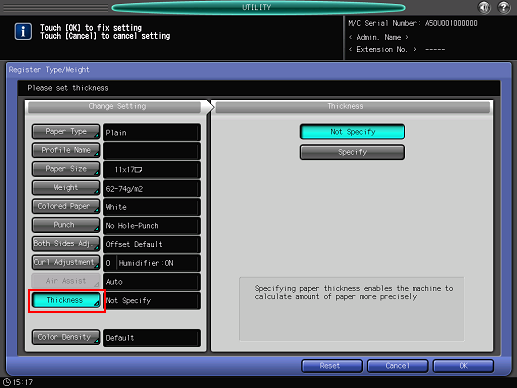
Selecting [Specify] displays the touch panel keypad. Use the touch panel keypad, [
 ][
][ ] to enter the adjustment value. Available range is from 0.050 mm to 0.500 mm.
The entered value is displayed on the right side of [Thickness] under [Change Setting]. Entering a value less than 0.050 mm automatically sets the value to 0.050 mm.
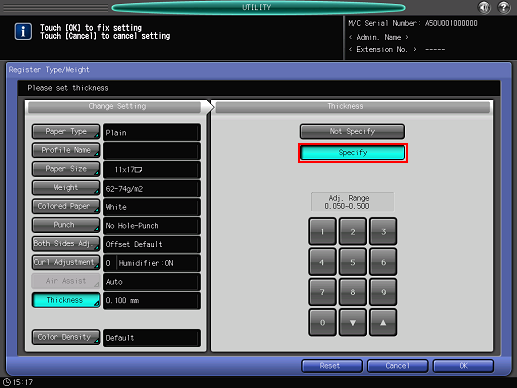
Press [Process Adj.].

Process Adjustment is not displayed by default. If you wish to use the Process Adjustment function in paper setting, contact your service representative.
For the items from [2nd Transfer Output Adj. (Front)] to [Fusing Speed Adjustment] displayed by pressing [Next], select the button for the item you want to adjust and press the touch panel keypad, [
 ], [
], [ ], or the keypad on the control panel to enter values.
Press [+/-] to specify the value to be positive or negative.
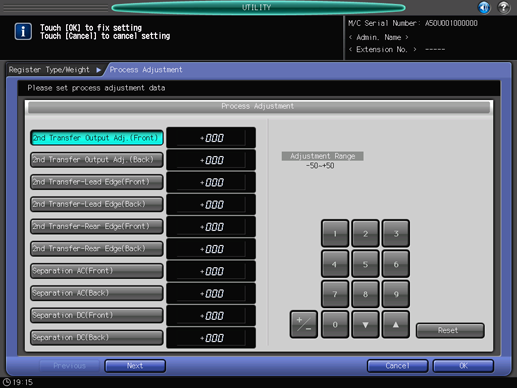
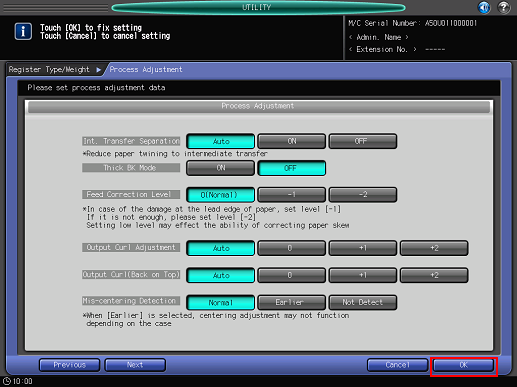
Press [Next] to display the setting screen.
Make settings for the following items.
[Up Fusing Initial Temp.], [2ndTrans. Pressure], [CPM Down], [Toner Amount Save], [Dens. Adj. Per Tray(YMC)], [Dens. Adj. Per Tray(K)], [Mis-centering Detect JAM], [Int. Transfer Separation], [Thick BK Mode], [Feed Correction Level], [Output Curl Adjustment], [Back on Top Output Curl Adj.], [Mis-centering Detection], [Fusing Air Separation Air Level Setting], [Change Fusing Pressure], [Hard Paper Mode]
Press [OK] to complete the setting. To cancel the change, press [Cancel]. In either case, the screen returns to the [Register Type/Weight] screen.
Press [Color Density Control].

This setting is enabled when [ON] is selected for using Color Density Control, accessed from [Color Density Control] - [Basic Settings] on the [Adjustment Menu] screen.
For details about Color Density Control, refer to Color Density Control.
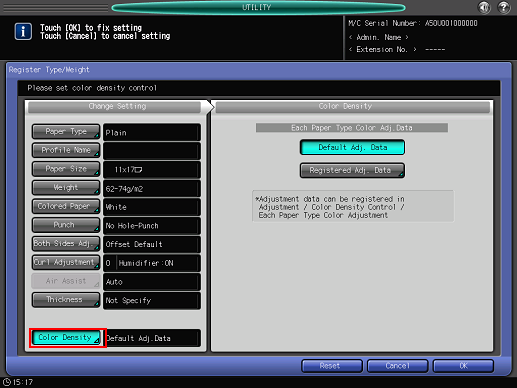
Press [Default Adj. Data] or [Registered Adj. Data].
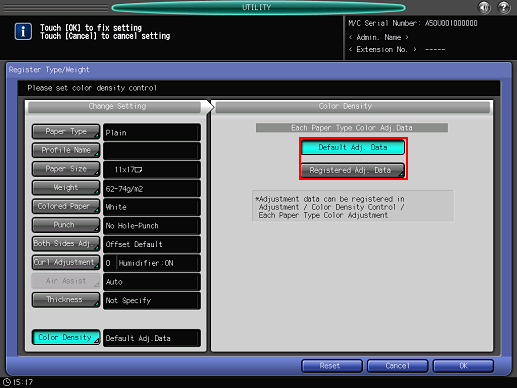
With [Default Adj. Data] selected, the machine performs Gamma Correction with reference to the adjustment data preset on the machine.
Selecting [Registered Adj. Data] displays the [Each Paper Type Color Adjustment List] screen. Select a name and press [OK]. The list displayed on the [Each Paper Type Color Adjustment List] screen shows the user-customized adjustment data that has been registered in [Each Paper Type Color Adj.], accessed from [Color Density Control] on the [Adjustment Menu] screen. For details, refer to Adj. of Color Sensor for Each Paper Type: Registering the Sensor Adjustment Data That is Adjusted to Paper Type (Color Sensor Adjustment Data for Each Paper Type).
Press [OK] on the [Register Type/Weight] screen. The screen returns to the [Reg./Del. Paper Set] screen.
Press [Close] to return to the [Paper Tray Setting Menu] screen.
Deleting the Paper Conditions
Follow the procedure on User Setting to display the [User Setting Menu] screen.
Press [System Setting] on the [User Setting Menu] screen, and then press [Paper Tray Setting] and [Paper Setting] in sequence.
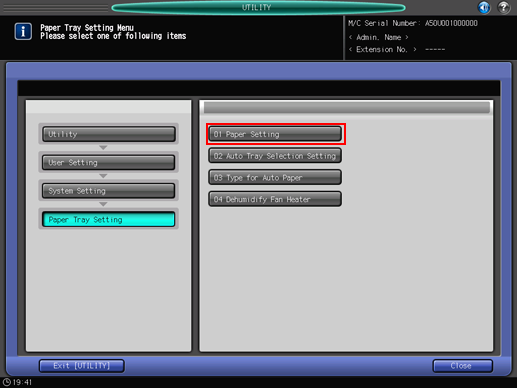
The [Register/Delete Paper Setting] screen is displayed.
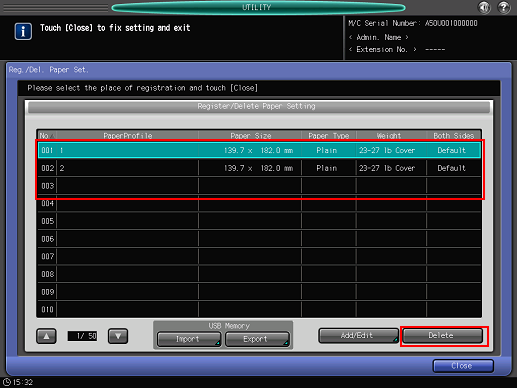
Select the row to be deleted from the list of paper conditions, then press [Delete].
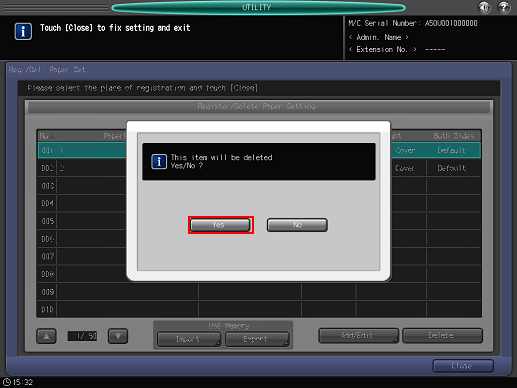
Press [Yes] on the confirmation dialog.
Or, press [No] to cancel.
Press [Close] to return to the [Paper Tray Setting Menu] screen.
USB Import/Export Function for Paper Setting
The USB Import/Export function saves the paper setting data registered on this machine to USB flash drive and registers the data to another machine of the same model. To import or export paper setting data, you need to connect USB flash drive to a USB port previously. The number of USB flash drive that can be connected is one.
When using the importing [All] option, all the data of paper size and paper setting stored on the USB flash drive is imported and the data registered on the machine is overwritten.
When using the importing [individual] option, the paper setting data you select is imported and the data is newly stored or overwritten on the machine. With the [New Store] option, up to 500 data, together with the number of the data that has already been registered on the machine, can be imported (The remaining data after reduction of the registered data from 500 can be imported). With the [Overwrite] option, up to 500 data can be imported.
The export function saves the entire paper setting data of a machine to a USB flash drive.
Importing Paper Setting Data
Follow the procedure on User Setting to display the [User Setting Menu] screen.
Press [System Setting] on the [User Setting Menu] screen, and then press [Paper Tray Setting] and [Paper Setting] in sequence.
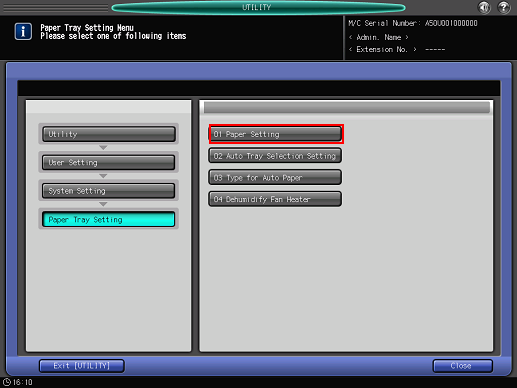
The [Register/Delete Paper Setting] screen is displayed.
Press [Import].
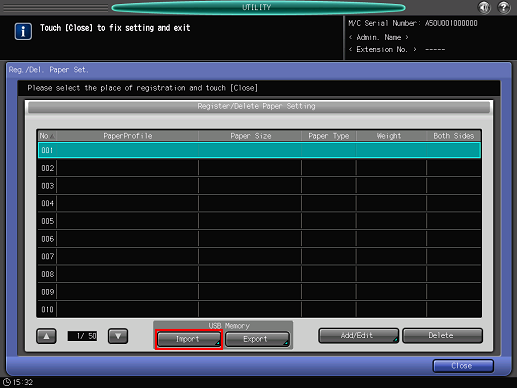
The [USB Import] screen is displayed.
Select the data to import, then press [All] or [Individual].
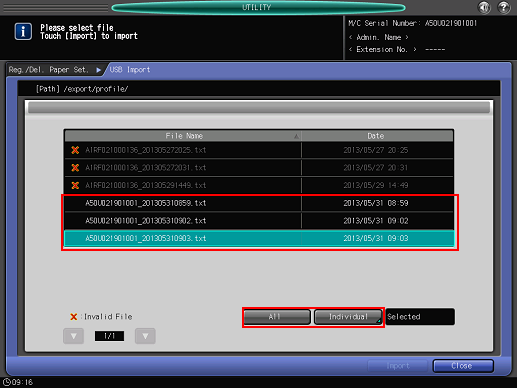
When pressing [All], go to step 5.
When pressing [Individual], go to step 6.
mark is displayed on the left side of the file name of the data which cannot be imported.
Press [Import] to change all data.
The confirmation dialog is displayed. Press [Yes] to confirm. To cancel, press [No].
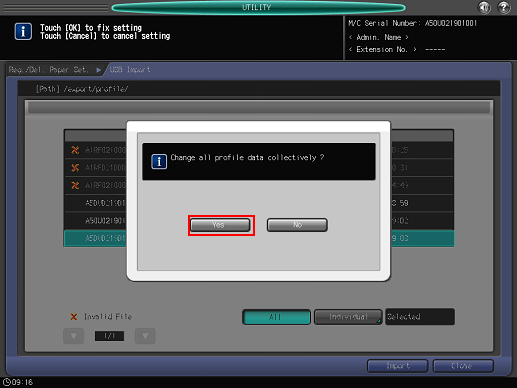
In each case, the screen returns to the [Register/Delete Paper Setting] screen.
When the [Individual] screen is displayed, select paper setting data to import.
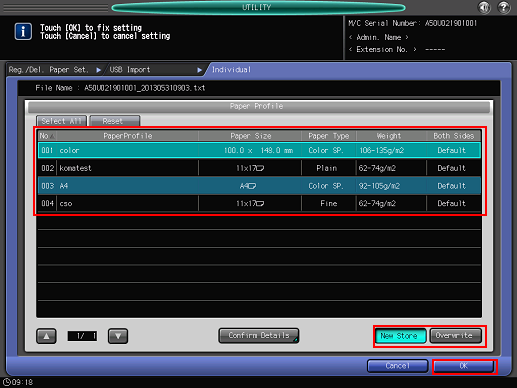
To select all data, press [Select All]. To cancel selecting all data, press [Reset].
To display details of the selected data, press [Confirm Details].
Select [New Store] or [Overwrite].
With New Store, the data is imported to the blank number of paper setting on the machine.
With Overwrite, the data is imported to the same number of paper setting on the machine.
Press [OK].
The screen returns to the [USB Import] screen.
Press [Import].
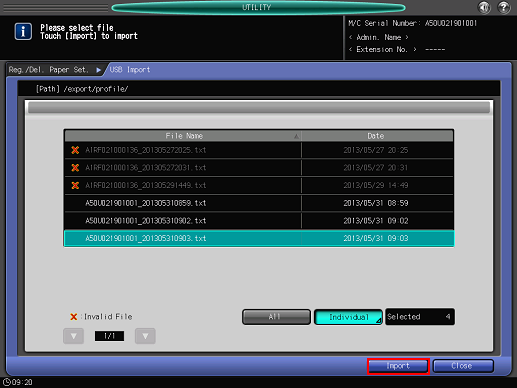
The confirmation dialog is displayed.
Press [Yes] to confirm. To cancel, press [No] (The confirmation dialog varies depending on whether to select [New Store] or [Overwrite]. The following shows an example of the screen for [New Store]).
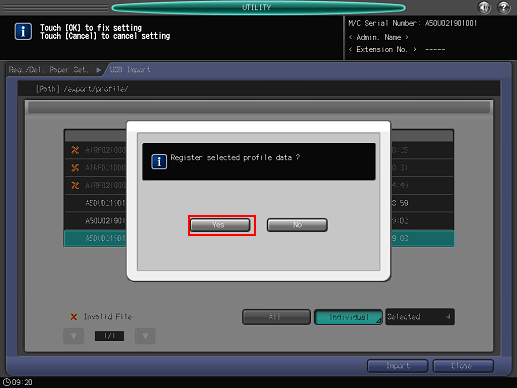
In each case, the screen returns to the [Register/Delete Paper Setting] screen.
Exporting Paper Setting Data
Follow the procedure on User Setting to display the [User Setting Menu] screen.
Press [System Setting] on the [User Setting Menu] screen, and then press [Paper Tray Setting] and [Paper Setting] in sequence.
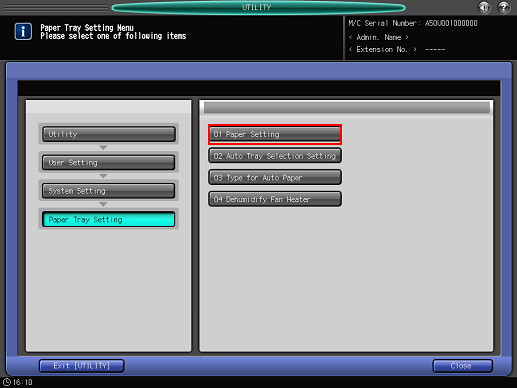
The [Register/Delete Paper Setting] screen is displayed.
Press [Export].
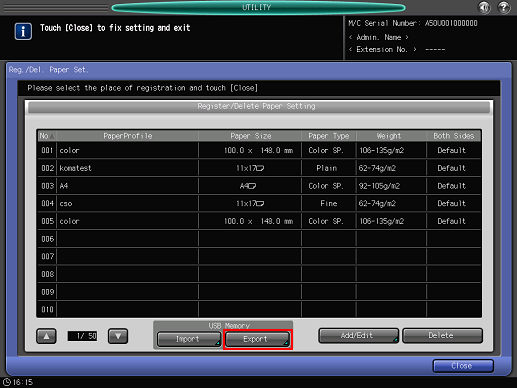
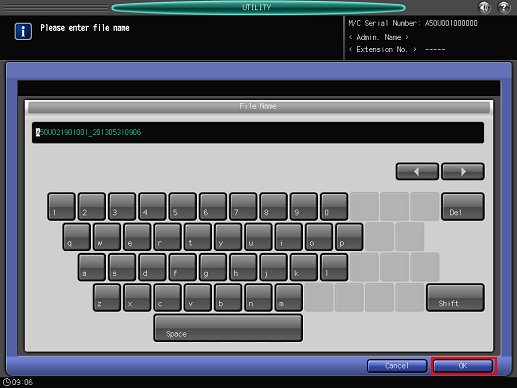
The screen for entering the file name of the exported paper setting data is displayed.
Enter the file name, and then press [OK].
The default file name is displayed in the following order.
machine number (13-digit)_year (4-digit) month (2-digit) day (2-digit) hour (2-digit) minute (2-digit)
Up to 60 one-byte characters can be entered for the file name.
When not changing the file name, press [OK] without entering any characters.
