
Maximum Density Adjustment (Regular Adjustment Flow (High Accuracy))
After the controller calibration and the advanced controller calibration (Exact Color) is performed, if no improvement is found due to large density change or when you want to make adjustment with high accuracy, you can perform the maximum density adjustment.

If the density change is still large after performing Calibration / Color Balance Adjustment (Adjustment Flow When Changing the Screen / Regular Adjustment Flow (Standard) / Regular Adjustment Flow (High Accuracy)) and Image Quality: Executing Advanced Controller Calibration (Exact Color), first contact your service representative.
• Image quality adjustment flow and the position of this adjustment
In the pre-output image quality adjustment flow, this adjustment is positioned shown below.
Perform the previous adjustment before proceeding with this adjustment.
To not continuously perform the series of adjustment of the image quality adjustment flow, perform Gamma Automatic Adjustment (Adjustment Flow When Changing the Screen / Regular Adjustment Flow (High Accuracy)), and then resume from the next adjustment.
• For Image Controller IC-602:
Image quality adjustment flow | Position of this adjustment | |||
Previous adjustment | This adjustment | Next adjustment | ||
Adjustment flow when changing the screen | Without RU | - (None) | ||
With RU | ||||
Regular adjustment flow (Standard) | Without RU | - (None) | ||
With RU | ||||
Regular adjustment flow (High accuracy) | Without RU | (STEP 1: Gamma automatic adjustment) | STEP 2: This adjustment | (STEP 3: Controller calibration) |
With RU | (STEP 2: Gamma automatic adjustment) | STEP 3: This adjustment | (STEP 4: Color density control) | |
• For Image Controller IC-415 or Image Controller IC-308:
Image quality adjustment flow | Position of this adjustment | |||
Previous adjustment | This adjustment | Next adjustment | ||
Adjustment Flow when changing the screen | Without RU | - (None) | ||
With RU | ||||
Regular adjustment flow (High accuracy) | Without RU | (STEP 1: Gamma automatic adjustment) | STEP 2: This adjustment | (STEP 3: Controller calibration) |
With RU | (STEP 2: Gamma automatic adjustment) | STEP 3: This adjustment | (STEP 4: Color density control) | |
Before performing the maximum density adjustment, make the following adjustments:
(1) Gamma automatic adjustment
For details, refer to Gamma Automatic Adjustment (Adjustment Flow When Changing the Screen / Regular Adjustment Flow (High Accuracy)).(2) Calibration
For details, refer to Calibration / Color Balance Adjustment (Adjustment Flow When Changing the Screen / Regular Adjustment Flow (Standard) / Regular Adjustment Flow (High Accuracy)) and Image Quality: Executing Advanced Controller Calibration (Exact Color).
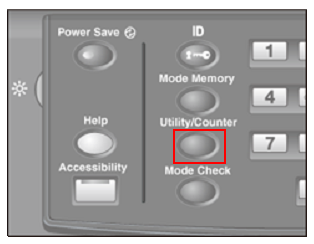
On the touch panel of the main body, press [Utility/Counter].
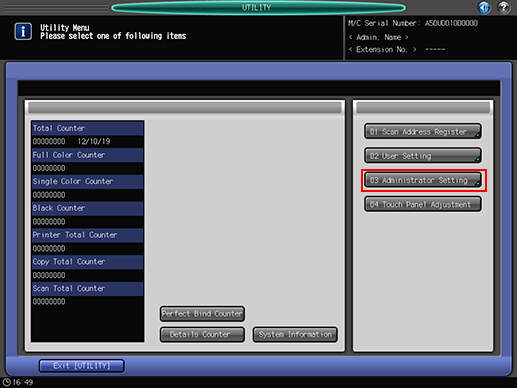
The [UTILITY menu] is displayed.
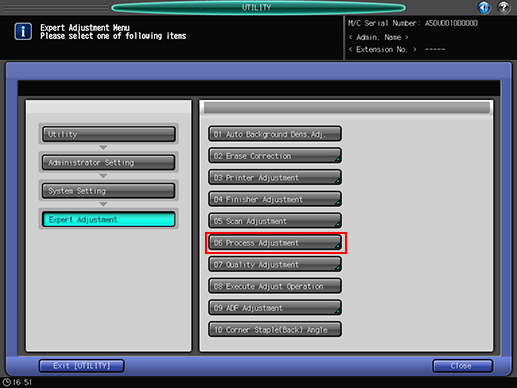
Press [Administrator Setting].
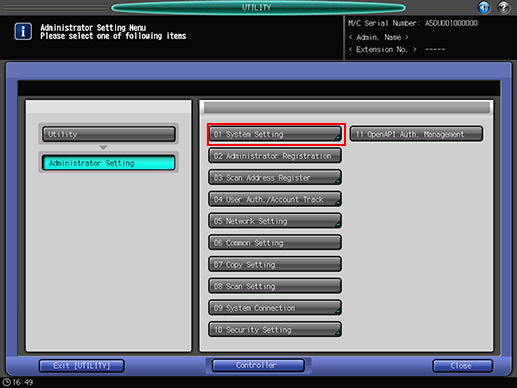
Press [System Setting].
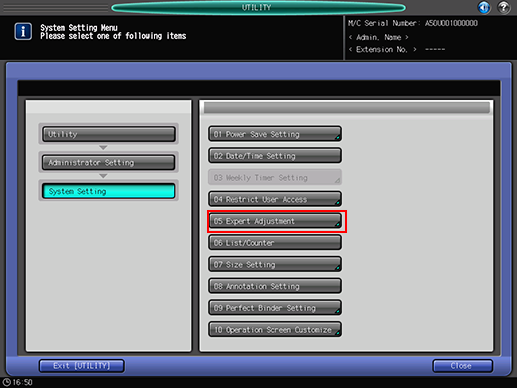
Press [Expert Adjustment].
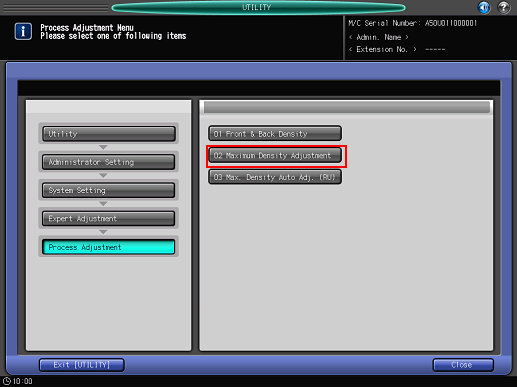
Press [Process Adjustment].
Press [Maximum Density Adjustment].
Adjust the maximum density for each color of [<Yellow>], [<Magenta>], [<Cyan>], and [<Black>].
If Relay Unit RU-509 is not mounted, go to step 10 after adjusting the density.
When the measured density is lower than the target density (target value): Adjust the density toward the + side (darker).
When the measured density is higher than the target density (target value): Adjust the density toward the - side (lighter)
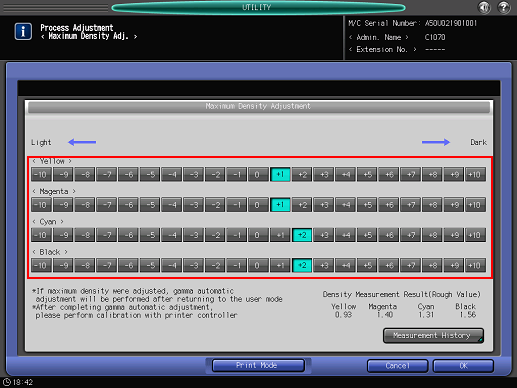
The amount of the density change differs depending on the type of paper. Repeat the adjustment to achieve your most desired density.
Density Measurement Result (Rough Value), [Measurement History], and [Print Mode] are displayed only when Relay Unit RU-509 is mounted.
If Relay Unit RU-509 is not mounted, you need to measure the density with an external spectrophotometer (densitometer) and manage the measurement data.
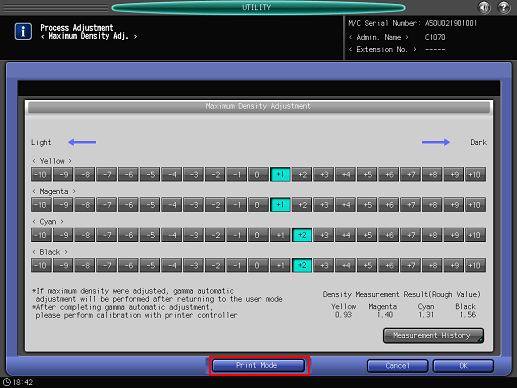
Press [Print Mode] to print the chart.
Density Measurement Result is displayed in the lower right of the [Maximum Density Adjustment] screen.
Press [Measurement History] to view the measurement history (up to 30 results).
Press [Switch Display] on the [Maximum Density Measurement History] screen to sort the list in order of the measurement date and the paper type.
Repeat steps 7 and 8 until the desired result is obtained.
Press [OK].
When [UTILITY] is exited, the gamma automatic adjustment starts. Wait for the adjustment to finish.