For Network Connection (IPP/IPPS)
Settings of this machine
To use IPP printing, you must configure the network settings for the machine in advance.
Items to be configured | Description |
|---|---|
IP Address | In [TCP/IP Settings] of this machine, specify the IP address. |
IPP Setting | In [HTTP Server Setting] for the machine, enable IPP printing. |
For details on the network settings for this machine, refer to NIC Setting: Setting the Machine Network Information.
Before you can use IPPS printing, you must register a certificate with this machine. You can use the selfsigned certificate that is preinstalled in this machine.
Installing the printer driver using the Add Printer Wizard
Installing the driver requires the administrator privilege.
Insert the Driver CD-ROM into the CD-ROM drive.
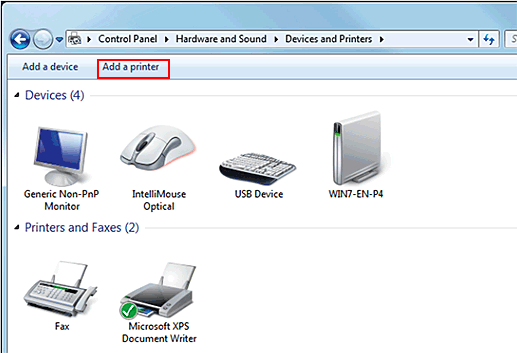
Click [Start] and then [Devices and Printers].
In Windows Vista/Server 2008, click [Printers] under [Control Panel] - [Hardware and Sound]. When [Control Panel] is displayed in Classic View, double-click [Printers].
On the toolbar, select [Add a printer].

In Windows Vista/Server 2008, click [Add a printer] on the toolbar.
[Add Printer Wizard] appears.
Click [Add a network, wireless or Bluetooth printer].
Connected printers are detected.
In the window showing the search result, click [The printer that I want isn't listed].
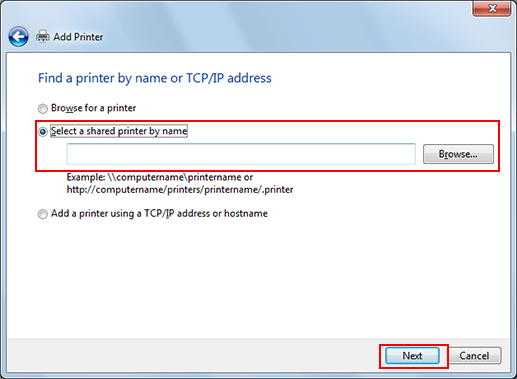
In the [Select a shared printer by name] box, enter the URL for the machine in the following format, and then click [Next].
http://address for the machine/ipp
Example: When the IP address for the machine is 192.168.1.20, http://192.168.1.20/ipp
When specifying to use IPPS printing, enter "https://host name.domain name/ipp". For "host name.domain name", specify the host name and domain name registered for the DNS server being used.
If the certificate for the machine is not the one issued by the certifying authority, you must register the certificate for the machine on the Windows Vista/Server 2008/ 7/Server 2008 R2 system as the certificate by "Trusted Root Certification Authorities" for the computer account.
When registering a certificate to this machine, confirm that "host name.domain name" is displayed as the common name of the certificate.

Click [Have Disk].
Click [Browse].
Select a desired printer driver in the CD-ROM, and then click [Open].
Select a folder according to the printer driver, operating system, and language to be used. The available printer drivers are the PS Plug-in driver and PPD driver.
Click [OK].
Click [OK].
Follow the instructions on the windows that follow.
If the [User Account Control] window appears, click [Continue] or [Yes].
If the [Windows Security] window for verifying the publisher is displayed, click [Install this driver software anyway].
Click [Finish].
After finishing the installation, make sure that the icon for the installed printer is displayed in the [Devices and Printers] or [Printers] window.
Remove the CD-ROM from the CD-ROM drive.
This completes the printer driver installation.
Once the settings for the printer have been configured, you can use the printer in the same way as a general local printer.

