
Editing Page of Hold Job (Page Edit)
If you select the hold job on the [Job Centro] screen, and select [Hold Job] - [Page Edit] from the Job Operations menu, the [Page Edit] screen is displayed. You can move, copy, delete of the page or insert a blank page, a tab, or a separator while checking the thumbnail display of the page data. You can also copy pages from other job. You can also select the job and choose the command from the right-click menu, click the [Page Edit] icon, or drag and drop the job to the [Page Edit] icon to display the [Page Edit] screen.
If you select multiple jobs, the [Page Edit] screen is not displayed. You can operate print jobs with an extension of PS, PDF, PDF (APPE) or TIFF. However, you cannot edit the page of print jobs with any other extensions, print jobs from the PPD driver, copy jobs, and hold jobs with 10,000 or more pages. However, by changing the setting of the controller memory switch No. 28, you can operate a PPD job.
Configuration of [Page Edit] Screen
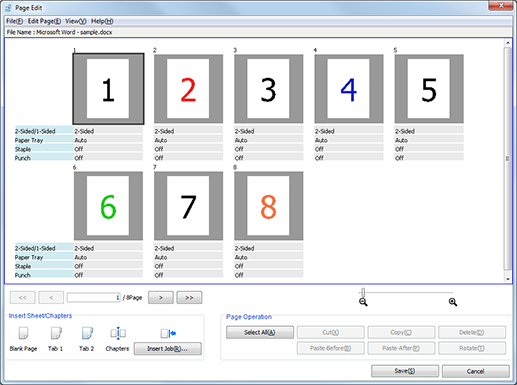
Name | Description | |
|---|---|---|
[File Name] | Displays the file name. | |
[Page View Area] | Displays the thumbnail of each page in order of the page. The page information (1-Sided/2-Sided, Paper Tray, Staple, and Punch) is displayed under the thumbnail. | |
[Page Navigation] | Displays the necessary page by entering the page number or using the following buttons.
| |
[View] | Changes the view size of the thumbnail using the slider. | |
[Insert Sheet/Chapters] | Inserts the blank page, tab page or separator by dragging and dropping each icon (Blank Paper, Tab 1, Tab 2, Separator) to the page view area. | |
[Insert Job] | Copies the page of other hold job. For details, refer to "Copying a Page from Other Job." | |
[Page Operation]
| [All Select] | Selects all pages. |
[Cut] | Cuts the selected page. For details, refer to "Moving a Page." | |
[Copy] | Copies the selected page. For details, refer to "Copying a Page." | |
[Delete] | Deletes the selected page. For details, refer to "Deleting a Page." | |
[Paste-Before] | Inserts the page you copied or cut to the previous of the selected page. | |
[Paste-After] | Inserts the page you copied or cut to the next to the selected page. | |
[Rotate] | Rotates the selected page by 180 degrees. For details, refer to "Rotating a Page." | |
[Save] | Saves the updated settings and closes the screen. | |
[Cancel] | Closes the screen without saving. | |
 : Displays the first page.
 : Displays the previous page.
 : Displays the next page.
 : Displays the last page.
Menu | Menu Items | Description |
|---|---|---|
[File] | [Insert Job] | Copies the page of other hold job. |
[Save] | Saves the job being edited. | |
[Exit] | Exits the editing of the job. | |
[Edit] | [Select All Pages] | All pages are to be edited. |
[Cut] | Cuts the selected page. | |
[Copy] | Copies the selected page. | |
[Paste-Before] | Inserts the cut or copied page to the previous of the selected page. | |
[Paste-After] | Inserts the cut or copied page to the next to the selected page. | |
[Delete] | Deletes the selected page. | |
[180° Rotate] | Rotates the selected page by 180 degrees. | |
[View] | [Top] | Moves the displayed page (displayed with black frame) to the top page. |
[Previous] | Moves the displayed page (displayed with black frame) to the previous page. | |
[Next] | Moves the displayed page (displayed with black frame) to the next page. | |
[Last] | Moves the displayed page (displayed with black frame) to the last page. | |
[Zoom] | Selecting Min minimizes the displays centering on the displayed page. Selecting Max maximizes the displays centering on the displayed page. | |
[Help] | [Help] | Click to display the help. |
[Version] | Displays the version information of Job Centro. |
Move a Page
This section describes how to move the page within the job.
Select the page that you want to move and select [Cut] from the right click menu.
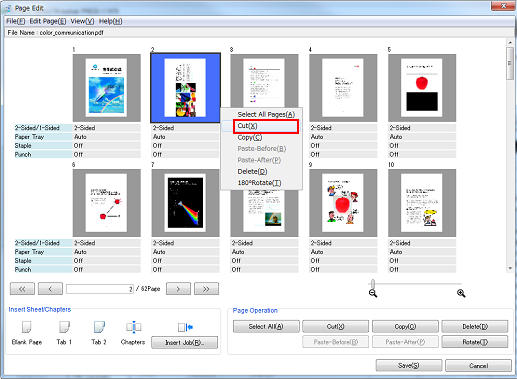
The selected page is highlighted.
You can select and cut the multiple pages.
Right-click between the destination pages of move, and select [Paste].
You can also operate by selecting the destination page of move and selecting [Paste-Before] or [Paste-After] from the right click menu.
You can also operate by selecting the destination page of move and clicking [Page Operation] - [Paste-Before] or [Paste-After].
You can also drag the selected page and drop it to the move destination.
Copy a Page
This section describes how to copy the page within the job.
Select the page to be copied and select [Copy] from the right-click menu.
The selected page is highlighted.
You can select and copy multiple pages. You can also select all the pages with [Select All].
Right-click between the destination pages of copy, and select [Paste].
You can also operate by selecting the destination page of copy and using [Paste-Before] or [Paste-After] from the right click menu.
You can also operate by selecting the destination page of copy and clicking [Page Operation] - [Paste-Before] or [Paste-After].
Copy a Page from Other Job
This section describes how to copy the page from other job.
Click [Insert Job] of [Insert Sheet/Chapters].
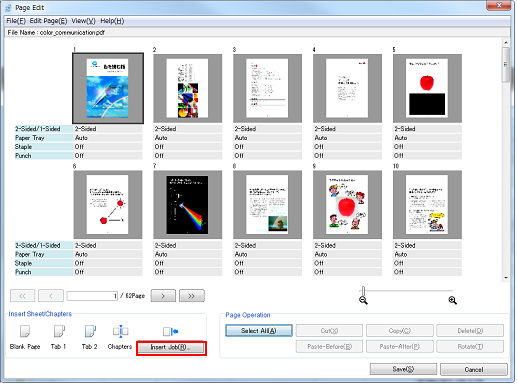
The [Insert Job] screen is displayed.
You can also click
 .
.
Select the job from the list of the left area on the screen.
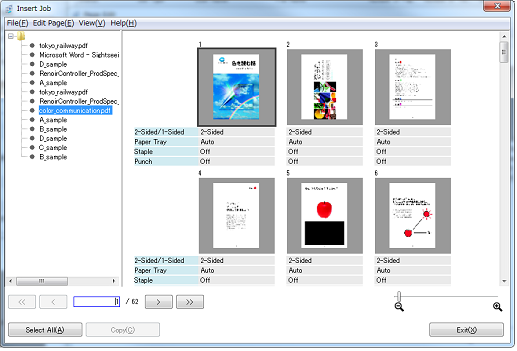
Hold jobs are listed in the job list in the order of new registrations.
None of security jobs, jobs that are edited with the machine, copy jobs, PPD driver jobs, jobs that are being edited, and jobs that are being updated are listed.
If the PDL of the job that is editing the page is PS or PDF, the jobs of PS or PDF are listed.
If the PDL of the job that is editing the page is TIFF, the jobs of TIFF are listed.
Select the page that you want to copy from the list of the right area on the screen and select [Copy] from the right click menu.
The selected page is highlighted.
You can also operate by clicking [Copy].
You can select and copy multiple pages.
Click [Exit].
On [Page Edit] screen, right click between destination pages of copy and select [Paste].
You can also operate by selecting the destination page of insert and selecting [Paste-Before] or [Paste-After] from the right click menu.
You can also operate by selecting the destination page of insert and selecting [Page Operation] - [Paste-Before] or [Paste-After].
You can also operate by dragging & dropping the copying page of [Insert Job] screen between destination pages of [Page Edit] screen.
Delete a Page
This section describes how to delete the page within the job.
Select the page that you want to delete and select [Delete] from the right click menu.
The selected page is highlighted.
You can select and delete the multiple pages.
You can also operate by clicking [Page Operation] - [Delete].
When the original has only one page, the item appears dimmed since the page cannot be deleted.
Rotate a Page
This section describes how to rotate the page within the job.
Select the page that you want to rotate by 180 degrees and select [180° Rotate] from the right click menu.
The selected page is highlighted.
You can select and rotate the multiple pages.
You can also operate by clicking [Page Operation] - [Rotate].
Insert a Blank Page
This section describes how to insert the blank page.
Right click [Insert Sheet/Chapters] - [Blank Page] icon and select [Copy].
[Insert Sheet Setting] screen is displayed.
Set each item on the [Insert Sheet Setting] screen and click [OK].

Name
Description
[Use Paper Profile]
To use the paper profile, check this item and select Paper Profile.
[Paper Size]
Select the paper size.
To use the custom size, register the paper size in [Custom Size Settings] and select the registered paper size from the [Paper Size] list. For details about how to register the paper size, refer to Custom Size Settings Screen.
[Feed Direction]
Select the feed direction.
[Paper Tray]
Select the paper tray.
[Number of Sheets]
Specify the number of sheets to insert. You can specify it only when the paper tray is PI tray.
Right-click between the destination pages of insert, and select [Paste].
You can also operate by selecting the destination page of insert and selecting [Paste-Before] or [Paste-After] from the right click menu.
You can also operate by selecting the destination page of insert and selecting [Page Operation] - [Paste-Before] or [Paste-After].
You can also operate by dragging & dropping [Insert Sheet/Chapters] - [Blank Page] icon between destination pages.
Insert a tab sheet
This section describes how to insert the tab paper.
When no Paper Tray is installed, the [Tab 1] and [Tab 2] icons appears dimmed.
Right click [Insert Sheet/Chapters] - [Tab 1] or [Tab 2] icon and select [Copy].
Right click between destination pages of insert and select [Paste].
You can also operate by selecting the destination page of insert and selecting [Paste-Before] or [Paste-After] from the right click menu.
You can also operate by selecting the destination page of insert and selecting [Page Operation] - [Paste-Before] or [Paste-After].
You can also operate by dragging & dropping [Insert Sheet/Chapters] - [Tab 1] or [Tab 2] icon between destination pages.
Tab 1 and Tab 2 cannot be inserted into the same place at the same time.
Insert a Separator (Chapters)
This section describes how to insert the separator to 2-sided printing job.
Right click [Insert Sheet/Chapters] - [Chapters] icon and select [Copy].
Right click between destination pages of insert and select [Paste].
The inserted Separator is displayed in yellow green line.
You can also operate by selecting the destination page of insert and selecting [Paste-Before] or [Paste-After] from the right click menu.
You can also operate by selecting the destination page of insert and selecting [Page Operation] - [Paste-Before] or [Paste-After].
You can also insert the separator by dragging & dropping [Insert Sheet/Chapters] - [Chapters] icon between destination pages.