
Using HDD: Changing the Print Setting of Hold Job (Job Ticket Edit)
For a held job, you can edit print settings using the touch panel of the main body or through a computer. The function is called "Job Ticket Edit."
You can save the edited job overwriting the original job or newly save as a different job keeping the original job as is.
• Examples Introduced in This Section
This section describes how to edit print settings of a held job using the touch panel of the main body or using Job Centro.
Editing Job Tickets from the Main Body
Edit print settings of a hold job using the [Hold Job] screen.Using a Computer to Edit a Job Ticket for Hold Job
Edit print settings of a hold job in this machine using Job Centro on the computer.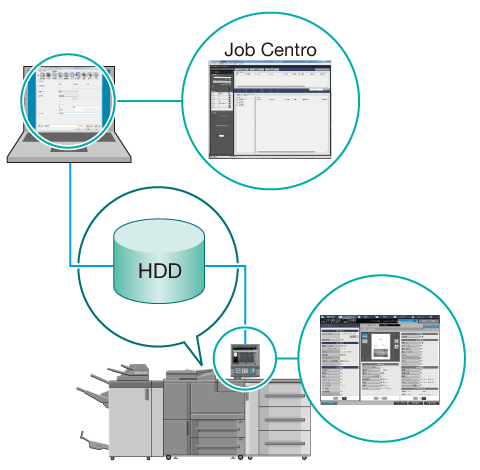
•Intended Environment
Operating system | Windows 7 |
Application | Job Centro |
Image Controller | Built-in image controller |
* The sample screen may be different from the actual display depending on your system environment and application version/revision.
• Related Section
•Precautions
On the touch panel of the main body, you can edit a copy or scan job ([Job Type] is set to [Copy]) or print job ([Job Print] is set to [Print]). In Job Centro, you can only edit print jobs ([Job Type] is [Print]).
You cannot edit a job saved on the HDD. Recall a job to Hold to use it as a hold job before starting editing. (Refer to Using HDD: Managing HDD Saved Jobs in Folders or User Boxes.)
Editing Job Tickets from the Main Body
Edit print settings of a hold job using the [Hold Job] screen on the touch panel of the main body.
Press the [JOB LIST] tab on the touch panel of the main body.
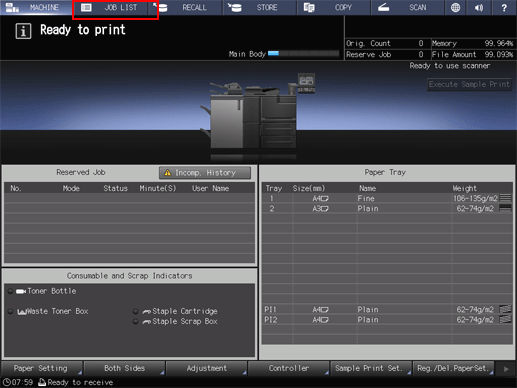
Press [Hold Job].

Select a job to be edited on the [Hold Job] screen.
Select a job to edit a job ticket from the list.
If the desired job is not found on the list, press [
 ] or [
 ] to display that job.
Pressing each title in the title row will sort the list in selected order.
Multiple jobs can be selected, but only the last selected job is targeted for editing.
For details about the icons displayed in the list, refer to Hold Job screen.

Press [Job Ticket] in the [Job Edit] field.
The specified job is called and the [Job Ticket Edit] screen is displayed.
On the [Job Ticket Edit] screen of the [Hold Job] screen, you can edit any of copy job, scan job, and print job.

Click the button of the item to edit and change the setting.
You can check the status of imposition with the preview image in the middle of the screen.

The following settings are available on the [Job Ticket Edit] screen.
Item
Check Job
1. Left pane of the screen
[Basic Settings]
Set [File Name][Set Number].
[Output Setting]
Set [Bind Direction][Sort/Group][Face][Order][Fold Print Side][Needless Tab Paper Exit ], etc.
[Application Setting]
Set [Booklet][Adhesive Binding][Combine][Image Repeat][Page Margin][Register Crop Mark][180 Deg. Rotation][Image Centering][Stamp], etc.
[Other Setting]
Check other application settings ([Book Copy], [Non-Image Area Erase], [Frame Erase], [Annotation], [Full Image Area], and [Negative/Positive Reverse]), [Copy Density], [Background Removal], [Sharpness], [Contrast], and [Distinction(Text)].
2. Center pane of the screen
Preview image display
Displays the preview image of the selected file. You can preview the front and back side image of a 2-sided original, and check the rotate view image or the output direction of the image. On the enlarged preview screen, you can set the crop mark, image position, or image shift function.
[Paper Setting]
Set [Profile No.][Paper Size][Paper Tray][Auto Tray Target][Paper Type][Weight][Colored Paper][Punch].
3. Right pane of the screen
[Print Side]
Set [Print Side] (1-sided/2-sided).
[Output Setting]
Set [Output Tray][Staple][Multi Half Fold][Multi Tri-Fold][Fold & Staple][Z-Fold][Punch], etc.
[Quality Adjustment]
Set [Image Shift][Image Position][Outline][Image Screen][TextGraphicsScreen][Tone Curve Adj.], etc.
[Other Setting]
Check [Original Size], [Original Type], [Original Side], [Zoom ], and [Resolution].
Pressing [Error Check] in the upper right of the screen starts checking for inconsistency of the settings. If any of the settings obstructs output, the cause is displayed.
If images with different type of job (copy (copy or scan job held from the main body) or print (print job held from the printer driver) or the controller image compression setting (priority on gradation/priority on resolution) are attached on the image data in the [Image Page Edit] screen, you cannot select [Booklet], [Adhesive Binding] or [Combine] of [Application Setting] in the [Job Ticket Edit] screen.
To check the output image with the current settings, press [Sample Output]. Only one set, the sheet being previewed, or the specified sheet is output so that you can check the actual result.
To display the [Image Page Edit] screen (refer to [), press the ]Image Page EditUsing HDD: Editing a Hold Job on a per Page Basis (Page Edit) tab. To return to the [Job Ticket Edit] screen, press the [Edit Job Ticket] tab.
After editing, press [New Store] or [Overwrite].
[New Store]: The data is saved as new data keeping the original data as is.
[Overwrite]: The original data is overwritten by the edited data.

Using a Computer to Edit a Job Ticket for Hold Job
You can edit print settings of a hold job using Job Centro.
Start Job Centro and log in to the machine. (Refer to Starting Job Centro.)

The [Job Centro] screen is displayed.
Click the [Hold Job] tab and select a job (one job) to edit.

In Job Centro, you can only edit print jobs ([Job Type] is [Print]). To edit a copy job or scan job ([Job Type] is [Copy]), use the touch panel of the main body.
Click [Job Edit].

If Color Centro is installed on your computer, you can click [Tone Curve] to adjust tone curve. (Refer to Image Quality: Changing the Contrast (Tone Curve).)
The specified job is called and the Job Edit (print setting) screen is displayed.
Click the tab of the item to edit and change the setting.

The Job Edit (print setting) screen of Job Centro allows you to make the following settings.
For more details of each item, refer also to the following.
Tabs
Check Job
[Basic]
Original size, original orientation, paper tray, paper profile / paper information / number of copies / page range
[Layout]
2-sided, imposition, binding position, imposition quality, page interval, creep adjustment, booklet cover blank page insertion, booklet splitting , book spread, poster printing , original size, original orientation, paper size, full bleed, 180° rotate
[Finishing]
Binding position, staple, divided output, punch, fold, ring binding (varies depending on the connected options)
[Output]
Output tray, feed direction, sort/group, output order, offset output copies, offset output sheets, needless tab ejection
[Paper]
Acquire tray and paper data, tray settings, paper profile
[Cover]
Banner tray, front cover (PI front cover tray and front cover tray), back cover (back cover tray and PI back cover tray)
(The PI front cover tray and PI back cover tray are available only when Post Inserter PI-502 is connected.)[Page Settings]
Page Settings, Chapters , Tab Settings
[Imaging]
Resolution, screening, tone curve, outline process, print quality, image density selection, use CIE color, 1 dot line emphasis
[Job Information]
Color bar, job settings information, printed items
[Image Position]
Image shift, tab image shift, image position
[Marks] (Crop Marks)
Crop Mark, Setting for Imposition, Only on Front Side, Corner Crop Mark Type, Trim Margin, Horizontal Shift, Vertical Shift
[Stamp]
Date/time, page number, numbering, copy protect
[Workflow]
Tandem Mode
[Authentication]
User authentication (user authentication, public user, user name, and password), account track (account track setting, account name, and password)
If images with different job type ([copy]/[print]) or the controller image compression setting (Gradation priority/Resolution priority) are imposed and saved in the [Page Edit] screen on the touch panel of the main body, you cannot select [Booklet], [Adhesive Binding] or [Combine] of [Application Setting] cannot be selected in the [Job Ticket] screen.
After editing, click [Save].

The Job Edit (print setting) screen closes and the edited content is saved. After saving, [Edited] is displayed in [Status] of the job displayed on the [Hold Job] screen of Job Centro.
The operations in Job Centro differ from the touch panel of the main body and you do not have the option to newly save or overwrite. To newly save as another job, copy an original job in the [Hold Job] screen of Job Centro before editing.