
Fold: Adjusting Tri-Fold Positions
Adjust the fold positions in Multi Tri-Fold mode.
As an example, this section explains how to adjust the fold position to reduce Fold 1 by 1 mm.
■ Meaning and Purpose of Tri-Fold Position Adjustment
This function allows you to adjust the fold positions for Multi Tri-Fold by specifying the desired values for Fold 1 and Fold 2.
In the case of Fold 1
Negative values make the fold width longer.
Positive values make the fold width shorter.
In the case of Fold 2
Negative values make the fold width shorter.
Positive values make the fold width longer.

When adjusting both Fold 1 and Fold 2, be sure to start with the Fold 1 adjustment. The position of Fold 1 is calculated from the edge of the paper, while that of Fold 2 is calculated from the position of Fold 1. Consequently, the measurement 'b' in Step 1 is subject to the change in either position of the fold.

Tri-Fold has two folds, Fold 1 (first fold) and Fold 2 (second fold) (refer to figure in Step 1). Each fold position can be set.


• When to perform
When a fold position for Multi Tri-Fold is misaligned
•Intended Environment
Image Controller | Built-in image controller |
Mounted finisher | Saddle Stitcher SD-510 + Finisher FS-532 |
* The sample screen may be different from the actual display depending on your system environment.
Measure the misalignment of the fold position using a ruler.
Check 'a' and 'b' in the figure below.
This section explains an example that makes the width 'a' shorter by 1 mm.
(1) Fold 1 / (2) Fold 2
* indicates the output direction.

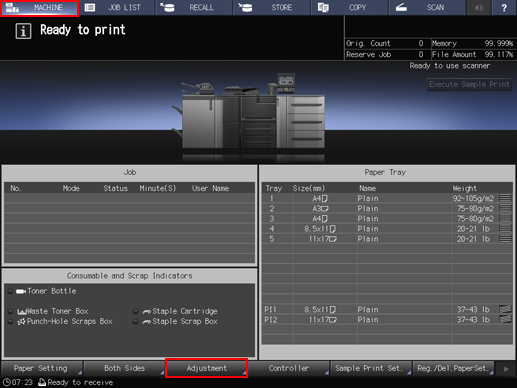
On the touch panel of the main body, press [Adjustment] on the [MACHINE] screen.
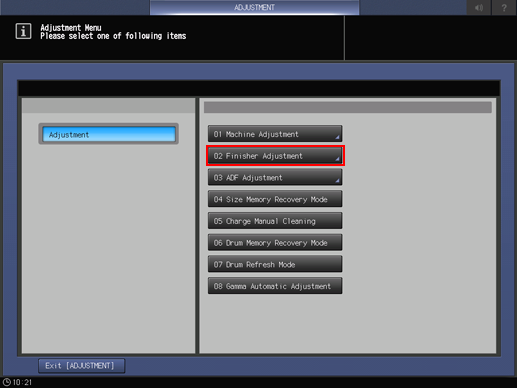
Press [Finisher Adjustment] on the [Adjustment Menu] screen.
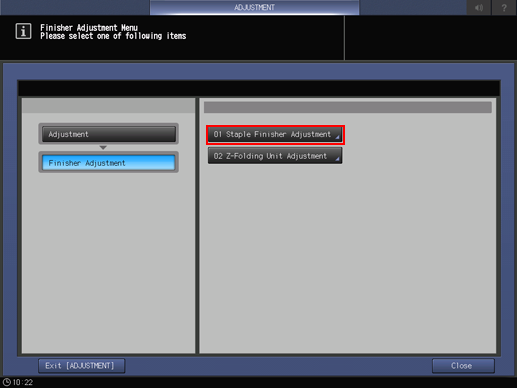
Press [Staple Finisher Adjustment] on the [Finisher Adjustment] menu.
Press [Staple Finisher (Fold) Adj.] on the [Staple Finisher Adjustment] menu.

Press [Tri-Fold Adjustment] on the [Staple Finisher (Fold) Adj.] menu.

Press [Tri-Fold Position Adjustment] on the [Tri-Fold Adjustment] menu.

Select the paper size and press [Fold 1] or [Fold 2]. Enter the adjustment value and press [Set].
Example: Reduce the width of Fold 1 for [A4] (Horizontal) by 1 mm.
Item
Setting
[A4] (Horizontal) - [Fold 1]
Reducing the width of Fold 1 by 1 mm (+10)
Press [1] and [0] in order to display [+10], then press [Set]. The input value changes to [+10], and the size of Fold 1 ('a' in the figure in Step 1) is shortened by 1 mm.

Press the keypad on the screen to set the value.
Use [+/-] to specify the value to be positive or negative. In Fold 1, [+] is used to reduce the width, and [-] to increase the width. In Fold 2, [+] is used to increase the width, and [-] to reduce the width.
The values are in 0.1 mm increments. (1 = 0.1 mm)
Pressing [Print Mode] switches the mode to print mode, which allows you to print the original.
Print the original again with tri-fold-in and check the fold positions.
Repeat the above steps until the desired fold positions are obtained.
