
Z-Fold Position Adj.: Adjusting the Folded Positions in Z-Fold Mode
Adjust Z-fold position of output in Z Folding Unit ZU-608 mounted on Finisher FS-532.
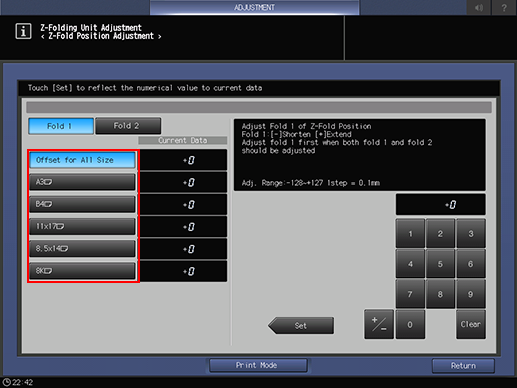
Objects of adjustment: Offset for All Size, A3  , B4 , 11
  17 , 8.5 14 , 8K

When adjusting both Fold 1 and Fold 2, be sure to start with the Fold 1 adjustment. The position of Fold 1 is calculated from the edge of the paper, while that of Fold 2 is calculated from the position of Fold 1. Consequently, the measurement (b) in step 7 is subject to the change in either position of the fold.
If a numeric value is specified for [Offset for All Size], it is applied to all paper sizes. With a specific paper size selected,the set value becomes the sum of the entered value and the value previously specified for [Offset for All Size].
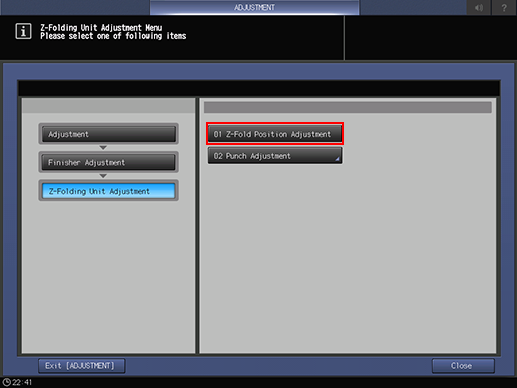
Press [Adjustment] on the [MACHINE] screen to display the [Adjustment Menu] screen.
Press [Finisher Adjustment], [Z-Folding Unit Adjustment], and [Z-Fold Position Adjustment] in sequence.
Select the size to be adjusted.
Press [Print Mode].
Load the paper size selected in step 3, then select that tray.
For [Output Setting], [Z-Fold] is automatically selected.
Press Start on the control panel.
A sample pattern will be output.
Measure the lengths (a) and (b) of the printed paper.
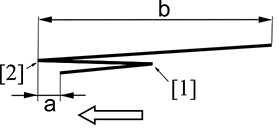
[1] Fold 1 [2] Fold 2
Paper size
a
b
A3
4 +/- 2 mm
209 mm or less
B4
4 +/- 2 mm
181 mm or less
11
17 4 +/- 2 mm
215 mm or less
8.5
14 - (2nd fold only)
241.7 mm or less
8K
4 +/- 2 mm
194 mm or less
If any adjustment is required, press [Exit PrintMode] to return to the [Z-Fold Position Adjustment] screen.
Select [Fold 1], and then use the touch panel keypad to enter the set value.
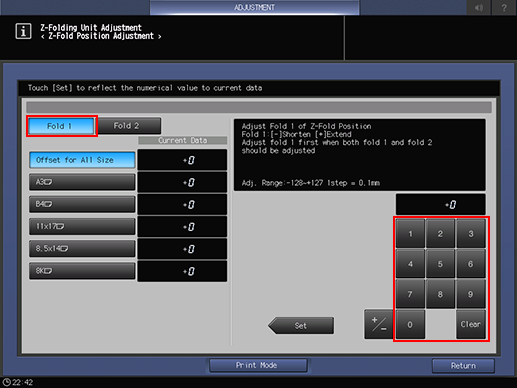
Adjustment Range: ([Shorten]) -128 to +127 ([Extend]) (1 step = 0.1 mm)
Use [+/-] to specify the value to be positive or negative.
Press [Set] to enter the Current Data as the setting value.
Select [Fold 2], and then use the touch panel keypad to enter the set value.
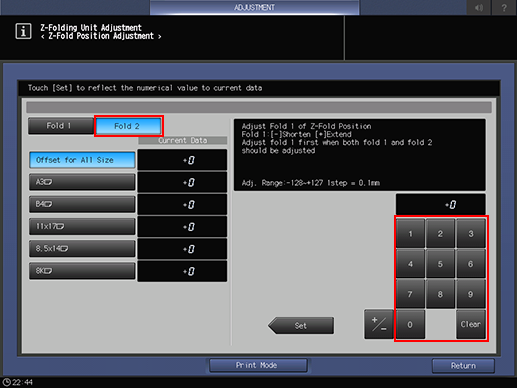
Adjustment Range: ([Shorten]) -128 to +127 ([Extend]) (1 step = 0.1 mm)
Use [+/-] to specify the value to be positive or negative.
Press [Set] to enter the Current Data as the setting value.
Repeat steps 4 to 12 until the desired result is obtained.
Press [Return].
The screen returns to the [Z-Folding Unit Adjustment Menu] screen.