
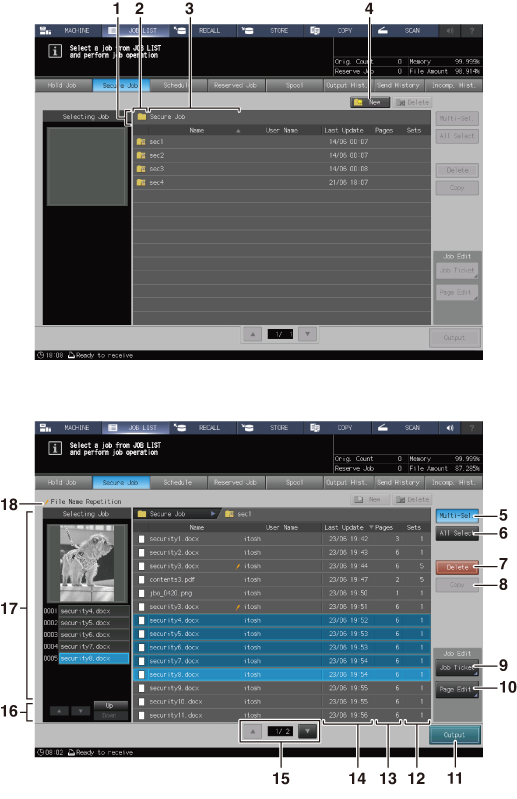
[Secure Job] screen
No. | Name | Description |
|---|---|---|
1 | Layer display area | Displays the directory to save the secure job in. |
2 | Preview icon | The secure job user box icon is displayed in the first layer, and the secure job icon is displayed in the second layer. |
3 | [Name] | The name of the secure job user box is displayed in the first layer, and the name of the print job saved as a secure job is displayed in the second layer. Pressing the title [Name] sorts the list by number included in the name. The jobs with the same name have the |
4 | [New] | Creates a new secure job user box in the first layer. When the second layer is displayed, this button is grayed out and does not function. |
5 | [Multi-Sel.] | Press before selecting multiple secure jobs in the second layer. Press first, then select jobs by pressing jobs in the job list. Press [Multi-Sel.] again to cancel this function. |
6 | [All Select] | Press to select all secure jobs in the second layer. Press [Multi-Sel.] to cancel this function. |
7 | [Delete] | Press before deleting the secure job in the second layer. |
8 | [Copy] | Press before copying the secure job in the second layer. |
9 | [Job Ticket] | Displays the [Job Ticket Edit] screen in order to edit a secure job using the Job Ticket Edit function in the second layer. You can shift the display from the [Job Ticket Edit] screen to the [Image Page Edit] screen. |
10 | [Page Edit] | Displays the [Page Edit] screen in order to edit a secure job using the Image Page Edit function in the second layer. You can shift the display from the [Image Page Edit] screen to the [Job Ticket Edit] screen. |
11 | [Output] | Press to print the secure job in the second layer. A dialog is displayed to select the output method. Select the desired output method, then press [OK]. |
12 | [Sets] | Displays the print quantity of the secure job in the second layer. Pressing the title [Sets] sorts the list in descending/ascending order of set count. |
13 | [Pages] | Displays the number of pages of the secure job in the second layer. Pressing the title [Pages] sorts the list in descending/ascending order of page count. |
14 | [Last Update] | The date/time when the secure job user box was created is displayed in the first layer, and the date/time when the print job was saved as a secure job is displayed in the second layer. Pressing the title [Last Update] sorts the list by date. |
15 | Scroll keys | Scrolls the secure job user box in the first layer, and the secure job list in the second layer. The current page number and total page count of the list are displayed between the keys. |
16 | Selected job scroll keys | Scrolls a list of multiple selected jobs in the second layer. |
17 | Selected job | Displays nothing in the first layer. Displays a preview image and the output conditions of the job selected in the list of secure jobs in the second layer. If multiple secure jobs are selected, a list of these jobs is displayed. |
18 | Duplication mark | If the jobs with the same name exist in the secure job list in the second layer, [File Name Repetition] is displayed. |
 mark on the right side.