
Numbering: Printing Annotation Number for Management
Print a distribution number onto the specified position of copies.
Position the original.
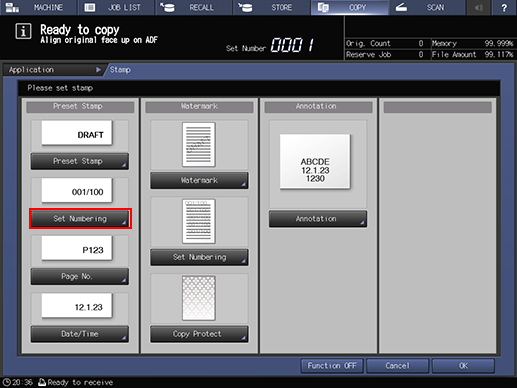
Press [Application] on the [COPY] screen.
Press [Stamp] on the [Application] screen.

Press [Set Numbering] under [Preset Stamp].
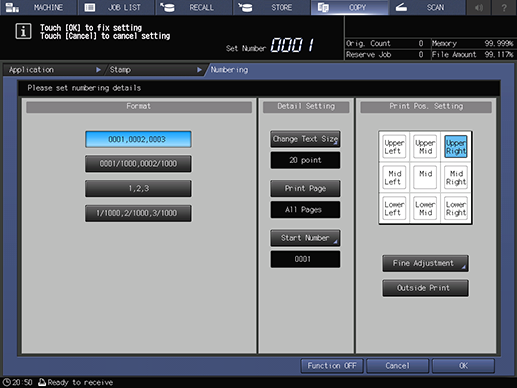
For Numbering, set [Format], [Detail Settings] ([Change Text Size], [Print Page], and [Start Number]), and [Print Pos. Setting].
Setting options
Description
[Format]
Select one of the four numbering type keys in the Format area.
[Change Text Size]
Select the desired Text Size.
[Print Page]
Press this key to select [Cover Only] or [All Pages].
[Start Number]
Press this key to specify the page to start printing.
[Print Pos. Setting]
Select one of the 9 printing positions provided under [Print Pos. Setting]. If fine adjustment is desired, press [Fine Adjustment]. Press [Outside Print] to print numbering on the outside edges of facing pages.
See Detailed Setting in Stamp for details on fine adjustment of printing position, how to change the text size, and how to set the start number.
Press [OK] twice to complete the setting.
To resume the original settings, press [Cancel].
To cancel the Stamp function with the current setting remained, press [Function OFF].
Press [OK] on the [Application] screen to return to the [COPY] screen.
The [Stamp] icon is displayed under [Application] on the [COPY] screen.
Enter the desired print quantity from the keypad on the control panel.
Press Start on the control panel.
Printing does not start without returning to the [COPY] screen. Be sure to display the [COPY] screen.