
Book Copy: Copying Left and Right Pages of a Two Page Spread Original Separately
Use this function to divide a page spread image, such as an open book or catalog, into two separate images on right and left pages. With a single scan, two sheets are printed for the 1-sided copy and both sides of a sheet are printed for the 2-sided copy. If front and back covers are also needed, scan them first in the order of front cover, back cover, and then scan the spread body so that all the original pages are output in correct order.
Also, when the Booklet function is used in combination, original images are automatically arranged in booklet format in correct order to make a multiple page signature booklet on both sides of paper.
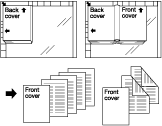
Selecting covers: When you need to add covers to the copied sets, scan the covers first.
Setting options | Description |
|---|---|
[No Cover] | 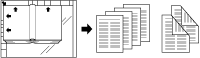 |
[Front With Cover (Left Bind)] | The original should be scanned in the order of the front cover, then page spread originals. Printed sets will be output in the order of the front cover page, then divided document pages according to the pagination. |
[Front/Back With Cover (Left Bind)] | The original should be scanned in the order of the front cover, the back cover, then page spread originals. Printed sets will be output in the order of the front cover page, divided document pages according to the pagination, then the back cover page. |
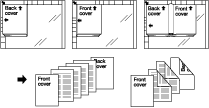
Using Booklet in combination: Use the Booklet function to make a booklet.
Setting options | Description |
|---|---|
[No Cover]+ [Booklet (Left Bind)] | 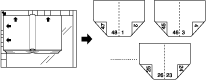 |
[Front/Back With Cover] + [Booklet (Left Bind)] | 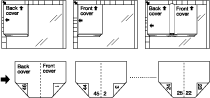 |
By choosing Bind Direction ([Left Bind]/[Right Bind]) of the original, the pages are output in the correct order.
The original size can be set to A3, B4, or 11
 17 in book spread.
Available paper sizes are A4
 , B5 , and 8.5 x 11 .
[Separate Scan] mode is automatically selected.
Neither [Auto Zoom] nor [Auto Paper] can be used in combination.
The ADF cannot be used to scan the original.
Position the original.
Load the front cover or the first page of the spread original face down.
Press [Application] on the [COPY] screen.
Press [Book Copy] on the [Application] screen.
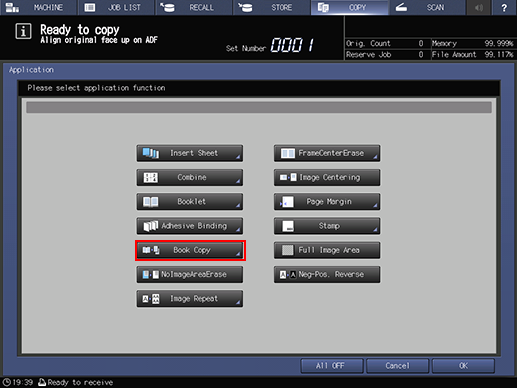
The [Book Copy] screen is displayed.
Select the options from the Original Bind Direction and Cover Put Select.
Select the binding position of the original by pressing [Left Bind] or [Right Bind].
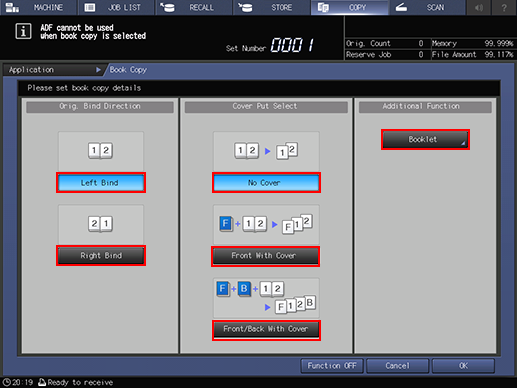
Press [Booklet] to use the Booklet function in conjunction with this function. For details about the setting procedure, refer to Booklet: Making Copies in the Order of Magazine Binding. To return to the [Book Copy] screen, press [OK] on the [Booklet] screen.
Press [OK] to complete the setting.
The screen returns to the [Application] screen.
To resume the previous settings, press [Cancel].
To disable the function while keeping the current setting, press [Function OFF].
Press [OK] on the [Application] screen to return to the [COPY] screen.
The [Book Copy] icon and shortcut key are displayed under [Application] on the [COPY] screen. And, [Separate Scan] is automatically selected.
Select additional copy conditions, as desired.
Select a tray. Available paper sizes are A4
, B5 , and 8.5 x 11 . Auto Zoom and Auto Paper are deselected and [x 1.0] magnification is selected automatically.
Combining with [Booklet] of Application allows you to create a new booklet with pagination different from that of the original booklet.

Do not select [Top] as binding direction on the Output Setting screen. It may cause an unexpected output.
Press Start on the control panel.
Scanning does not start without returning to the [COPY] screen. Be sure to display the [COPY] screen. The machine starts scanning and the scanned image is stored into memory. Repeat this procedure to complete scanning of all originals.
Press [Separate Scan] on the [COPY] screen to exit the Separate Scan mode.
Enter the desired print quantity from the keypad on the control panel.
Press Start on the control panel.
Printing does not start without returning to the [COPY] screen. Be sure to display the [COPY] screen.