
Insert Sheet: Adding a Front Cover or Insert Paper
Use this function in print mode or blank mode to insert chapter sheets or separator sheets into the finished set, as well as front and back covers. You can select whether to add the original in print mode or blank mode upon setting the Front/Back cover and insert sheets. The covers and insert sheets can be fed from a tray source other than that of body sets. When Post Inserter PI-502 is installed, paper feeding is also possible from the post inserter. If a Post Inserter is available, a blank cover or insert sheet can be inserted.
Front/Back Cover setting
There are the following options which can be selected for Front/Back Cover setting. Front Cover (Print or Blank) and Back Cover (Print or Blank) can be configured individually.
Setting options | Description |
|---|---|
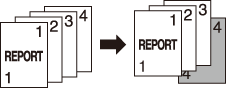
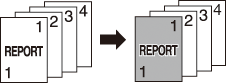
Front Cover + Print |
|
Front Cover + Blank | A blank sheet for a front cover will be inserted as the first sheet, regardless of the printing mode (simplex/duplex) of the original or copied set.
|
Back Cover + Print |
 |
Back Cover + Blank | A blank sheet for a back cover will be inserted as the last sheet of copied set, regardless of the simplex/duplex printing mode of the original or copy. 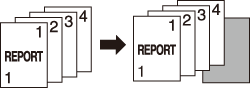 |
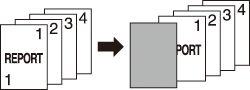
Insert Sheet setting
Insert Sheet setting produces various output depending on the [simplex/duplex] setting of the original and copy type or the [simplex/duplex] setting of insert paper.
Example: Selecting [Print] with page [5] specified as insertion location
Setting options | Description |
|---|---|
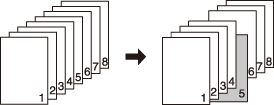
[1->1] | The 5th sheet of single-sided original is copied onto the insert sheet, which will be the 5th sheet of copied set. An insert sheet cannot be duplex-copied.
|
[1->2] |
|
[2->2] | The 5th sheet (the 9th and 10th pages) of double-sided original is printed onto both sides of the insert sheet, which will be the 5th sheet of copied set. An insert sheet cannot be simplex-copied. 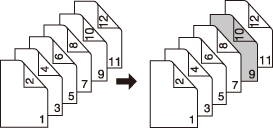 |
[2->1] | The 5th sheet (the 9th and 10th pages) of double-sided original is simplex-copied onto 2 insert sheets, which will be the 9th and 10th sheets of copied set. An insert sheet cannot be duplex-copied. 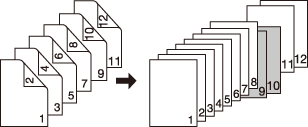 |
Example: Selecting [Blank] with page [5] specified as insertion location
Setting options | Description |
|---|---|
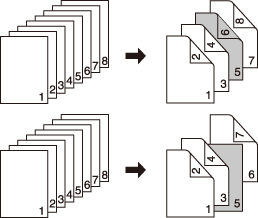
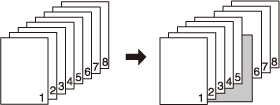
[1->1] | A blank sheet will be inserted after the 5th sheet of single sided original is simplex-copied.
|
[1->2] | A blank sheet is inserted after the 5th and 6th sheet of single-sided original are duplex-copied. With page [6] specified, the output result will be the same.
|
[2->2] | A blank sheet will be inserted after the 5th sheet (the 9th and 10th pages) of double-sided original are duplex-copied. 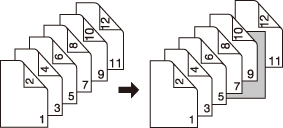 |
[2->1] | A blank sheet will be inserted after the 5th sheet (the 9th and 10th pages) of double-sided original are simplex-copied. A sheet cannot be inserted after an odd-numbered page of copied set. 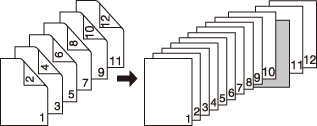 |

Use ADF. Use [Separate Scan] if the original page count exceeds 150. Combined with the Separate Scan mode, the original glass will also be available.
Trays for copy paper, front and back covers, and insert sheets should have the same paper size loaded. (Auto Zoom is automatically selected.)
Front/back cover can be fed one sheet at a time from tray 1-5 and/or up to 40 sheets from the post inserter. When sheets from the main body tray and post inserter are fed together, the post inserter feeds the first (front) cover and the last (back) cover.
You can set up to 100 types, from page 1 to 999, for insert sheet setting, excluding front and back covers. Also, a maximum of 40 sheets can be inserted for each insertion point from the post inserter.
Position the original.
Load paper into the tray.
Load paper for front/back cover, insert sheets, and text copy into any tray. When using the post inserter, load paper into the post inserter tray. Be sure that the trays for copy paper, front/back cover, and insert sheets have paper of the same size.

Check the tray information to see which type/size of paper is specified for each tray before loading paper. If a different type of paper is loaded into the tray, copying may not be completed or a malfunction may occur.
Set [Simplex/Duplex] for original and copied set.
Display the Copy Screen and press the desired key under [Simplex/Duplex]. The [Simplex/Duplex] setting specified here will be reflected in the print side setting for cover and insert sheet.
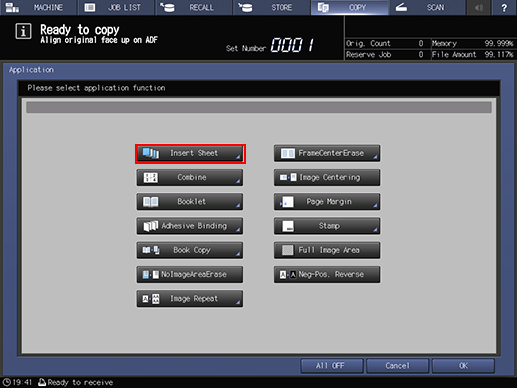
Press [Application] on the [COPY] screen.
Press [Insert Sheet] on the [Application] screen.
Select the desired cover mode.
To add a front cover, press [Change Set] under [Front Cover Setting]. To add a back cover, press [Change Set] under [Back Cover Setting].

[Front Cover Setting] screen

[Back Cover Setting] screen
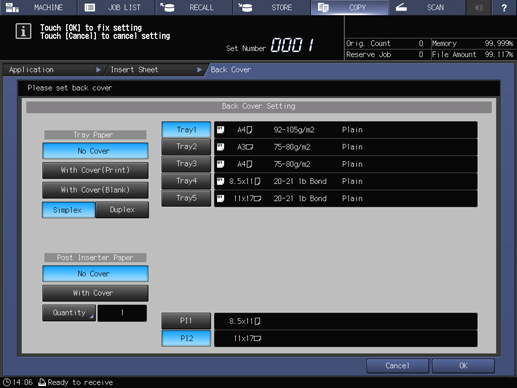
Set the following options, if necessary.
[Tray Paper]
Cover print
To copy and attach a cover, press [With Cover(Print)]. To insert blank sheets, press [With Cover(Blank)].
Print Side
To make 1-sided copy on a cover, press [Simplex]. To make 2-sided copy, press [Duplex]. When the screen is initially displayed, the setting is what you have selected for print side of copied set in the [Simplex/Duplex] setting in step 3. If you select [With Cover(Blank)] in the cover print setting, [Simplex] is automatically selected.
[Post Inserter Paper]
Post Inserter Paper
To use paper set in the post inserter as a cover, press [With Cover], and press one of the post inserter tray keys. Paper fed from the post inserter tray cannot be printed.
Quantity Set
From the post inserter, covers can be attached up to 40 sheets. Press [Quantity Set] to specify the number on the keypad on the screen, then press [OK].
Paper for cover can be simultaneously fed from a paper tray and post inserter tray. In that case, the post inserter feeds the first (front) cover and the last (back) cover.
[PI Paper Quantity] screen
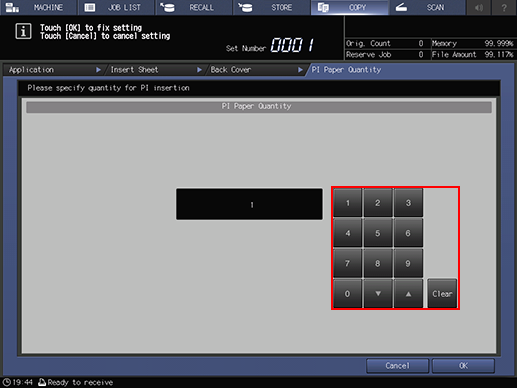
Press [OK] to return to the [Insert Sheet] Screen.
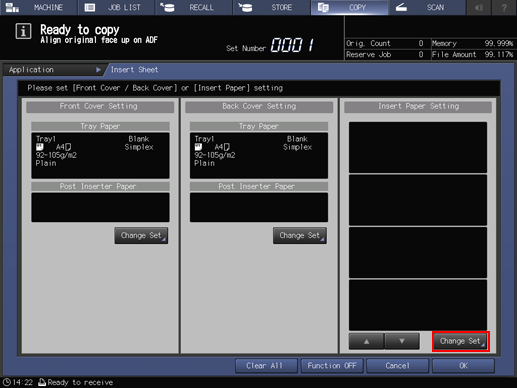
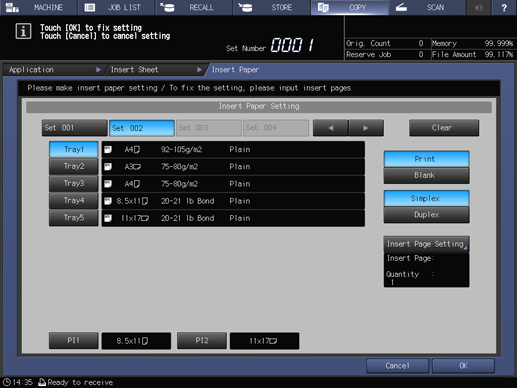
Select the desired insert sheet.
Press [Change Set] under [Insert Paper Setting].
On the upper left of the screen, [Set 001] is highlighted.
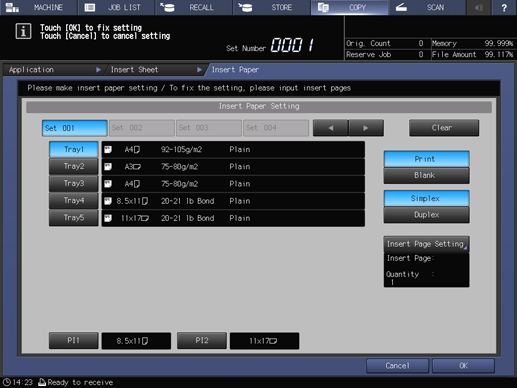
For a single set key, you can specify only one combination of printing/not printing, print side, and paper tray settings, while multiple insertion points can be specified. If another combination is necessary to add insert sheets, confirm the current setting and use the following keys to create a new setting.
Paper Tray
Select the desired tray key. To use paper loaded in the post inserter, select one of the post inserter tray buttons. Paper fed from the post inserter tray cannot be printed.
Insert sheet printing
To copy and add insert paper, press [Print]. To add blank paper, press [Blank].
Print side
To make 1-sided copy on insert paper, press [Simplex]. To make 2-sided copy, press [Duplex]. When the screen is initially displayed, the setting is what you have selected for print side of copied set in the [Simplex/Duplex] setting in step 3. If you select [Blank] in the insert sheet print setting, [Simplex] is automatically selected.
Specify the insert page.
Press [Insert Page Setting] to display the [Insert Page Setting] Screen.
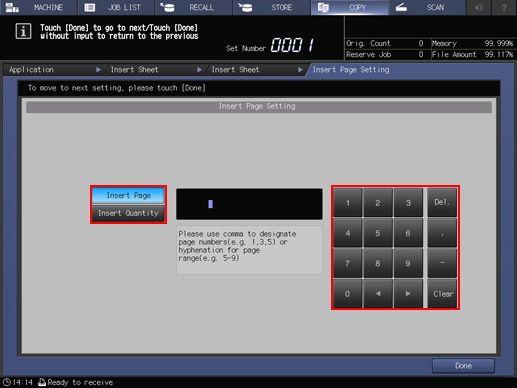
Use the keypad on the screen to enter the page number of insertion location. Use commas "," to separate the page numbers when specifying multiple pages. Use a hyphen "-" between the first and last page numbers when specifying a range. You can enter up to 20 characters including commas and hyphens.
The page numbers entered will be automatically sorted in ascending order. You cannot specify the same page more than once.
Press [Delete] to delete the last number entered (the one preceding the cursor). Press [Clear] to delete all the entries.
If a post inserter tray is selected as a paper tray, specify the insert quantity. Press [Insert Quantity] to enter the desired number of sheets using the keypad on the screen. You can specify up to 40 sheets.
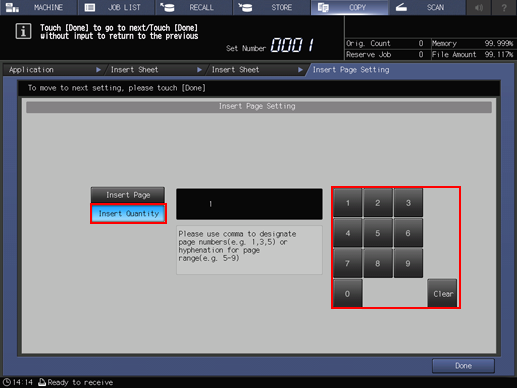
When all entries are made, press [Done]. This returns to the [Insert Sheet] screen.
Continue setting the insert sheet options, if necessary.
On the upper left of the screen, [Set 002] is highlighted. You can change the settings to attach a different type of insert sheets. You can set up to 100 types.
When the same page number as the previous setting is entered, the last setting with a larger set number takes precedence.
Press [Clear] on the upper right of the screen to clear the setting of the highlighted set key.
When all settings are completed, press [OK].
The [Insert Sheet] Screen will be restored. The Insert Sheet Screen provides information on the settings made on the Front Cover, Back Cover, and Insert Sheet Setting screens.
Press [OK] to complete the setting.
To resume the original settings, press [Cancel].
To cancel the Insert Sheet function with the current setting saved, press [Function OFF].
To clear all the settings, press [Clear All].
Press [OK] on the [Application] screen to return to the [COPY] screen.
The [Insert Sheet] icon and shortcut key are displayed under [Application] on the [COPY] screen.
Enter the desired print quantity from the keypad on the control panel.
Press Start on the control panel.
To print and attach back covers, scan all of the original and then output the data.
Printing does not start without returning to the [COPY] screen. Be sure to display the [COPY] screen.