
Using the Search
Searching for the Network Scanner features is available when address is registered beforehand.
Normal Search
Use this function to search a desired address among registered addresses. Searchable addresses include E-mail addresses, storage locations on the HDD, FTP server addresses, SMB server addresses, and WebDAV server addresses.
The following is how to use [Search].
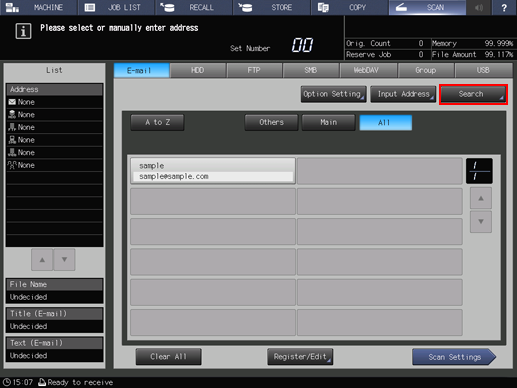
Press [Search].
Input the Character for Search you registered, and press [OK].
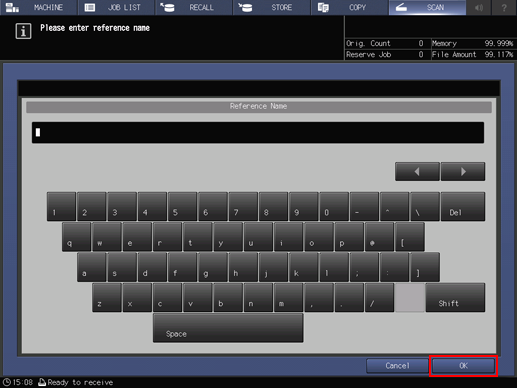
You can search by at minimum one character. If there are too many search results, press [Search] to add search characters. (The search characters you entered are saved until you perform scanning.)
Pressing [Cancel] cancels the input search letters, and the search letter input screen closes.
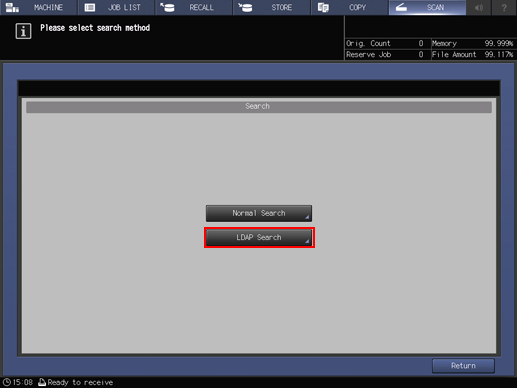
If required information has been set for the LDAP Search, the screen to select [Normal Search] or [LDAP Search] is displayed. If you select [Normal Search], the above screen is displayed.
The desired address will be displayed.
LDAP Search
You can acquire the information meeting the search conditions entered on the control panel from the data base in the LDAP server. You can also select the acquired E-mail address, and then send or register the scan data.

Before using LDAP Search, a setting is required. For details, consult your network administrator.
Press [Search] on the [SCAN] screen.
Press [LDAP Search].
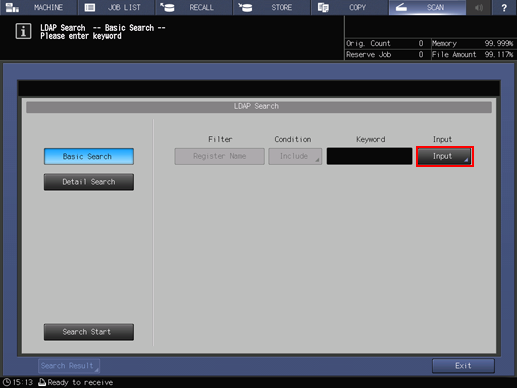
Press [Basic Search] or [Detail Search].
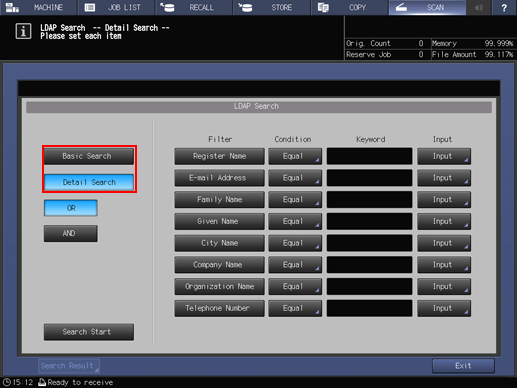
[Basic Search]
Enter one keyword and search. Data beginning with the keyword input for [Register Name], [E-mail Address], [Family Name], and [Given Name] is searched.
[Detail Search]
A keyword can be respectively specified for [Register Name], [E-mail Address], [Family Name], [Given Name], [City Name], [Company Name], [Organization Name], and [Telephone Number].
[OR] or [AND] can be selected in each field.
[Equal], [Include], [Begin], or [Close] can be set up as the search condition.
Press [Input], input the search condition, and then press [OK].
- In case of [Basic Search]
You can enter up to 256 one-byte characters (128 two-byte characters) as the search term in [Basic Search].
- In case of [Detail Search]
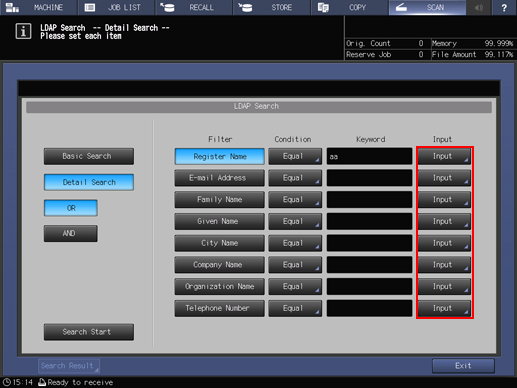
To change the search condition, press a key under [Condition] and change the search condition on the screen displayed.
The search ongoing screen is displayed while in the search.
You can enter [Register Name] and [E-mail Address] using up to 256 one-byte characters (128 two-byte characters).
You can enter other filter items using up to 64 one-byte characters (32 two-byte characters).
Press [Search Start].
Press [Cancel] if you want to cancel the search.
Press [Return] to return to the Search screen if you encounter an LDAP search error.
Check the search result.
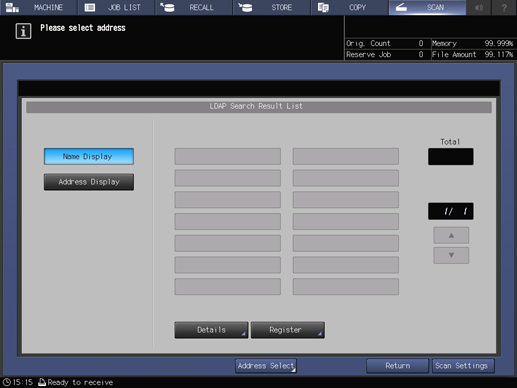
The desired address will be displayed in the registered name. Press [Address Display] to display its E-mail address. (Displays up to 100 addresses)
Specify an address and press [Details] if you want to check its detailed information.
When transmitting:
Select the desired address from the search results, and press [Scan Settings]. Set the scan conditions.
For details about the screen to configure the scan settings, refer to Scan Settings Screen.
You can select multiple addresses for transmission. Press [Address Select] to select the address for transmission. For details about how to send to multiple addresses, refer to Sending to a Group.
Set an original, and then press Start on the control panel.
When registering:
Select an address to register from the result of search and press [Register].
If more than one address is selected, the address that is selected last is registered.
In the [LDAP Search Results Register] screen, check [Address], [Register Name], and [Reference Name], and if there is no problem, press [OK] to register the address.