
IPsec Setting
IPsec Setting (IKEv1 Setting)
Specifies the IKEv1 setting.
Access IPsec to display the IPsec Operation Selection screen.
Select the [IPsec Setting] radio button, and click [OK]. The [IPsec Setting] screen is displayed.

Click [Edit] of [IKEv1].
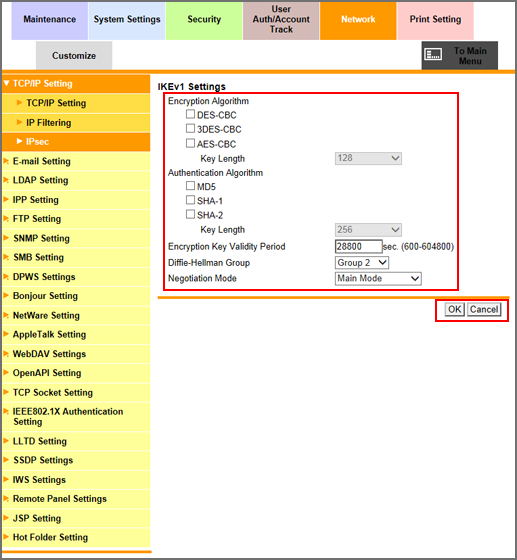
Specify [Encryption Algorithm] you want to use when generating a common key used for communication.
Select the checkbox of the encryption algorithm to be set. When selecting the [AES-CBC] checkbox, select the key length to be set from the [Key Length] drop-down list.
Specify [Authentication Algorithm] you want to use when generating a common key used for communication.
Select the checkbox of the authentication algorithm to be set. When selecting the [SHA-2] checkbox, select the desired key length from the [Key Length] drop-down list.
Specify the validity period of common key to securely generate a common key used for encrypting communication. Enter a desired period of time into the [Encryption Key Validity Period] text box. The available range is 600 to 604800 (seconds).
Select a group from the [Diffie-Hellman Group] drop-down list.
Select either [Main Mode] or [Aggressive Mode] from the [Negotiation Mode] drop-down list. Select the method to securely generate a common key used for encrypting communication.
Click [OK]. Clicking [Cancel] cancels the setting.
Click [OK] on the setting complete screen.
The screen returns to the [IPsec Setting] screen.
IPsec Setting (IKEv2 Setting)
Set the IKEv2 setting.
Display the [IPsec Setting] screen.
The procedures are the same as Steps 1 to 2 in "IPsec Setting (IKEv1 Setting)."
Click [Edit] of [IKEv2].

Specify [Encryption Algorithm] you want to use when generating a common key used for communication.
Select the checkbox of the encryption algorithm to be set. When selecting the [AES-CBC] checkbox, select the key length to be set from the [Key Length] drop-down list.
Specify [Authentication Algorithm] you want to use when generating a common key used for communication.
Select the checkbox of the authentication algorithm to be set. When selecting the [SHA-2] checkbox, select the desired key length from the [Key Length] drop-down list.
Specify the validity period of common key to securely generate a common key used for encrypting communication. Enter a desired period of time into the [Encryption Key Validity Period] text box. The available range is 600 to 604800 (seconds).
Set the priority of [Diffie-Hellman Group].
Select a group from each drop-down list of [Priority1] to [Priority4].
Click [OK]. Clicking [Cancel] cancels the setting.
Click [OK] on the setting complete screen.
The screen returns to the [IPsec Setting] screen.
IPsec Setting (SA Setting)
Registers Security Associations (SAs) used for encrypted communication, edits the registered SAs, and deletes the registered SAs.
Display the [IPsec Setting] screen.
The procedures are the same as Steps 1 to 2 in "IPsec Setting (IKEv1 Setting)."
Click [Create] in [SA].
When editing the registered SA, click [Edit].
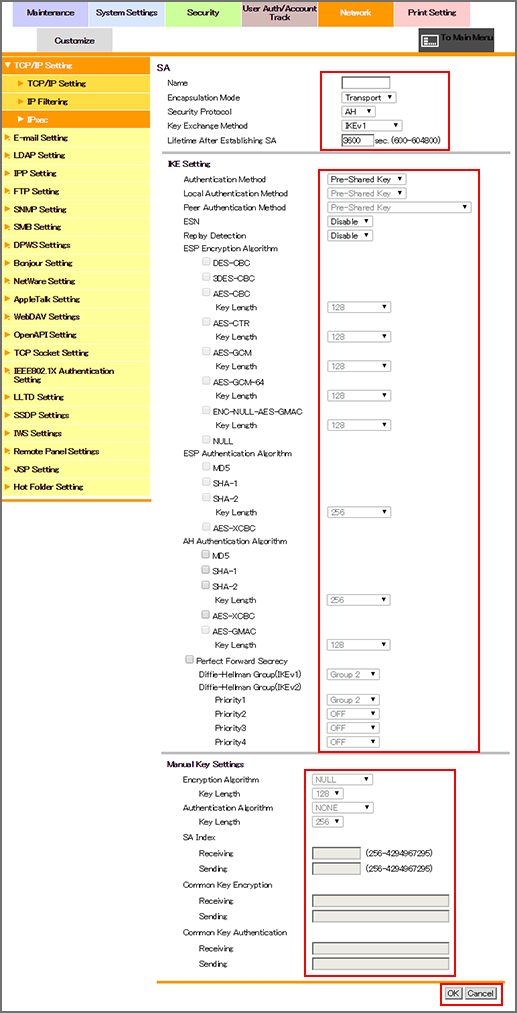
Specify the SA setting.
Enter the name of the SA in the [Name] field. Up to 10 one-byte characters can be used.
Select the options from the [Encapsulation Mode], [Security Protocol], and [Key Exchange Method] drop-down lists.
Enter a desired period of time into the [Lifetime After Establishing SA] text box. The available range is 600 to 604800 (seconds).
Configure the settings of IKE used for this SA.
Select the options from the [Authentication Method], [ESN], and [Replay Detection] drop-down lists.
If you have selected [IKEv2] for [Key Exchange Method]. select the authentication method of the machine from [Local Authentication Method], and select the method to authenticate the peer from [Peer Authentication Method].
Select the checkboxes of [ESP Encryption Algorithm], [ESP Authentication Algorithm], and [AH Authentication Algorithm] to be set. Depending on the selected items, select the key length to be set from the [Key Length] drop-down list.
To enable [Perfect Forward Secrecy] capable of increasing the IKE strength, select the checkbox.
Select a group from the [Diffie-Hellman Group(IKEv1)] drop-down list.
Set the priority of [Diffie-Hellman Group(IKEv2)]. Select a group from each drop-down list of [Priority1] to [Priority4].
If you have selected [Manual Key] for [Key Exchange Method], configure the manual key settings.
Select an item from a drop-down list for [Encryption Algorithm] or [Authentication Algorithm]. Depending on the selected items, select the key length to be set from the [Key Length] drop-down list.
Enter a value ranging from 256 to 4294967295 in each field of [Receive] and [Send] in [SA Index].
Enter a key in each field of [Receive] and [Send] in [Common Keys for Enc.]. You can enter up to 64 alphanumeric characters.
Enter a key in each field of [Receive] and [Send] in [Common Keys for Auth.]. You can enter up to 64 alphanumeric characters.
Click [OK]. Clicking [Cancel] cancels the setting.
Click [OK] on the setting complete screen.
The screen returns to the [IPsec Setting] screen.
When deleting the SA, click [Delete].
Click [OK] on the confirmation screen. Click [Cancel] to cancel the deletion.
Click [OK] on the setting complete screen.
The screen returns to the [IPsec Setting] screen.
IPsec Setting (Peer)
Registers peers, edits the registered peer, and deletes the registered peers.
Display the [IPsec Setting] screen.
The procedures are the same as Steps 1 to 2 in "IPsec Setting (IKEv1 Setting)."
Click [Register] in [Peer].
When editing the registered peer, click [Edit].
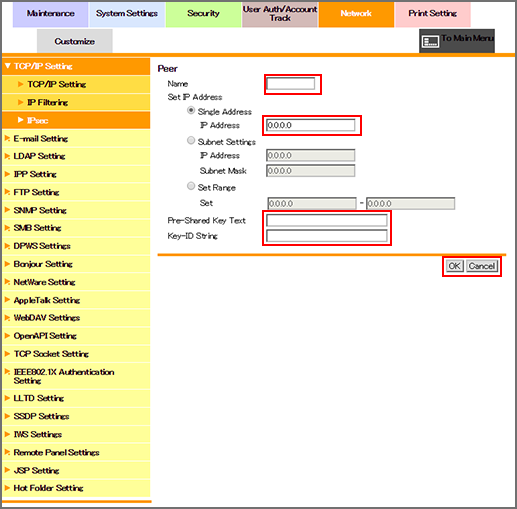
Enter the name of the peer in the [Name] field.
Up to 10 one-byte characters can be used.
Select a radio button of the [Set IP Address], and enter the IP address and other information.
Enter a string in each field of [Pre-Shared Key Text] and [Key-ID String]. You can enter up to 128 alphanumeric characters and symbols.
Click [OK]. Clicking [Cancel] cancels the setting.
Click [OK] on the setting complete screen.
The screen returns to the [IPsec Setting] screen.
When deleting the peer, click [Delete].
Click [OK] on the confirmation screen. Click [Cancel] to cancel the deletion.
Click [OK] on the setting complete screen.
The screen returns to the [IPsec Setting] screen.
IPsec Setting (Protocol Setting)
Registers protocol settings, edits the registered protocol settings, and deletes the registered protocol settings.
Display the [IPsec Setting] screen.
The procedures are the same as Steps 1 to 2 in "IPsec Setting (IKEv1 Setting)."
Click [Create] in [Protocol Setting].
When editing the registered protocol setting, click [Edit].

Enter the name of the protocol setting in the [Name] field.
Up to 10 one-byte characters can be used.
Select a protocol identification from the [Protocol Identification Setting] drop-down list.
If you have selected [TCP] or [UDP] for [Protocol Identification Setting], select a radio button of the [Port Number] setting, and enter the port number.
If you have selected [ICMP] or [ICMPv6] for [Protocol Identification Setting], specify a message type.
Click [OK]. Clicking [Cancel] cancels the setting.
Click [OK] on the setting complete screen.
The screen returns to the [IPsec Setting] screen.
When deleting the protocol setting, click [Delete].
Click [OK] on the confirmation screen. Click [Cancel] to cancel the deletion.
Click [OK] on the setting complete screen.
The screen returns to the [IPsec Setting] screen.