
Specify Information to Print
This section describes how to specify items to be printed outside the image area.
Click [File] - [Color Verification].
The [Color Verification] screen is displayed.
Select [The Color Setting Information], then select items.
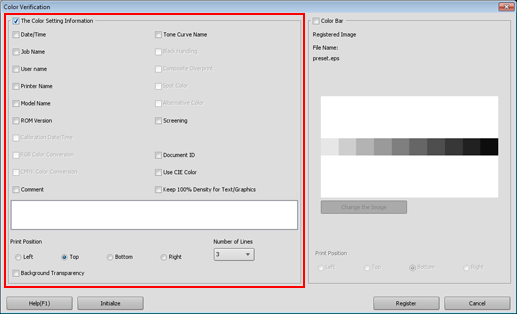
The following functions are not available on the machine.
[Calibration Date/Time]
[RGB Color Conversion]
[CMYK Color Conversion]
[Black Handling]
[Composite Overprint]
[Spot Color]
[Alternative Color]
To select a printing position, select a radio button at [Print Position].
To select the number of lines to be printed, select the number from [Number of Lines]. (1 to 5)
Select [Color Bar].
The image that has been registered as the color bar is displayed.
To use it from another file, click [Change the Image] and specify the eps file.
To print those items in the job, select the items, then select [Save] in the print mode using the printer driver.
[User Name]
[Printer Name]
[Model Name]
[ROM Version]
[Tone Curve Name]
[Document ID]
[Comment]
To select a printing position, select a radio button at [Print Position].
Click [Register].
The settings are registered in the image controller.
Close the [Color Verification] screen, and return to the [Color Default Settings] screen.
To revoke the settings and reset them to default values, click [Initialize].