
Stamp/Composition
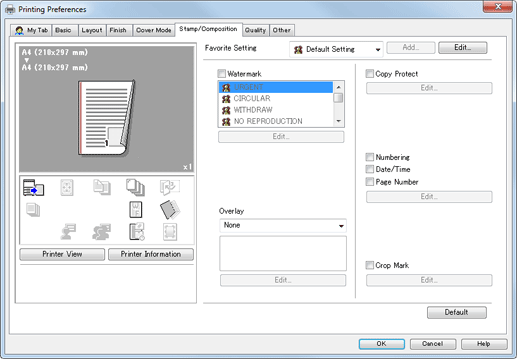

This manual includes the pages that describe how to register an overlay and print a document over it (Superimposition). For details, refer to Form (Overlay) Print (PCL Driver).
In Power Point 2007, if overlay printing is carried out while the background is set to white, it may fail.
Function | Option | Description |
|---|---|---|
[Watermark] | [URGENT] [CIRCULAR] [WITHDRAW] [NO REPRODUCTION] [TOP SECRET] [INTERNAL USE] [Important] [Proof] [Confidential] [DRAFT] [COPY] | Prints a document overlapping a watermark (text stamp). The default watermarks described in the left column are prepared. When you want to create a watermark with another name, use [Edit] to create new name and add the watermark to the list. |
[Watermark] - [Edit] | - | Edit watermarks. You can create, change, and delete watermarks. For details, refer to "Edit Watermark" shown below. |
[Overlay] | [None] | Set this not to use the overlay function. |
[Create Overlay File] | Create the data for overlay by printing after specifying the document in this setting. The data created is saved in the computer. | |
[Create Shared Overlay File] | Create the overlay file in the shared folder that is specified in the [Use Shared Folder (Overlay Printing)] on the [Settings] tab. For details on the [Settings] tab, refer to Settings. | |
[Print in Overlay] | Prints a document overlapping with the data for the overlay created in the [Create Overlay File]. Set this to enable to select from the list for overlay saved in computer. | |
[Overlay] - [Edit] | - | Edit the overlay printing. You can edit the condition for the overlay printing. For details, refer to "Edit Overlay" shown below. |
[Copy Protect] | Off, On | Set this to combines the selected document with the copy protect pattern to protect from unauthorized copying |
[Copy Protect] - [Edit] | [Preset Stamp] | Select the preset stamp that is used on settings for the [Copy Protect] from among [Copy], [Invalid], [Illegal Copy], or [Invalid Copy]. |
[Background Pattern] | Select the background pattern that is used on settings for the [Copy Protect] from among [Cherry], [Arabesque], or [Check]. | |
[Numbering] | Off, On | Set this to print adding distribution number. |
[Date/Time] | Off, On | Set this to print adding date and time. |
[Page Number] | Off, On | Set this to print adding page number. |
[Numbering] / [Date/Time] / [Page Number] - [Edit] | - | Edit Numbering, Date/Time, or Page Number. For details, refer to "Edit Numbering, Date/Time, and Page Number" shown below. |
[Crop Mark] | Off, On | Set this to print adding a crop mark. |
[Crop Mark] - [Edit] | - | Edit a crop mark. |
Edit Watermark

Function | Description |
|---|---|
[Watermark List] | The following watermarks are available. [URGENT] [CIRCULAR] [WITHDRAW] [NO REPRODUCTION] [TOP SECRET] [INTERNAL USE] [Important] [Proof] [Confidential] [DRAFT] [COPY] |
[Watermark Name] | Enter the name to be displayed in the watermark list. You can enter up to 30 characters. |
[Watermark Text] | Enter a watermark. You can enter up to 30 characters. |
[New] | Click this button to create a new watermark. |
[Delete] | Click this button to delete the selected watermark. The preset watermarks cannot be deleted. |
[ | Click the button to change the order of items displays in the list. This allows you to move the frequently used items upward. |
[Position] | Select the vertical and lateral positions. You can specify the positions using the scroll bars provided on the right of and under the image. |
[Center] | Click this button to return the watermark back to the center position. |
[Angle] | Specify the watermark print angle. |
[Font Name] | Select the font. |
[Size] | Select the size. |
[Style] | Select the style. |
[Frame] | Select the frame style. |
[Density] | Specify the density of the text character. |
[Transparent] | Select this check box to print the watermark in a transparent image. |
[1st Page Only] | Select this check box to print the watermark only on the first page. |
[Repeat] | Select this check box to print the watermark on one page repeatedly. |
[Sharing] | Select this check box to register the watermark for sharing it with other users or clear this check box to register it for private use. |
 ]
] ]
]
In the 64-bit operating system, the watermark and authentication functions cannot be used together.
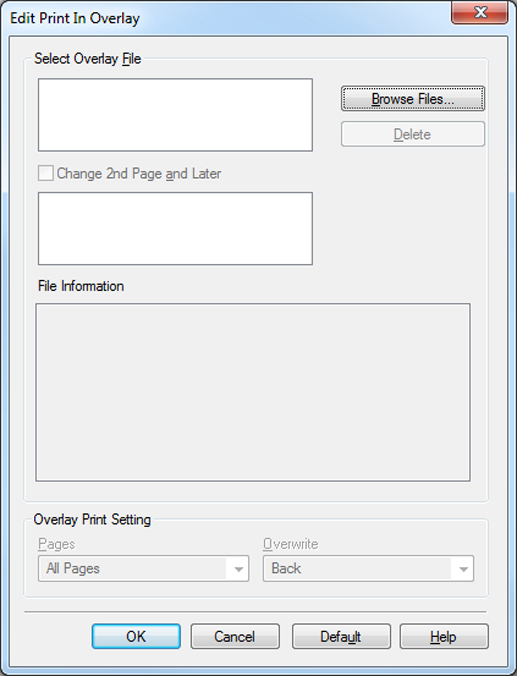
Edit Overlay
Select [Print Overlay] and click [Edit] to edit overlay printing.
Function | Description |
|---|---|
[Browse Files] | Click to load the overlay file. |
[Delete] | Deletes the selected overlay from the list. |
[Change 2nd Page and Later] | Set this to change the overlay used for 2nd page and later. |
[File Information] | Displays the file information for the overlay selected in list. |
[Pages] | Select the pages of the document to be printed. |
[Overwrite] | Specify the order to overlap between the document and overlay data to print. |
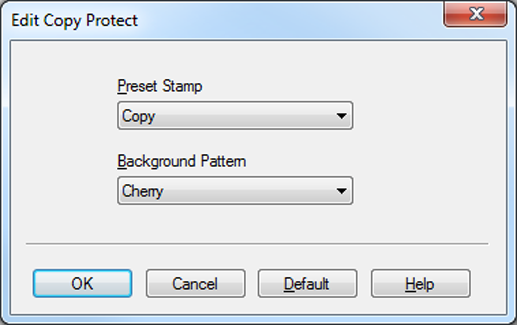
Edit Copy Protect
Function | Description |
|---|---|
[Preset Stamp] | [Copy], [Invalid], [Illegal Copy], [Invalid Copy] Select one from the above. |
[Back Pattern] | [Cherry Blossoms], [Arabesque], [Lattice] Select one from the above. |
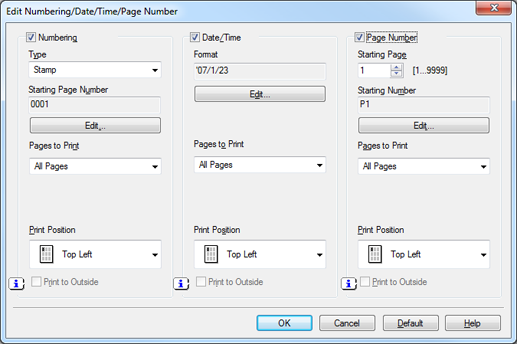
Edit Numbering, Date/Time, and Page Number
Function | Option | Description | |
|---|---|---|---|
[Numbering] | [Type] | [Stamp], [Watermark] | Select the numbering type. |
[Starting Page Number] | - | Displays the starting number specified in [Edit] - [Starting Number]. | |
[Edit] - [Style] | ["0001, 0002"], ["0001/1000, 0002/1000"], ["1,2"], ["1/1000, 2/1000"] | Specify a notation of numbering when printing [Numbering]. | |
[Edit] - [Starting Page Number] | [1] to [9999] | Specify a starting number when printing [Numbering]. | |
[Edit] - [Size] | [8 pt], [10 pt], [12 pt], [14 pt], [20 pt], [36 pt] | Specify a font size when printing [Numbering]. | |
[Pages to Print] | [All Pages], [1st Page Only] | Inserts the printing number of copies to be printed on each page of the document when printing with [Numbering]. | |
[Print Position] | [Top Left], [Top], [Top Right], [Left], [Center], [Right], [Bottom Left], [Bottom], [Bottom Right] | Specify a position when printing [Numbering]. | |
[Print to Outside] | [Off], [On] | Select this option to print [Numbering] on the outside edges of facing pages. | |
[Date/Time] | [Format] | - | Displays the date and time specified in [Edit] - [Date Type] and [Time Type]. |
[Edit] - [Date Type] | [<'07/1/23>], [<23 Jan. 2007>], [<Jan 23, 2007>], [<23/1/'07>], [<1/23/'07>] | Specify a notation of date when printing [Date/Time]. | |
[Edit] - [Time Type] | [<1:23PM>], [<13:23>] | Specify a notation of time when printing [Date/Time]. | |
[Edit] - [Font] | [Gothic], [Ming] | Specify a font when printing [Date/Time]. | |
[Edit] - [Size] | [8 pt], [10 pt], [12 pt], [14 pt] | Specify the font size when printing [Date/Time]. | |
[Edit] - [Preview] | - | Displays the date and time specified in [Edit] - [Date Type] and [Time Type]. | |
[Pages to Print] | [All Pages], [1st Page Only] | Select [1st Page Only] or [All Pages] when printing [Date/Time]. | |
[Print Position] | [Top Left], [Top], [Top Right], [Left], [Center], [Right], [Bottom Left], [Bottom], [Bottom Right] | Specify a position when printing [Date/Time]. | |
[Print to Outside] | [Off], [On] | Select this option to print [Date/Time] on the outside edges of facing pages. | |
[Page Number] | [Starting Page] | [1] to [9999] | Specify a page to start printing the number when printing [Page Number]. |
[Starting Number] | - | Displays the page number specified in [Edit] - [Page Number Type]. | |
[Edit] - [Page Number Type] | [P1], [1/5], [1], [- 1 -] | Specify a notation of a page number when printing [Page Number]. | |
[Edit] - [Starting Number] | [1] to [9999] | Specify the starting page number when printing [Page Number]. | |
[Edit] - [Font] | [Gothic], [Ming] | Specify a font when printing [Page Number]. | |
[Edit] - [Size] | [8pt], [10pt], [12pt], [14pt] | Specify the font size when printing [Page Number]. | |
[Edit] - [Preview] | - | Displays the page number specified in [Edit] - [Page Number Type]. | |
[Pages to Print] | [All Pages], [Not Front Cover], [Not Front-Back Cover] | Select pages to print [Page Number]. | |
[Print Position] | [Top Left], [Top], [Top Right], [Left], [Center], [Right], [Bottom Left], [Bottom], [Bottom Right] | Specify a position to print [Page Number]. | |
[Print to Outside] | [Off], [On] | Select this option to print [Page Number] on the outside edges of facing pages. | |
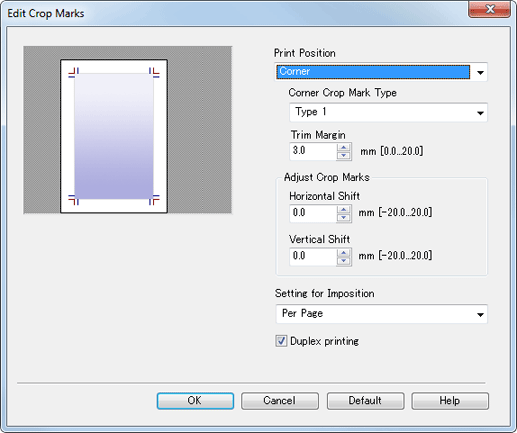
Edit Crop Marks
Function | Option | Description |
|---|---|---|
[Print Position] | [Corner], [Center], [Corner/Center] | Set the position to print a crop mark. |
[Corner Crop Mark Type] | [Type 1], [Type 2], [Type 3] | Specify a type of a corner crop mark. [Type 1]: [Type 2]: [Type 3]: |
[Trim Margin] | 0 mm to 20 mm / 0.00" to 0.79" | A position can be shifted while displaying a preview. |
[Horizontal Shift] | -20 mm to 20 mm / -0.79" to 0.79" | A position can be shifted while displaying a preview. |
[Vertical Shift] | -20 mm to 20 mm / -0.79" to 0.79" | A position can be shifted while displaying a preview. |
[Setting for Imposition] | [Per Page], [Per Sheet] | Set whether to print a crop mark for imposition per page or per sheet. |
[Duplex printing] | Off, On | Specify whether to also print a crop mark on the back side if [2-Sided] is selected. |


