
Scan
Q1. What types of file formats are available for scanned images?
A1. The types of files that can be saved are TIFF, JPEG, PDF, Compact PDF, XPS, Compact XPS and PPTX.
An image saved as a TIFF or JPEG file can be viewed using a general image browsing application.
To view an image saved as a PDF or Compact PDF, install Adobe Reader. Adobe Reader can be downloaded without charge from the Adobe website.
To view an image saved as an XPS or Compact XPS, install XPS Viewer. XPS Viewer has automatically been installed if Microsoft .NET Framework 3.0 has been installed on your computer.
Microsoft .NET Framework 3.0 can be downloaded without charge from the Microsoft website.
To view an image saved as a PPTX file, Microsoft Power Point 2007/2010 must be installed.
Q2. Can I use the scanning function by connecting to the network with a USB cable?
A2. No. You cannot use the scanning function via network connection with a USB cable. Use a LAN cable for network connection.
However, you can connect a USB memory to the USB Port of this machine to save scanned data to the USB memory. For the procedure for saving scanned data to a USB memory, refer to Here.
Q3. Can I send scanned data to my PC without disabling the firewall setting?
A3. Yes. Register this machine in the exception setting for firewall.
How to set: Setting in Windows XP/Vista
- Open the [Windows Firewall] window or [Windows Firewall Setting] window.
- In Windows XP, open the Start menu, then click [Control Panel] - [Security Center] - [Windows Firewall].
When [Control Panel] is displayed in Classic View, double-click [Windows Firewall]. - In Windows Vista, open the Start menu, then click [Control Panel] - [Windows Firewall].
When [Control Panel] is displayed in Classic View, double-click [Windows Firewall].
- In Windows XP, open the Start menu, then click [Control Panel] - [Security Center] - [Windows Firewall].
- On the [Exceptions] tab, select [File and Printer Sharing] and click [OK].

How to set: Setting in Windows 7
- From the Start menu, click [Control Panel] - [System and Security] - [Check firewall status]. When [Control Panel] is displayed in Classic View, double-click [Windows Firewall].
- Click [Preferences].
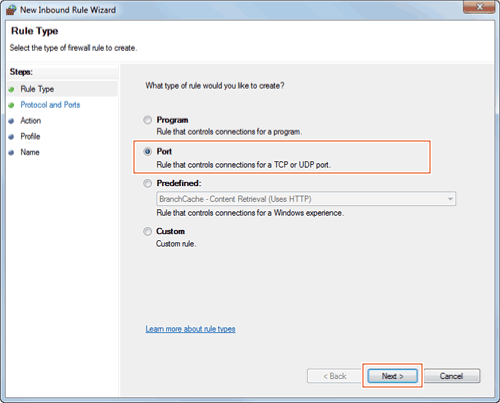
- Select [Inbound Rules] and click [New Rule].
- Select [Port] and click [Next].
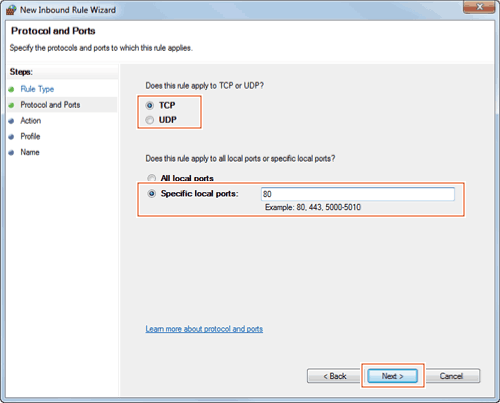
- Select a protocol, enter the port number in [Specific local ports] and click [Next].
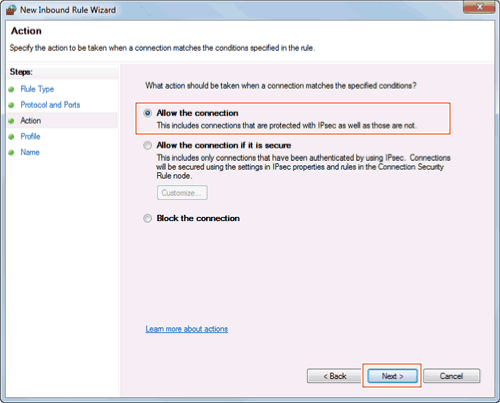
- Ensure that [Allow the connection] is selected, and click [Next].
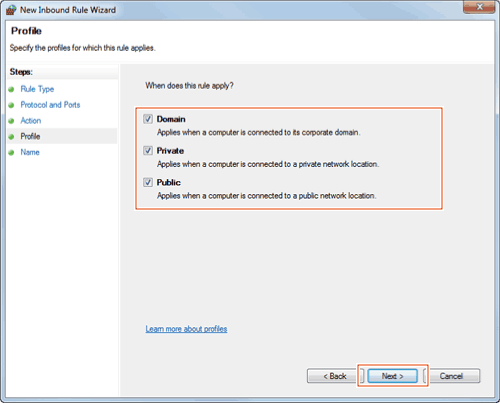
- Select the check boxes for the profiles that match the environment for using this machine, and click [Next].
- Enter the name and description of the firewall and click [Finish].
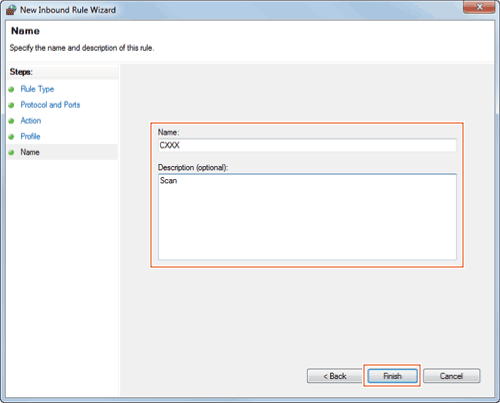
- Check that the firewall name you have set is displayed in [Inbound Rules].
Q4. The FTP TX function does not work for sending data to a destination.
A4. Check the settings for the FTP destination on this machine and the settings on the FTP server side.
Check for the following items:
- Is the correct address of the FTP server registered in [Host Address] of the destination settings of this machine.
- In address registration, is [File Path] registered correctly?
- When no folder is specified: Enter "/ (slash)".
- When a folder is specified: Simply enter the folder name without a "/ (slash)".
- (Example) To send data to a "scan" folder in an FTP server whose address is "ftp.xxxxxxxx.co.jp"
Host address: ftp.xxxxxxxx.co.jp
File path: scan - Are the correct values entered in [User ID] and [Password] of the destination settings of this machine?
- A colon (":") should not be added to the file name. Have any been added?
If the problem cannot be solved even after checking for the above points, contact your administrator.
Q5. Can frequently used destinations be registered?
A5. Yes. You can register frequently used destinations in the address book.
You can also put a number of one-touch destinations in one group and register them as a group.
Once you have registered a one-touch or group destination, you can recall it by simply tapping the assigned key.
Tips
- You can register up to 2,000 one-touch destinations in the address book.
- Up to 100 group destinations can be registered.
- To register a group destination, members must have been registered as one-touch destinations.
How to set: Registering one-touch destinations in the address book
- Tap [Utility], then select [One-Touch/User Box Registration].
- Select [Create One-Touch Destination] - [Address Book (Public)].
- Select the type of destinations to register, then tap [New].
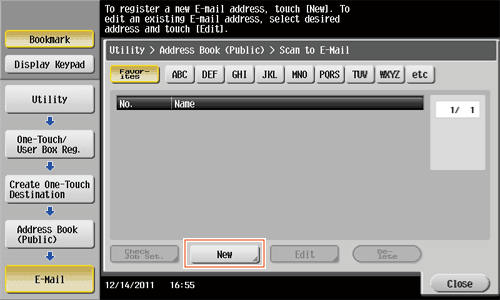
Settings Description [E-Mail]Register e-mail destinations.[User Box]Register a User Box to save documents in.You need to create a User Box beforehand.[PC (SMB)]Register a computer to send files to.[FTP]Register the FTP server to send files to.[WebDAV]Register the WebDAV server to send files to. - Configure respective items, then tap [OK].
Common settings Description [No.]Use the Keypad to enter the registration number for a one-touch destination. If no number is entered, the smallest number available is assigned to the destination.[Name]Enter the registration name for the one-touch destination. You can enter up to 24 characters.[Sort Character]Enter the same name as the one registered. You can enter up to 24 characters.You can sort destinations by registration name.[Index]Select a search text. Destinations are displayed on the top screen in the fax/scan mode as sorted by index specified here. For a frequently used destination, specify the index characters and select [Favorites] at the same time. This allows you to find it more easily.Settings for [E-Mail] Description [E-Mail Address]Enter the E-mail address of the destination.Settings for [User Box] Description [User Box]Select one User Box for the destination.Settings for [PC (SMB)] Description [User ID]Enter the ID of a user authorized to access the shared folder on the destination computer.[Password]Enter the password of a user authorized to access the shared folder on the destination computer.[Host Address]Enter the host name, IPv4 address or IPv6 address as the host address for the destination computer.When using the host name, enter it using uppercase letters.When using the IPv6 address, set direct hosting to [ON].[File Path]Enter the name of the shared folder.Settings for [FTP] Description [Host Address]Enter the host name, IPv4 address or IPv6 address as the host address for the destination FTP server.When entering the host name, check that the DNS settings are correct beforehand.[File Path]Enter the destination file path.[User ID]Enter the user ID for logging in to the FTP server on the destination side.[Password]Enter the password for logging in to the FTP server on the destination side.[anonymous]Tap [ON] if no user ID is required to log in to the FTP server.[PASV]Select whether to use the PASV mode.[Proxy]Select whether to use the proxy server.[Port Number]Enter a port number.Settings for [WebDAV] Description [User ID]Enter the user ID for logging in to the destination WebDAV server.[Password]Enter the password for logging in to the destination WebDAV server.[Host Address]Enter the host name, IPv4 address or IPv6 address as the host address for the destination WebDAV server.When entering the host name, check that the DNS settings are correct beforehand.[File Path]Enter the destination file path.[Proxy]Select whether to use the proxy server.[SSL Settings]Select whether to use SSL.[Port Number]Enter a port number.
Reference
- For details on the one-touch address registration procedure, refer to Here.
How to set: Registering a group
- Tap [Utility], then select [One-Touch/User Box Registration].
- Select [Create One-Touch Destination] - [Group].
- Tap [New].
- Configure the respective items for the group destination, then tap [OK].
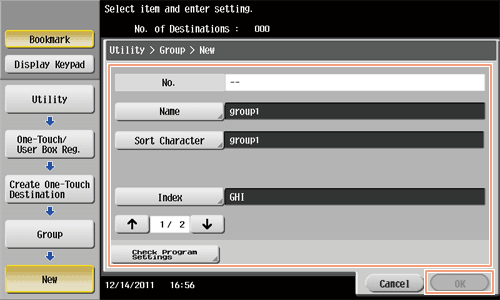
Settings Description [Name]Enter the registration name for the group destination. You can enter up to 24 characters.[Sort Character]Enter the same name as the one registered. You can enter up to 24 characters.You can sort destinations by registration name.[Index]Select a search text. Group destinations are displayed on the top screen in fax/scan mode as sorted by index specified here. For a frequently used group, specify the index characters and select [Favorites] at the same time. This allows you to find it more easily.[Select Group]Select addresses to register in the group from already registered one-touch destinations. You can select up to 500 destinations.[Check Program Settings]Allows you to view a list of one-touch destinations registered in a group.
Q6. How can I send clear images of text in a fine font or of photos?
A6. You can either set the resolution (granularity) when the original is scanned or specify the image quality according to the quality of the original.
Operation procedure: Setting the resolution
- Load the original.
- Tap [Scan/Fax] and select a destination.
- Select [Resolution], then select the desired resolution.
- The greater the value, the finer granularity is achieved for the image.
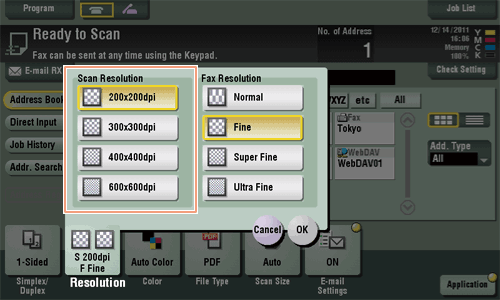
- The greater the value, the finer granularity is achieved for the image.
- Press Start to start scanning of the original.
- Press Preview before Start to check the finishing on the Touch Panel. For the procedure for checking the finishing, refer to Here.
Operation procedure: Specifying image quality according to the quality of the original
- Load the original.
- Tap [Scan/Fax] and select a destination.
- Tap [Application] to select [Original Type], then select an option according to quality of the original to be scanned.
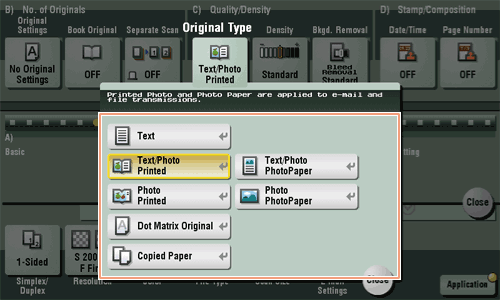
- Press Start to start scanning of the original.
- Press Preview before Start to check the finishing on the Touch Panel. For the procedure for checking the finishing, refer to Here.
Q7. Can I send data in a selected file type or color mode?
A7. Yes, you can set a file format and color mode.
The following file formats are supported on this machine.
| Settings | Description |
|---|---|
[PDF] | Saves data in PDF format. |
[Compact PDF] | Saves data in further compressed PDF file. |
[TIFF] | Saves data in TIFF format. |
[JPEG] | Saves data in JPEG format. |
[XPS] | Saves data in XPS format. |
[Compact XPS] | Saves more compressed data than is saved in XPS format. |
[PPTX] | Saves data in PPTX format. |
On this machine, the following color modes are supported.
| Settings | Description |
|---|---|
[Auto Color] | Automatically detects the color of the original and scans it to fit the original setting. |
[Full Color] | Scans the original in full color. |
[Gray Scale] | Scans the original in white, black and gray. Select this mode for an original mostly in half tone (tones between light and dark tones), such as for black-and-white photos. |
[Black] | Scans the original in black and white. Select for originals with distinct black and white areas, such as in line drawings. |
Operation procedure
- Load the original.
- Tap [Scan/Fax] and select a destination.
- When setting a file format, select [File Type] and then the desired format.
- When having more than one page scanned, you can specify how to combine pages into files.
Selecting [Multi Page] creates one file incorporating all original pages scanned.
Select [Page Separation] and enter the number of pages to create one file for the specified number of pages of the original. For example, if you enter "2" and have 10 original pages scanned, the original is divided into five separate files. - When scanning is performed in [Page Separation] mode, you can set how to attach the files to the E-mail message to be sent.
Selecting [Send All as 1 E-Mail] attaches all the files to one E-mail.
Selecting [1 File per E-Mail] attaches one file to one E-mail.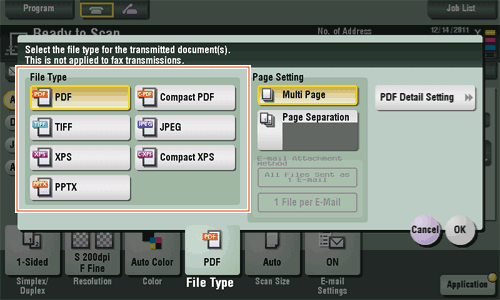
- When having more than one page scanned, you can specify how to combine pages into files.
- Tap [OK].
- When setting a color mode, select [Color], then select the desired color mode.
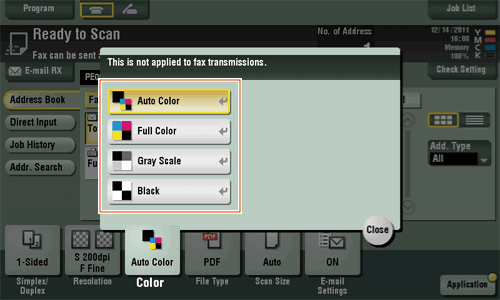
- Tap [Close].
- Press Start to start scanning of the original.
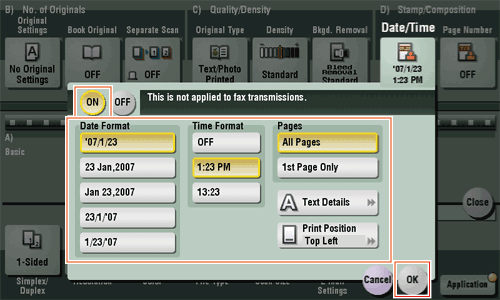
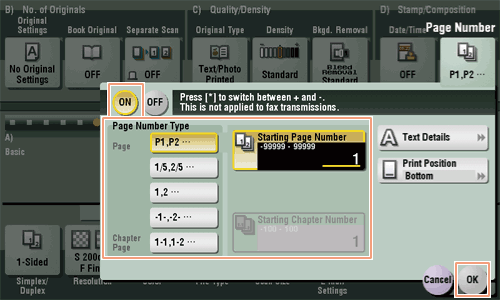
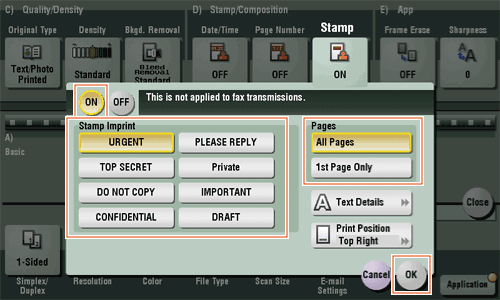
Q8. Can I send scanned data with page numbers and a time stamp?
A8. Yes. You can use Application to have data scanned with the date and time, page numbers or a stamp added.
Reference
- If necessary, you can register any stamp in addition to the stamps pre-registered in this machine. The registration procedure is explained using the data management utility in Web Connection. For details, refer to Here.
Operation procedure
- Load the original.
- Tap [Scan/Fax] and select a destination.
- To add the date and time, tap [Application] and select [Date/Time].
- Tap [ON], set values for [Date Format], [Time Format] and [Pages], then tap [OK].
- To add page numbers, tap [Application] and select [Page Number].
- Configure [Page Number Type] and [Starting Page Number], then tap [OK].
- If you have selected [Chapter Page] for [Page Number Type], specify the chapter number to start printing in [Starting Chapter Number]. For details, refer to Here.
- If you have selected [Chapter Page] for [Page Number Type], specify the chapter number to start printing in [Starting Chapter Number]. For details, refer to Here.
- To add a stamp, tap [Application] and select [Stamp].
- Tap [ON], set values for [Stamp Imprint] and [Pages], then tap [OK].
- When the date and time, page numbers or stamp cannot be easily read with the initial settings, tap [Text Details] in each of the [Date/Time], [Page Number] and [Stamp] setting screens to set the text size and font as well as the text color.
- If the date and time, page numbers or stamp are overlapped with the text of the original, tap [Print Position] in each of the [Date/Time], [Page Number] and [Stamp] setting screens to set the printing positions.
- Press Start to start scanning of the original.
Q9. The back of the original can be seen through. How can I make adjustment so that the back may not bleed into the scanned image?
A9. You can adjust the density of the background color for clean scanning.

Operation procedure
- Load the original.
- Tap [Scan/Fax] and select a destination.
- Tap [Application] and select [Background Removal].
- Tap [Bleed Removal], set the level of back bleeding, then tap [OK].
- Set to [Auto] to have this machine automatically adjust the bleed level.

- Set to [Auto] to have this machine automatically adjust the bleed level.
- Press Start to start scanning of the original.
- Press Preview before Start to check the finishing on the Touch Panel. For the procedure for checking the finishing, refer to Here.
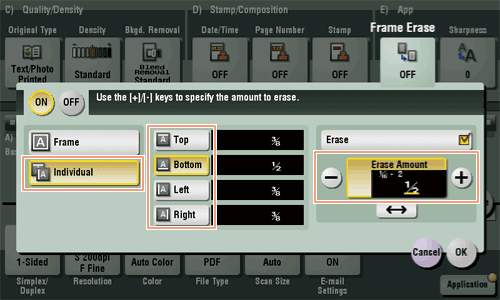
Q10. Can I scan the original with its headers and punch holes erased?
A10. Yes. Enable the frame erase function, and the machine scans the original by erasing unwanted sections on the four sides of the original.
Operation procedure
- Load the original.
- Tap [Scan/Fax] and select a destination.
- Tap [Application] and select [Frame Erase].
- Tap [ON].
- To erase the four sides of the original by the same width, tap [Frame] and specify the width using [+] and [-].
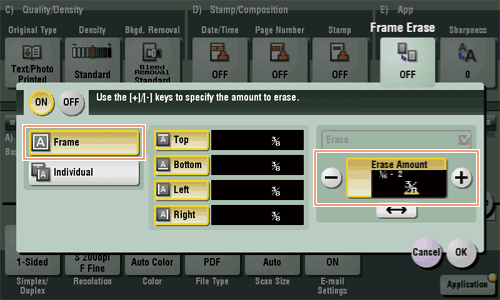
- To specify the width of the frame to be erased individually, tap [Individual] to select a side, then specify the width using [+] and [-].
- When specifying the erase width individually, you can set to exclude a side from erasing by selecting the side and canceling the setting of [Erase] for that side.
- When specifying the erase width individually, you can set to exclude a side from erasing by selecting the side and canceling the setting of [Erase] for that side.
- Tap [OK].
- Press Start to start scanning of the original.
- Press Preview before Start to check the finishing on the Touch Panel. For the procedure for checking the finishing, refer to Here.
Q11. Can I send an E-mail to a number of destinations at one time?
A11. Yes, you can.
It eases the operation to register a group that contains a number of destinations beforehand.
The maximum number of destinations that you can specify for a single transmission depends on how the destinations are set.
| Item | Specifications | |
|---|---|---|
When using the address book | 500 addresses Up to 30 User Boxes | |
When directly entering addresses | E-mail | 5 addresses |
User Box | 1 User Box | |
Fax | 100 addresses | |
Tips
- When registering a group, even destinations of different types can be registered in one group.
Operation procedure: Selecting multiple addresses from the address book
- Load the original.
- Tap [Scan/Fax] and select a destination.
- You can select more than one one-touch destination from the address book. [No. of] displays the number of selected destinations.
- To cancel the destination setting, tap the Address Book key for the destination to be canceled.
- Select an index to narrow down destinations to display.
- Specify [Add. Type] to narrow down the types of destinations to display.
- Tap [Check Setting] to check detailed information on the destinations you have set or to cancel destinations.
- You can also select a group,
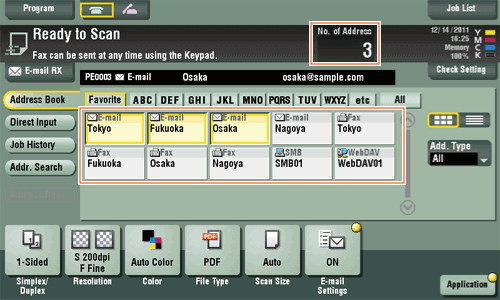
- Press Start to start scanning of the original.
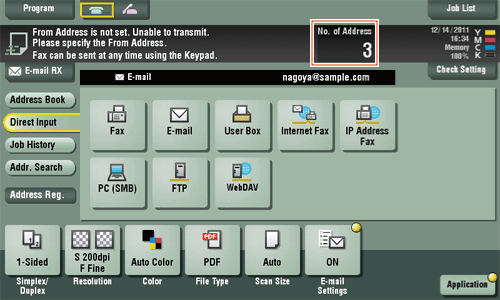
Operation procedure: Directly entering multiple destinations
- Load the original.
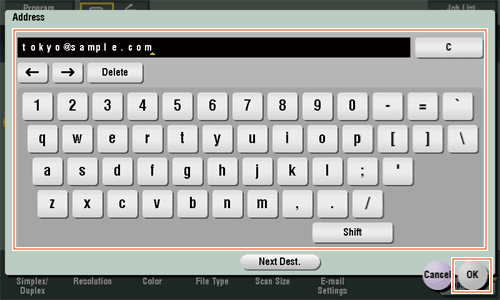
- Tap [Scan/Fax] and select an destination type from [Direct Input].
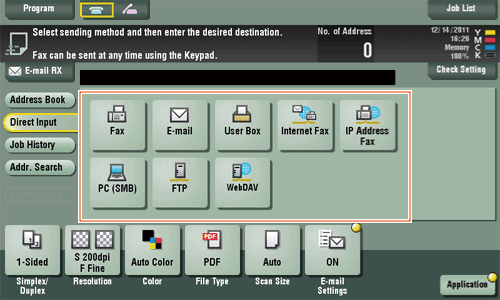
- Enter a destination, then tap [OK].
- Tap [Next Dest.] on the destination input screen to proceed to enter another destination. (Not enabled for a User Box)
- Tap [Next Dest.] on the destination input screen to proceed to enter another destination. (Not enabled for a User Box)
- Repeat Steps 1 and 2 to complete entry of all destinations.
[No. of] displays the number of entered destinations.
- Tap [Check Setting] to check detailed information on the destinations you have entered or to cancel destinations.
- Tap [Check Setting] to check detailed information on the destinations you have entered or to cancel destinations.
- Press Start to start scanning of the original.
Q12. Can I send scanned data by E-mail?
A12. Yes, you can.
Simply specify an E-mail address for the destination, and you can send the data as an attachment.
Operation procedure
- Load the original.
- Tap [Scan/Fax] and select an E-mail address.
- Press Start to start scanning of the original.
Reference
- For details, refer to Here.
Q13. Can I send scanned data to my computer?
A13. Yes. To do so, use the SMB Send function that can send scanned data to a location on the specified computer. Register a one-touch destination for SMB transmission beforehand, or directly enter the destination for SMB transmission when scanning the original.
Reference
- For details on the SMB TX setting, refer to Here.
Q14. Can I check the transmission log for scanning?
A14. Yes. You can check the transmission log for scanning in the job history.
See job history to quickly check names of scanned documents, scan dates and scan results (success/failure) among others.
How to set
- Tap [Job List].
- Check the transmission log on the [Log] tab.
- Select a log, then tap [Details] to check the log details.
- You can narrow down logs to display using [Select Job Ty] or [Limitation Filter].
